To perform this task you will need a replacement Coolant Temperature Sensor (part number from Vauxhall 90541520) purchased on TC for £13.94 inc. VAT:

You will also need a good tool kit such as the Halfords 150 piece kit.
Its not necessary to remove the wipers or the scuttle. First of all you need to remove the plenum.
Follow the instructions in the relevant maintenance guide.
Once the plenum is removed place tissue in all 6 inlet pipes to protect from debris. You will then need to remove the inlets themselves. I have highlighted on the following picture what you need to remove. You can do it all in any order you like EXCEPT before you remove the two fuel lines from the drivers side you must first depress the shrader valve to release fuel pressure. (note that once the inlets are ready to be removed you may fight to get it out as it can only remove one way; be patient and keep moving it about until they come out):

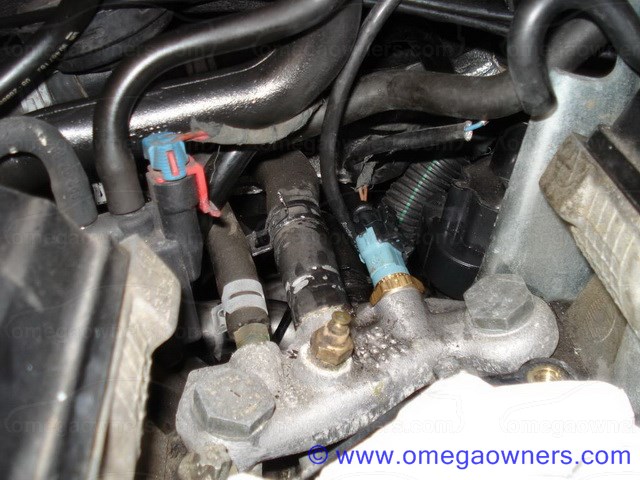
Once the inlets are removed transfer your tissue to the 6 lower inlet holes. You will be at the following point. I've highlighted the CTS:

Disconnect the black plastic electrical connection on top and use a 19mm wrench to relieve the CTS from its hole. The easiest way is to slide the ring spanner end over the CTS and rotate it that way as space is tight and having the 12 points of the ring spanner end really helps overcome this. Note also that coolant will gush out at quite a fast rate so have your new part to hand to quickly plug the hole once removed.
Take your new bright and shiny CTS and screw it in to the hole and tighten it up with your wrench. I couldnt find a torque setting in the Haynes manual so I snugged it up as the old one wasnt on very tight. Reconnect the electrical connection.
New CTS in place:
The following is a picture of the old CTS (please ignore the fact I accidentally broke the blue connector). The sensor end that is inserted in the coolant looks as though it has some gunk built up on it; perhaps the cause of its failure:

Replacement is reverse of removal. Remove your tissue and replace the inlets. Replace the plenum. Pour yourself a beer. Job done


 Author
Topic: How to: Replace Coolant Temperature Sensor (V6) (Read 14407 times)
Author
Topic: How to: Replace Coolant Temperature Sensor (V6) (Read 14407 times)