If you have problems with the ignition key refusing to turn occasionally then follow this guide to re-condition the lock cylinder before it sticks completely....you must be able to turn the key to get the cylinder out so dont leave it too late.
First remove the steering column shrouds (3 screws from underneath, two more visible with steering wheel turned through 90 degrees).
Now turn the key to position '1' (key is in-line with the largest of the two notches on the face of the key hole).
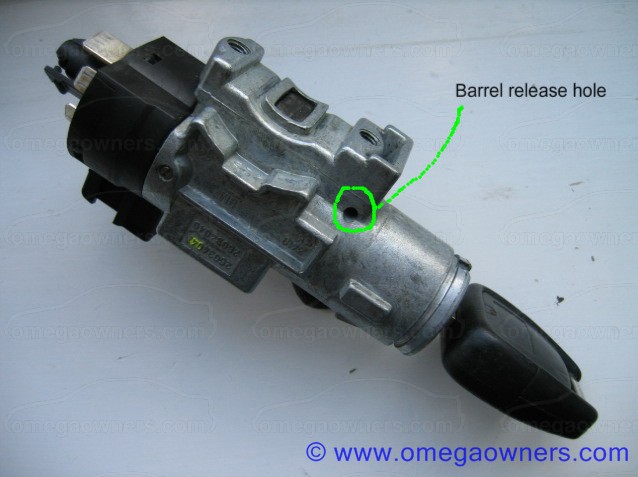
Push a piece of welding rod or a 3mm allen key into the lock barrel release hole and the barrel should spring out.

Look at the end of the lock barrel and turn the key to the START position, there is a spring-loaded pin which is acting as a rotation stop, press in this pin and turn the key further but do not let the pin fly out,

remove the pin and gently pull the lock cylinder out of the barrel, keeping the key in place.

Make a sketch of the lock cylinder then gently remove the key whilst keeping your fingers on the brass levers, we dont want any of them or their springs flying off into a spider infested corner somewhere.
Take out the brass levers one by one and lay them on your sketch, there is a number on each lever, write this on your sketch against the corresponding position to help with re-assembly.
Ease out the tiny lever springs, take care not to stretch them and try to keep them separated or they will lock together.

Wash all parts in parrafin or turps to remove old grease and dirt.
Look at the levers, if there are burrs on them then rub them gently on a fine oilstone.
Smear each lever with a tiny bit of grease then fit back into the correct slot, together with its spring.
Once all the levers are in place, press them flush with the cylinder and insert the key. If you have got the levers back in the right places they will be flush with the cylinder.
Put the cylinder back into the barrel and replace the spring loaded pin. Check that the key is free to turn then replace the barrel back into the steering lock. If the steering lock has engaged the barrel wont go in, look into the barrel chamber and there is a steel plate at the bottom of the chamber, use a screwdriver to slide this down until it latches then re-fit the barrel.
The door and boot lock cylinders can be dismantled and cleaned in a similar manner, the estate tailgate locks seem prone to collecting fine road dust which causes them to jam so these benefit from cleaning if begining to get stiff.


 Author
Topic: Ignition lock re-condition (Read 17255 times)
Author
Topic: Ignition lock re-condition (Read 17255 times)