


46
General Car Chat / Update to rear shock replacement guide
« on: 14 May 2011, 20:02:29 »
Hi Mod's,
Just did my rear shocks today and have a couple of additions to the guide if that's OK.
I've put it here - if you're happy with it - could you add it to the maint' section - or let me know and I'll add it (if I can).
Thanks
Ian.
Hi all,
Just did the rear s/l shocks on my car today. The guide on here is a great help it really is a pretty straightforward job.
Just a couple of additional notes to add to the guide though.
The bottom bolt on mine was exactly a 13/16th Imperial . 21mm is pretty close but as it can be extremely tough to undo ( I had my Torque wrench on it to get the extra leverage) I wouldnt risk it slipping off with a slightly lose fitting socket. It got tighter to undo as the end of the threaded bolt retreated back through the mounting so I re- tightened it cleaned the thread again added Wd40 and tried again perfect.
I replaced like for like the bit that appears to be missing off the guide is the reference to the top mounting fixings.
On the old shock the rubber bush in the wheel arch sits on a cupped plate I didnt pay too much attention to it as it didnt come off when I removed the shock. I tried bashing it and it still remained firm and to be honest looked like it was welded as part of the casing. But there was no sign of one on the new shock, BUT the new bush looked like it fitted Ok directly on top of the shock body so I carried on and fitted it without it.
Now I could see why youd need a deep socket on the 16mm nut in the boot because the threaded stem protrudes a long way into the boot. Tightened it up and all seemed OK.
I then went to the other side to repeat the job.
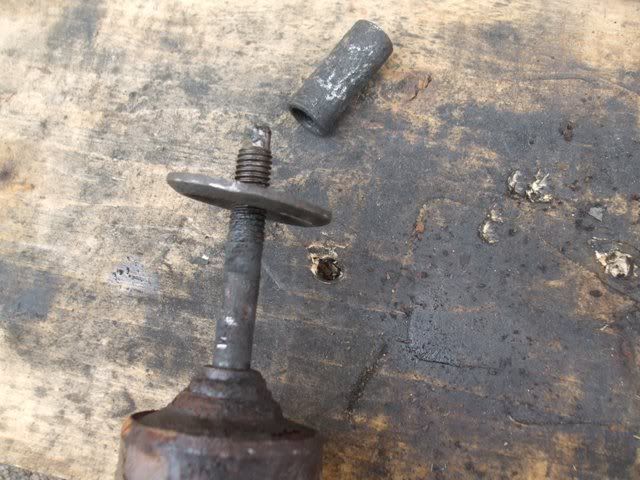
This time as I took the shock off the said cupped plate and a spacer bush fell off with no assistance whatsoever bug**r. This meant I now realised these parts are needed to be swapped over onto the new shocks knickers.
So this one went swimmingly the bits duly swapped over and the shock replaced AND you dont need a deep 16mm to do the top nut up fully. As far as torque setting once it bites tight on the spacer theres no need to try and over-tighten it. The bottom bolt based on the heave I needed to undo it seemed happy to nip up to 90Nm
Then I returned to the other old one and with a bit of soaking with WD and a lot of bashing with a ball pein and a tyre lever got the bits off the old one and re-fitted to the one Id just done literally 5 minutes to release the top nut raise the car the shock lowered itself out of the top mount fitted said cup/spacer/rubber bush re-located top mount and re-tightened (didnt even take the wheel off this time).
Pictures below show the offending pieces that need to be swapped over (on mine anyway)
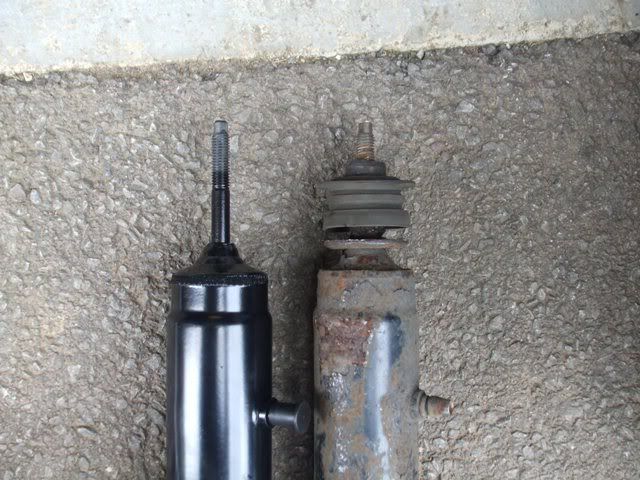

Before fitting the spacer and cup to the new shocks I liberally coated the stem with copper slip as they were seriously corroded on the old ones.
I now have fully functioning Self Levelling suspension again chuffed to bits as this really was quite an easy job.
Just did my rear shocks today and have a couple of additions to the guide if that's OK.
I've put it here - if you're happy with it - could you add it to the maint' section - or let me know and I'll add it (if I can).
Thanks
Ian.
Hi all,
Just did the rear s/l shocks on my car today. The guide on here is a great help it really is a pretty straightforward job.
Just a couple of additional notes to add to the guide though.
The bottom bolt on mine was exactly a 13/16th Imperial . 21mm is pretty close but as it can be extremely tough to undo ( I had my Torque wrench on it to get the extra leverage) I wouldnt risk it slipping off with a slightly lose fitting socket. It got tighter to undo as the end of the threaded bolt retreated back through the mounting so I re- tightened it cleaned the thread again added Wd40 and tried again perfect.
I replaced like for like the bit that appears to be missing off the guide is the reference to the top mounting fixings.
On the old shock the rubber bush in the wheel arch sits on a cupped plate I didnt pay too much attention to it as it didnt come off when I removed the shock. I tried bashing it and it still remained firm and to be honest looked like it was welded as part of the casing. But there was no sign of one on the new shock, BUT the new bush looked like it fitted Ok directly on top of the shock body so I carried on and fitted it without it.
Now I could see why youd need a deep socket on the 16mm nut in the boot because the threaded stem protrudes a long way into the boot. Tightened it up and all seemed OK.
I then went to the other side to repeat the job.
This time as I took the shock off the said cupped plate and a spacer bush fell off with no assistance whatsoever bug**r. This meant I now realised these parts are needed to be swapped over onto the new shocks knickers.
So this one went swimmingly the bits duly swapped over and the shock replaced AND you dont need a deep 16mm to do the top nut up fully. As far as torque setting once it bites tight on the spacer theres no need to try and over-tighten it. The bottom bolt based on the heave I needed to undo it seemed happy to nip up to 90Nm
Then I returned to the other old one and with a bit of soaking with WD and a lot of bashing with a ball pein and a tyre lever got the bits off the old one and re-fitted to the one Id just done literally 5 minutes to release the top nut raise the car the shock lowered itself out of the top mount fitted said cup/spacer/rubber bush re-located top mount and re-tightened (didnt even take the wheel off this time).
Pictures below show the offending pieces that need to be swapped over (on mine anyway)
Before fitting the spacer and cup to the new shocks I liberally coated the stem with copper slip as they were seriously corroded on the old ones.
I now have fully functioning Self Levelling suspension again chuffed to bits as this really was quite an easy job.

 . There were loads of people also crammed round the stand also trying to find it and paying money to have their photo taken next to it
 .
.
 - but it should be a good day out.
 ) ..come on you can do it..... yes
