Omega Owners Forum

Please login or register.

Login with username, password and session length
Advanced search  

News:

Please play nicely.  No one wants to listen/read a keyboard warriors rants....

Show Posts

This section allows you to view all posts made by this member. Note that you can only see posts made in areas you currently have access to.

Topics - Matchless

Pages: [1] 2 3
1
General Discussion Area / Time for a change
« on: 05 November 2011, 23:32:22 »
After 11 years of Omega ownership I am now omega-less; JohnM came today and took my 2.5 estate to a new home in Newark. I hope it serves you well John.

Over the years I think I have done every job possible on an Omega and am ready for a change and a new challenge so its time to hit the Autotrader, my only definite requirement is that it has to be an estate.

Im not leaving the forum completely. I will pop in from time to time but I seem to be spending more time thinking about and working on various bits of plant on the GCR, especially my nemesis, the Case 688 360, which I will get working, someday.

TaTa.

2
Maintenance Guides / Ignition switch and connector removal
« on: 02 November 2008, 21:00:26 »
[size=12]To remove connector from ignition switch:[/size]

Disconnect battery
Turn ignition key to position '1'
Insert a small screwdriver into the connector release hole, keeping the screwdriver at the key end of the hole,  and press to release the latch, at the same time as pulling / levering the connector off the switch. It is a tight fit but if it doesnt move you havnt deprssed the latch enough or have pressed on the wrong part of the latch.


To remove switch:
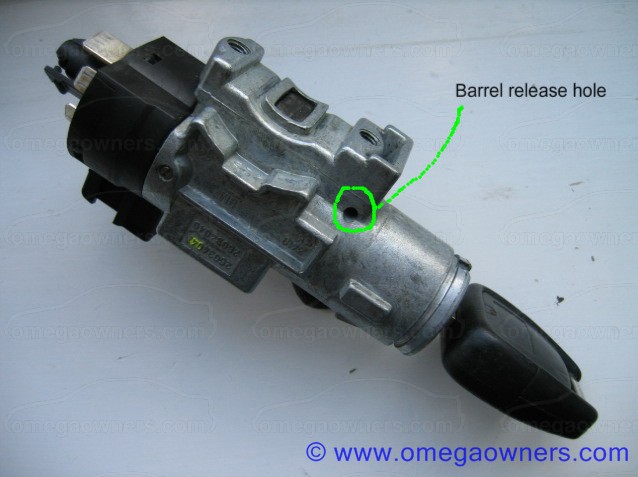
With key in position '1', push a welding rod or allen key into the barrel release hole and remove the lock barrel.

Now remove the switch fixing screw and the connector should move towards you slightly and come away. Do not simply try levering the switch off with the barrel still in place, you will distort the hole for the other holding pin at the back of the switch.

3
Maintenance Guides / Ignition lock re-condition
« on: 02 November 2008, 20:29:31 »
If you have problems with the ignition key refusing to turn occasionally then follow this guide to re-condition the lock cylinder before it sticks completely....you must be able to turn the key to get the cylinder out so dont leave it too late.

First remove the steering column shrouds (3 screws from underneath, two more visible with steering wheel turned through 90 degrees).
Now turn the key to position '1' (key is in-line with the largest of the two notches on the face of the key hole).
Push a piece of welding rod or a 3mm allen key into the lock barrel release hole and the barrel should spring out.


Look at the end of the lock barrel and turn the key to the START position, there is a spring-loaded pin which is acting as a rotation stop, press in this pin and turn the key further but do not let the pin fly out,

remove the pin and gently pull the lock cylinder out of the barrel, keeping the key in place.


Make a sketch of the lock cylinder then gently remove the key whilst keeping your fingers on the brass levers, we dont want any of them or their springs flying off into a spider infested corner somewhere.

Take out the brass levers one by one and lay them on your sketch, there is a number on each lever, write this on your sketch against the corresponding position to help with re-assembly.
Ease out the tiny lever springs, take care not to stretch them and try to keep them separated or they will lock together.


Wash all parts in parrafin or turps to remove old grease and dirt.
Look at the levers, if there are burrs on them then rub them gently on a fine oilstone.

Smear each lever with a tiny bit of grease then fit back into the correct slot, together with its spring.
Once all the levers are in place, press them flush with the cylinder and insert the key. If you have got the levers back in the right places they will be flush with the cylinder.

Put the cylinder back into the barrel and replace the spring loaded pin. Check that the key is free to turn then replace the barrel back into the steering lock. If the steering lock has engaged the barrel wont go in, look into the barrel chamber and there is a steel plate at the bottom of the chamber, use a screwdriver to slide this down until it latches then re-fit the barrel.

The door and boot lock cylinders can be dismantled and cleaned in a similar manner, the estate tailgate locks seem prone to collecting fine road dust which causes them to jam so these benefit from cleaning if begining to get stiff.


4
Maintenance Guides / Autobox to Manual Conversion
« on: 13 August 2008, 14:33:01 »
I will assume that if you are thinking of doing this then you must be a fairly competent mechanic so this will not be a complete step by step guide.

Parts Required

From the donor car:

Gearbox with rear cross-member and exhaust support
Differential (not essential---work out the ratios)
Front propshaft section (with vibration damper if present)
Clutch cover and driven plate
Flywheel and bolts
Clutch master cylinder and clutch pedal assy. Do not shorten the feed pipe from reservoir….you need every mm.
Plastic clip securing clutch pipe union to bulkhead
Brake pedal. Note only the pedal is needed, just push out the pivot pin.
Gear lever assy (drill off the rivet heads)
Piece of plastic trim just behind gear lever
Clutch pedal switch (will be on pedal assy if donor has cruise, get connector and wire)
Brake pedal switch and connector (not needed if car already has cruise 4-pin switch)
Section of gearbox/lambda sensor wiring loom

From main dealer:

Spigot needle bearing    90105743  
Spigot nylon bush          9157141


Procedure

With front wheels on ramps and rears raised on axle stands. (Chock front wheels securely or use ratchet straps from wheel to ramp) Raising the rear improves access to the exhaust bolts and centre propshaft joint.

Follow the Haynes manual if unsure but:
Unbolt propshaft then remove front section by tugging sharply off rear section
Unbolt torque convertor from flexplate and remove with gearbox
Unbolt flexplate from crank and remove adaptor ring from crank
Remove centre console then drill off rivet heads fixing gear selector to tunnel

Fit nylon spigot bush into bore in end of crank then gently tap in the needle bearing using a suitable socket.
Fit flywheel and torque the bolts…The crank must not be allowed to turn ‘backwards’ when doing this or the cambelt may slip on its sprockets.
Fit the clutch and centralise. This can be done by eye…visibility is good.

Fit gear lever assy to tunnel and make sure the rubber seal fits correctly then Pop Rivet in place
Check the bellhousing dowels are in the correct places then fit gearbox to engine. Use Locktite on the gearbox crossmember bolts

Look carefully at the rear propshaft splines, there is one wide ‘master’ spline. Locate the corresponding gap on the new front propshaft section and join the two halves. Grease the splines first.

Swap the brake pedals
Remove rubber bung from bulkhead then fit clutch master cylinder, it will fit in without loosening the servo with a bit of wriggling, scuttle has to be removed for access. Bolt on the clutch pedal assy, don’t forget the third bolt high up.
NB the metal clutch pipe fits between the two heater pipes. Fit clutch pipe plastic clip in place on the bulkhead. See pic for pipe route and position of retaining clip.


Drain the master cylinder header with a syringe then cut off the crimped pipe end with a stanley knife and connect the flexi hose with a jubilee clip. Refill the header and allow fluid to drain out via the clutch bleed nipple to flush the old fluid and debris out. Bleed from the bottom up using a pressure feed….no other method works properly.

This is my improvised pressure bleed kit made from an old eezi bleed, the green plastic pipe is a tight fit onto the clutch bleed nipple, fill bottle with hydraulic fluid, open bleed nipple, connect bottle to spare wheel (Max 10psi...otherwise you will get very wet very quickly!!). Allow fluid to flow into the nipple until the (previously empty) reservoir is full then close bleed nipple and test clutch operation.


Electrical

Cut off the auto selector switch connector.
 Starter inhibit
 Join the two thick Bk/R wires by soldering.
 Reverse Lights
 Separate the reverse switch wires from the donor loom and solder one side to the Bk wire (was on   pin D) solder the other side to the W/Bk wire (was on pin F)
 Lambda sensors
Plug-in the Lambda sensors, the auto loom is a bit short so move the connector fixing clips and tyrap the loom in place clear of hot bits. Tie up unused connectors and loom ends.

Ignition Timing Retard
Unplug the engine ECU and remove the connector from its hood (1 screw)
Locate the Bk/R wire on pin 42, cut off as far from pin 42 as possible (can do this further up the loom if preferred) then solder to one of the thin Brown wires and tape joint.

Cruise Control
Auto is not wired as shown in Haynes. My 99 was wired as follows:


For safety reasons the cruise has 3 separate circuits which can turn it off, to preserve this on an ex-auto car requires a bit of re-wiring to bring it in line with the manual box wiring.
Identify the Bk/R and Bk/Bu wires from the Brake switch cruise contacts, cut these and crimp together where they leave the main loom.
Remove the autobox ecu from the kick space by drivers foot and discard. Take cover off connector and identify the Bk/Y wire on pin 37. Cut at connector pin and free wire from the loom, pulling it back to the pedal area. Join this wire to the Bk/Bu from cruise brake switch.
Join the Bk/R from cruise brake switch to one wire from clutch switch.
Unscrew fuse box and pull down, find a thin Black wire going to F15, tap into this and connect to the remaining wire from clutch switch.

Re-tape any parts of the loom where you cut the fabric binding and replace any tyraps. Tyrap the auto ecu connector to the ecu mounting bracket. Make sure nothing can get caught on the pedals or throttle cable.


5
Maintenance Guides / How to disconnect heater hoses
« on: 31 July 2007, 15:10:35 »


The photo should help you understand what is lurking in the hard-to-reach corner of your engine bay.

To remove a connector:
       Press-in the latch and pull the locking ring back towards you ( the pic shows the locking ring in the fully-back position).
       Twist the whole connector assembly to un-stick the internal seals from the heater.
       Pull the connector and hose off the heater.


To replace a connector:
       Apply universal lubricant (spit) to the metal heater pipe.
       Push the connector onto the pipe and make sure it is fully home.
       Slide the locking ring away from you until it clicks into place. (if the locking ring wont move you probably havnt pushed the connector onto the heater pipe fully).

6
Maintenance Guides / Fitting an adjustable steering column
« on: 15 November 2006, 23:37:41 »


Fairly simple and very worthwhile mod, especially if you are tall.

From the donor car you will need the cowlings and operating lever for the adjuster, also a curved bit of plastic trim that fits between clocks and cowling (1 screw). Try to find a car with correct colour steering wheel and cowlings in good condition and close to same age, there should be less differences in ignition switches then. Try to get the ignition key, you will fit your old lock barrel to keep the same key but if you have the key to the new column it saves drilling out bolts in order to swap over steering lock assemblies.

Disconnect battery.
Remove column cowlings:
Turn steering wheel 90 deg to left of centre, remove plastic cap and screw that becomes visible. Repeat on other side.
Remove 3 screws on bottom, cowling should lift away.
Unlatch and lift out both switch stalks, no need to disconnect.
Disconnect ignition switch wiring (turn to posn. 1 and depress latch in side of connector)

Loosen steering wheel: If lucky you will have a wheel of the correct colour and good condition on your new column so wont have to do this step otherwise....
Remove airbag, two torx screws through rear of wheel...you did disconnect the battery didnt you??
Carefully unplug airbag and put safely to one side.
Disconnect plugs to remote stereo buttons if fitted.
Loosen centre nut 2 turns but do not remove completely. (to preserve your teeth during next step)
Apply load to underside of wheel with your knees whilst striking end of shaft with hammer and alloy or copper drift. The wheel should come free with a sharp knock but keep load applied until it does, if you hit shaft without supporting wheel you will likely collapse the crash structure in the column. Note there is a special puller for this job but it is usually possible without. Do not release the wheel from its splines yet, we need to maintain alignment for a bit longer.
Remove cardboard cover above pedals. Look for pinch bolt where column joins steering gear, start to remove bolt then make sure wheel is set straight ahead and remove bolt completely and open up the split slightly by tapping in a thin cold chisel or screwdriver. Do not turn wheel or column again.
Remove steering wheel nut and wheel.

Disconnect wiring from steering column 'squib', there is a yellow latch to slide out of connector end before the connector comes free.
Open fuse box cover, the column is held by a nut on the RH and a sheer bolt on the LH. Centre punch the sheer bolt then drill off the head, it is a 8mm bolt so pilot 3mm then follow up with 10mm to remove head or drill 6mm then chisel off. Keep the washer, drill or file out hole to fit a replacement 8mm bolt.

Use a torch to peer down length of column, at about mid point there is a bracket facing upwards, fastened with a single bolt, use several long extensions and 13mm socket to remove. Access is improved if you unlatch and unscrew the relay panel. Dont drop the bolt, it seems to hide if you do.
Remove the nut at upper bracket and column should now pull free and wriggle out past wiring looms etc. A bit of levering may be needed to get upper bracket free of dash moulding.

Compare old and new ignition switches, will the plug fit? if not you have to drill out the sheer bolts and swap over the lock assy, You might have to file a notch in lock body or column housing to get lock to fit properly (the auto and manual locks wont interchange without this) use new sheer bolts or socket cap head screws with a bit of locktite.
Swap over the lock barrels, key in, turn to posn 1 then insert rod or allen key etc into small hole in side of lock, barrel will pull out.

Ease new column into place, either align bottom clamp with position of old one or set wheel straight if still fitted.
Fit all bolts loosely then tighten mid clamp first, then upper then pinchbolt with fresh locktite.
Reconnect squib, refit stalks etc.
Refit wheel, nip up but do not fully tighten nut yet until alignment is checked.
Reconnect and refit airbag, reconnect battery and go round block to check steering wheel alignment.
Disconnect battery again, remove air bag again and adjust wheel position or fully tighten wheel.
Fit the half moon plastic filler that goes below speedo on adjustable column cars.
Fit cowlings.
Fit airbag again, and reconnect battery.

If you turn on ignition when air bag is disconnected then warning light will come on and only a trip to the dealer or The Boy will get it activated again.

7
Omega General Help / Steering Box Replacement
« on: 19 January 2010, 10:18:50 »
Has anyone replaced a steering box on a V6?

How long to do it.
How much skin loss required.

8
Omega General Help / Front Strut top bearing
« on: 16 December 2008, 21:42:00 »
Does anyone have a spare one lying around and can they tell me the size of balls used in it please.


9
Omega General Help / For The Boy
« on: 13 August 2008, 15:52:19 »
Jamie, have a look in the test area, Ive posted a how-to in two parts.
Comments please.Cant PM you...something about you having a mega post count??

Pete.

10
Omega General Help / Repairing headlight adjusters
« on: 16 July 2008, 16:25:45 »
Has anyone tried fitting the earlier white adjusters to a later projector headlamp?
Do they fit properly and give the correct adjustment range?

11
Omega General Help / Test your diagnostic skills
« on: 15 July 2007, 00:47:42 »
My project 2.5 estate has been on the road for a couple of months now but is not well, it lacks bottom-end performance and is drinking fuel. I have worked through a diagnostic process and reached a conclusion as to what I think is wrong with it and should find out if I am right in the next day or so...weather permitting.

I thought I would post up the symptoms and the results of my tests to see if anyone comes to the same conclusion but if I am right then I suspect there will be others suffering with the same fault.

A bit of history: It was bought as a runner but "makes a rattling noise". The cambelt tensioner had failed and the passenger bank timing was 2 teeth out. A new cambelt kit had it idling smoothly but it wouldnt rev over 2500, this was fixed by a new fuel filter. It passed the MoT and I started using it which is when I realised there was something wrong.

Symptoms:

Revs freely to 6750 but lacks torque and bottom-end 'grunt'.
No hint of a missfire or un-even running.
Fuel consumption is 22mpg at best on commute (my Elite used to manage 27 on the same run).
Air mass meter OK and coolant temp sensor OK.
looking back at the MoT emission test:
      lambda slightly high
      CO at top limit
      HC slightly raised
Manifold vacuum low at 17.5" Checked all the breather seals, vacuum pipes etc and eventually changed the manifold and bridge gaskets...no improvement.
EGR valve blanked off...no improvement.
HT leads, plugs coil etc checked.
Compression test shows drivers side 15 bar, passenger side lower at 13 bar.
Back to the vacuum gauge, when I hold the rear multi-ram open by hand the gauge oscillates rapidly between 21" and 14".

So what do you think is wrong and how do you account for all the symptoms?....

12
Omega General Help / V6 Difficult to cold start
« on: 11 January 2007, 10:00:09 »
Solved this one....might help someone else.

V6, wouldnt start on first turn of the key, usually started on second go but ran lumpy for a few seconds and exhaust smelt of petrol. Once running it behaved perfectly.

I was pretty sure it was an injector which was leaking fuel into the manifold over time, I have had to disconnect the fuel lines a couple of times recently (fuel filter and camcover gaskets) and each time there was no pressure in the fuel feed pipe.
I acquired another inlet manifold and injectors and swapped them at the w/e and it now starts first turn and idles cleanly straight away. Loosened the fuel feed union after 24Hrs and there was still pressure in the rail.

So that seems to confirm the diagnosis of an incontinent injector....it happens to us all with age...apparantly

13
Omega General Help / + 50 bhp and extra 2000 rpm for £5
« on: 30 November 2006, 10:57:21 »
Project 2 seemed a bit sluggish and refused to rev above 5k.
Changed the fuel filter last night and now it goes to the red line and seems to be back on song.

Im amazed that a fuel filter had so much of an effect but then Ive never left the same filters in any of my cars for 8 years to find out what happens.

Worth bearing this in mind when buying a car with unknown or dubious service history.

14
Omega General Help / Autobox delayed change-up when engine cold
« on: 10 August 2006, 09:57:31 »
Does anyone know if this wonderful feature can be disabled?
My street is a fair distance from the main road and has parked cars, school kids, side streets etc so I drive gently along pulling 2700 rpm in first looking like I dont know how to change gear.
I have tried using the snow button which is OK except when I forget to switch it off again once I reach the main road.
There must be a way of knobbling this.

15
Omega General Help / Front brake pads
« on: 15 July 2006, 00:50:33 »
Just fitted some new VX pads to the Elite to replace the powerstop ones which were on it when I aquired it... I like brakes to be there when needed, not to have faded to nothing because I had used them within the last 30 seconds.

Anyway, the new VX pads have two with plain backs and two with a 'rubber' dampener stuck on. Which pad fits where? T*S is silent on this.

I guessed the rubber backed ones would go on the outside, against the 'fixed' part of the caliper and the plain ones against the piston.

I now have brake squeal at 100dBA so will try swapping them around but does anyone know for sure which way they should be fitted?

Pages: [1] 2 3

Page created in 0.016 seconds with 14 queries.