Provided with permission from the original author (Duncan the admin) from the Vectra-C owners forum
http://forum.vectra-c.com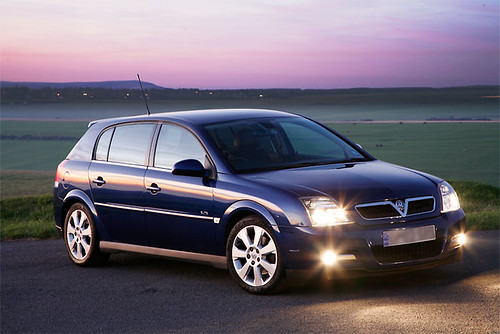
The main factors that are going to get you the best photographs are...
LOCATION: The setting of the shot is going to have a big effect on the feel of the shot. All personal choice, do you want a shot by the sea, in the country, urban shot, at night etc.
Can you get the car onto the spot without being told to move on or becoming dangerous to shoot?
LIGHT: Without good light you're onto a loser. The best times to get great light for car photography are around sunrise and sunset. On a car shoot we'd be getting set up long before the sun rose so that everything was in place - car and camera - for the first bit of light that came up and then shooting again as the sun was going down again. Long days if you're shooting in summer!
The advantage of the winter months is that you don't have to wait until late to get the sunset, or get up at silly o'clock for a sunrise; you can be shooting 4/5pm for a sunset shot and 6/7am for a sunrise.
A bit of research can help you avoid wasted trips. You've found a nice location, but where does the sun set/rise? Take a compass, find out. Sun rises in East, sets in West. In winter the trajectory of the sun is lower than in summer so bear this in mind. Will that large nearby building block out the light, just at the time you want to be shooting? Depending on the location, and the angle/position that you want the car at, you may find that it will only work with a sunrise, not sunset. Work this all out.
LITTLE TIP: Grab a Dinky Toy, or whatever, the bigger the better, and take it with you to the proposed location. Just hold it in the air, turning it, and you can quickly work out the angle that the light will work best on the car.
TIMING: get there a good bit (an hour or more) before the light is at its best. It's going to take a little while to position the car etc. Once the light is at its best it goes really quickly so you want to be shooting then, not frantically trying to position the car!
POSITIONING - of the car in relation to the light, and the camera in relation to the car. This is where a second person can help as they can be moving the car, whilst you're looking through the camera. A small change in angle can make a big difference in where the light is reflecting off the car. I did the shot above by myself but it is definitely quicker with a second person.
This is where your Dinky Toy could save you time. You'll know the angles/spots that you want to put the car in. You'll need to tweak the car and camera position to get the light best on the car, as well as getting what you want, or don't want, in the background.
You can have the car at whatever angle you want, but a good starting point is the 'front 3/4' angle - like above (although I chose to show a bit more of the side). Experiment; look at the car a bit more from the front or side. You can apply the same technique to a rear shot. Each time you're going to have to move the car to get the best angle.
CAMERA: You can get decent pics with a 'snappy' camera; you don't need an expensive bit of gear. But the cheapest ones will have limitations - specifically in quality and features/manual settings.
QUALITY/SIZE: Whatever camera you have, if it's got a quality setting (fine, extra fine, normal etc) always set it on the highest quality you can. If you don't, then you're already compressing the image more than necessary and this will ultimately degrade the quality.
Same with the image size; set it to the highest pixel count that you can. This means you are capturing as large a file as possible. Yes, it will be too big to put onto a forum, but you just downsize it in your image program. It means you've got a large enough file size for, say, doing a print from. If you shoot a low-res and then want to crop it, you may end up with an image that isn't large enough.
MANUAL OVERRIDE: A camera with a manual setting, or some sort of exposure compensation, will be very useful. This allows you to override/control how the image is exposed. A shot like above, dark car at dusk, is going to cause most cameras to overexpose as it sees a lot of dark areas and overcompensates - opposite for silver/white cars. You'll want to be able to override the camera to adjust this.
To get the maximum sharpness on the car, you'll want to be able to set the aperture on the camera so that you can choose a small aperture (large number). Some cameras won't give you this option.
Shooting on a small aperture in fairly low-light is going to result in a slow shutter speed, so some sort of support (tripod) is essential.
FLASH: If it's got an option to turn off the built-in flash use it. The flash will just kill that beautiful light you've spent all that time arranging the car in. It'll also make your number plate zing out like a good 'un!
LENS: Don't stick the camera on a wide angle/standard setting and get close to the car unless you're specifically after a distorted/unusual effect/angle. Zoom to the longest telephoto setting you have then move yourself backwards to get the car framed how you want it. This will have two effects:
Firstly, it will compress the perspective. The car will look a bit shorter and not look like it's tailing off into the distance and give it a 'meatier' look.
Secondly, it will throw the background out of focus so things like trees etc, that may be distracting, will blur.
The best thing, especially shooting digitally, is just shoot lots of shots. Experiment with angles and exposures of the same setup to see how it has an effect on the final result. This is how you'll learn things for the future.


 Author
Topic: Some car picture taking advice direct from a Pro (Read 1392 times)
Author
Topic: Some car picture taking advice direct from a Pro (Read 1392 times)