Omega Owners Forum

Please login or register.

Login with username, password and session length
Advanced search  

News:

Please check the Forum Guidelines at the top of the Newbie section

Pages: 1 [2] 3 4 5 6 7   Go Down

Author Topic: 'The' Omega... Progress Diary  (Read 12829 times)

0 Members and 1 Guest are viewing this topic.

05omegav6

  • Guest
Re: 'The' Omega... Progress Diary
« Reply #15 on: 07 October 2014, 12:56:32 »

Shall be doing similar to my back box shield tomorrow... once I have riveted the upper part of my repair plate to the boot floor for a bit of extra strength... the epoxy gunge seems to have done the trick so far :y

Instead of drilling where the studs used to be I shall be aiming 1/4" forward so that the bolts all line up consistently with the minimum of fuss... that's the plan any road ::)
Logged

Diamond Black Geezer

  • Omega Lord
  • *****
  • Offline Offline
  • Gender: Male
  • N E Lincolnshire & Warwickshire
  • Posts: 5694
  • Diamond Black '96 CDX V6 - 'Pissy'
    • & a silly coupe coming...
    • View Profile
Re: 'The' Omega... Progress Diary
« Reply #16 on: 07 October 2014, 13:57:21 »

Nice jobby  :D Did you use nyloc nuts to tighten to the body  :-\ I can see the last nut is nyloc  :y

Yes. As per the picture of the sequence of bolt - washer - nut etc... the nyloc nut goes direct to the body. To help that little more, there's a grip washer on the inside of the bodyshell. I'd advise having someone just to hold the bolt still as you tighten the nyloc. Though I did resort to the method of a 'socket & extension bar pinched with molegrips' which was allowed to rotate as I turned the nut until it hit something hard, whereupon I was then able to tighten the nut. As everyone had gone to bed  :P

Those aren't coming undone any time soon, that's for sure! :y I'd imagine the seam sealer would act as a reasonable glue as well. Well 'gobboed' up inside, too.
Logged
Ex-Dealer Kent-Moore Rear Wheel Bearing Tool available for hire, PM for details.

"There's no point in being grown up if you can't be childish sometimes." 4th Doctor

Diamond Black Geezer

  • Omega Lord
  • *****
  • Offline Offline
  • Gender: Male
  • N E Lincolnshire & Warwickshire
  • Posts: 5694
  • Diamond Black '96 CDX V6 - 'Pissy'
    • & a silly coupe coming...
    • View Profile
Re: 'The' Omega... Progress Diary
« Reply #17 on: 07 October 2014, 14:13:55 »

Shall be doing similar to my back box shield tomorrow... once I have riveted the upper part of my repair plate to the boot floor for a bit of extra strength... the epoxy gunge seems to have done the trick so far :y

Instead of drilling where the studs used to be I shall be aiming 1/4" forward so that the bolts all line up consistently with the minimum of fuss... that's the plan any road ::)

The option was/is always there of course to drill just next to where the threads were. Certainly the last owner did that when fitting self-tappers. If I'm honest it added only 30 secs or so of grunting per hole by going through the last of the tough steel of the thread. I used a 1.5mm ish drill bit as a pilot hole, before moving to 6mm.

Also not forgetting that I snapped off the threads very close to the body, so hardly any old steel left to drill through. In one case the thread snapped, leaving a neat hole (happy days!), which just needed enlarging to 6mm, which took all of two seconds  :y

Logged
Ex-Dealer Kent-Moore Rear Wheel Bearing Tool available for hire, PM for details.

"There's no point in being grown up if you can't be childish sometimes." 4th Doctor

omega3000

  • Guest
Re: 'The' Omega... Progress Diary
« Reply #18 on: 07 October 2014, 14:37:47 »

Nice jobby  :D Did you use nyloc nuts to tighten to the body  :-\ I can see the last nut is nyloc  :y

Yes. As per the picture of the sequence of bolt - washer - nut etc... the nyloc nut goes direct to the body. To help that little more, there's a grip washer on the inside of the bodyshell. I'd advise having someone just to hold the bolt still as you tighten the nyloc. Though I did resort to the method of a 'socket & extension bar pinched with molegrips' which was allowed to rotate as I turned the nut until it hit something hard, whereupon I was then able to tighten the nut. As everyone had gone to bed  :P

Those aren't coming undone any time soon, that's for sure! :y I'd imagine the seam sealer would act as a reasonable glue as well. Well 'gobboed' up inside, too.

Hm im considering the way you have done it now  :-\ When my health is a little better , nothing like rolling on the floor outside in the dirt to make you feel better  ::)
Logged

Diamond Black Geezer

  • Omega Lord
  • *****
  • Offline Offline
  • Gender: Male
  • N E Lincolnshire & Warwickshire
  • Posts: 5694
  • Diamond Black '96 CDX V6 - 'Pissy'
    • & a silly coupe coming...
    • View Profile
Re: 'The' Omega... Progress Diary
« Reply #19 on: 07 October 2014, 15:16:26 »

Haha. Ahh well once I've finished them all, I'll be the country's premier expert on fitting stainless steel heat shield bolts... I could do a PHD in it  :D

I'm just at the point now where I might be able to get it to my mate for this friday for pre-MoT (he's then going to tell me what's needed, and we'll work out what's best/cheapest together) It's already 3 weeks overdue from my original deadline  :-[ but I've literally not had the time, been working every evening I can.

Basically there's only a couple of threads left that are original, the rest have snapped. So do I go that little bit further, snap them off and drill/install stainless on them, too? AT least then I'll never ever need to touch them again. Be a pain if the next time I need to remove a heatshield, the thread's rusted solid and I have to repeat this whole procedure again, seats out, carpets up, etc....

I think I've just answered my own question.

All parts available off heebay, or local hardware stall. All-in each 'fitting' comes in at approx 70p each.
Logged
Ex-Dealer Kent-Moore Rear Wheel Bearing Tool available for hire, PM for details.

"There's no point in being grown up if you can't be childish sometimes." 4th Doctor

Diamond Black Geezer

  • Omega Lord
  • *****
  • Offline Offline
  • Gender: Male
  • N E Lincolnshire & Warwickshire
  • Posts: 5694
  • Diamond Black '96 CDX V6 - 'Pissy'
    • & a silly coupe coming...
    • View Profile
Re: 'The' Omega... Progress Diary
« Reply #20 on: 08 October 2014, 10:46:03 »

OK, well if anyone's interested in me writing a complete 'How To' I'd be happy to. For now here's a little basic diagram/plan I've drawn up, so you can all visualise it a little better.


No pictures of the complete finished article yet. I finished last night at gone midnight and it was just a little bit cold up the driveway! Will try and get a decent snap or two of all the bolts in place looking shiney  :)
Logged
Ex-Dealer Kent-Moore Rear Wheel Bearing Tool available for hire, PM for details.

"There's no point in being grown up if you can't be childish sometimes." 4th Doctor

omega3000

  • Guest
Re: 'The' Omega... Progress Diary
« Reply #21 on: 08 October 2014, 12:01:33 »

Quote
Basically there's only a couple of threads left that are original, the rest have snapped. So do I go that little bit further, snap them off and drill/install stainless on them, too? 

I would , just snap them all off and re-do them ..mite as well while your enjoying rolling around in the dirt  :D Ive forgotten what it looks like underneath , will have to dig some pictures out ..about 6 bolts to each heat shield without digging them out the shed if i remember  :-\
Logged

Diamond Black Geezer

  • Omega Lord
  • *****
  • Offline Offline
  • Gender: Male
  • N E Lincolnshire & Warwickshire
  • Posts: 5694
  • Diamond Black '96 CDX V6 - 'Pissy'
    • & a silly coupe coming...
    • View Profile
Re: 'The' Omega... Progress Diary
« Reply #22 on: 08 October 2014, 12:18:03 »

They're already off and rolling around the driveway!  :D

To chuck some OCD out there, the heat shields have...
6 x bolts front most
4 x bolts 2nd shield
4 x bolts 3rd shield

Just counting up now, as it may be I've missed fitting a nut/bolt somewhere along the way. It's not easy seeing the 'whole picture' when the car's so low(supported on spare wheels, so suppose that maker her 225mm high!)
Logged
Ex-Dealer Kent-Moore Rear Wheel Bearing Tool available for hire, PM for details.

"There's no point in being grown up if you can't be childish sometimes." 4th Doctor

omega3000

  • Guest
Re: 'The' Omega... Progress Diary
« Reply #23 on: 08 October 2014, 12:25:02 »

Its a bit better with car ramps and axle stands , ive got a creeper to lay on ive not used yet so will try that out ..got to be better than the dirt and damp block paving  :D Should be a doddle  :D
Logged

Diamond Black Geezer

  • Omega Lord
  • *****
  • Offline Offline
  • Gender: Male
  • N E Lincolnshire & Warwickshire
  • Posts: 5694
  • Diamond Black '96 CDX V6 - 'Pissy'
    • & a silly coupe coming...
    • View Profile
Re: 'The' Omega... Progress Diary
« Reply #24 on: 08 October 2014, 13:12:30 »

I angle grinded some surface rust off the floorpan along the way. Though I might as well, since I had the Seam Sealer out. I have been called a creeper, but don't own a creeper.  :y

Looking at the diagram I've drawn cross-checking it on the EPC I suspect I have missed one dead in the middle of the drive tunnel - where the two heat shields overlap. Have picked up a suitable nut and some more bolts today, as I'm running out.

Getting there!  :y
Logged
Ex-Dealer Kent-Moore Rear Wheel Bearing Tool available for hire, PM for details.

"There's no point in being grown up if you can't be childish sometimes." 4th Doctor

Diamond Black Geezer

  • Omega Lord
  • *****
  • Offline Offline
  • Gender: Male
  • N E Lincolnshire & Warwickshire
  • Posts: 5694
  • Diamond Black '96 CDX V6 - 'Pissy'
    • & a silly coupe coming...
    • View Profile
Re: 'The' Omega... Progress Diary
« Reply #25 on: 09 October 2014, 16:05:23 »

So here's a little How To. Subject to a few modifications and pictures, I'll gladly then offer it to the Mods, who may wish to see it in the How To section, if we think it an improvement to our vehicles?

How To (subject to revision) Replacing Sheared Heat Shield Threads

4 x M6 50mm or 60mm bolts (may be part threaded)
9 x M6 x 40mm bolts (FULLY threaded)
13 x M6 nyloc nuts
13 x M6 normal or flanged nuts
13 x M6 large penny washers
13 x M6 smaller washers 20mm
13 x M6 grip washers
(The above total can be sourced off ebay for about £7 all-in)
2 x drillbits 1.5mm approx and 6mm and Drill
Small Socket set inc 10mm
Spanners
T40 Torx
Angle grinder with flap wheel
Seam Sealer (you'll only need about a shoepolish tin's worth  :) )
Mole grips

For this guide, rather than describing the drilling and 'modding' of every hole, I've treat each one the same. The detail differences are dealt with in the Afterward section at the bottom.

The sequence of the fittings goes...
Bolt > large washer > grip washer > floorpan > nyloc nut > heat shield > small washer > flange nut.
You may wish to spend an evening in front of the TV making up these in order one evening before starting make up your 'fittings' in that order


1 Assuming the car is on ramps or jacked and on axlestands and safe (the higher the better for this particular job) etc...

2 Seats out (guide elsewhere). and peel carpets up. You may wish to take carpets out completely, but I didn't.

3 Find a sheared thread. Angle grind off remaining proud thread (if necessary)

4 Estimate where the drill will come through in the cabin, ensuring no carpet or sound deadening material will be damaged. Return underneath and drill your pilot hole as accurately to the centre of the old thread as possible. The angle grinding will have sped up drilling time significantly.

5 Return to the cabin, confirm the exit point, if all's well, back under and enlarge to 6mm hole.

6 Smear a decent coating of seam sealer both sides of the hole.

7 Insert bolt, large washer and grip washer from the top. Fit nyloc nut on the protruding thread under the car. Here you need a spanner and a mate to stop the bolt rotating as you tighen the nut. If you're on your own, other tricks include mole grips or a spanner, allowed to rotate with the bolt until they hit eg: the drive tunnel. Ensure nut is tightened with no chance of the thread spinning

8 Spin on washer and nut / just a flanged nut, so they don't go missing. These will be removed momentarily to refit heat shields.

9 Admire your handiwork.  :D You will notice that having threads to help locate the heatshields on is a lot easier than holding a shield roughly in place with one hand, then trying to insert a self-tapper into a now-invisible hole.

Afterward
Most holes are treat the same, however, there are some slight differences between certain ones. Notably:
-The frontmost thread, the last one to point straight down before you head upward into the engine bay comes out DIRECTLY next to the WIRING LOOM. I say again - THE WIRING LOOM, located at the front of both front footwells. I strongly suggest lifting this up and rearward or 'chocking' it suitably out the way before drilling. If you drill through several of the car's vital systems I can not be there to help solder them back together!  :y
-You will notice that you have a transverse box-section with four (two per side) threads. This is what the longer M6 x 50mms are for. Simply repeat the process as before, only drilling through both layers of steel. Ensure as good a smear of seam sealer inside the holes as best you can.
-In the case of the two opposite shields that share a single stud (image 2 below) I simply bolted them together, with a nut locking the bolt to the top shield. There is a bracket on the prop shaft; If you were to drill it out, then repeat the process as with the other bolts, this would be fine, too.

-You may find certain holes come out a little bigger for whatever reason. I'd say use your judgement in this situation if you think it worth putting an extra washer with the nyloc nut to prevent the nut being pulled into the floorpan on tightening. Also some heat shields will require a further washer to prevent the nut being pulled through, on some a flanged nut will be suffice perfectly. So just treat each hole with your own discretion and common sense.
-Finally this is probably not a job for one evening - unless you're very lucky, have a mate helping, and confident. You may wish to even treat each size as a separate job. It's a pig of a job, but the results are stainless steel heat shield securing threads, which are maintenance-free, will never rust, look great and total cost is about 75pence per fitting!
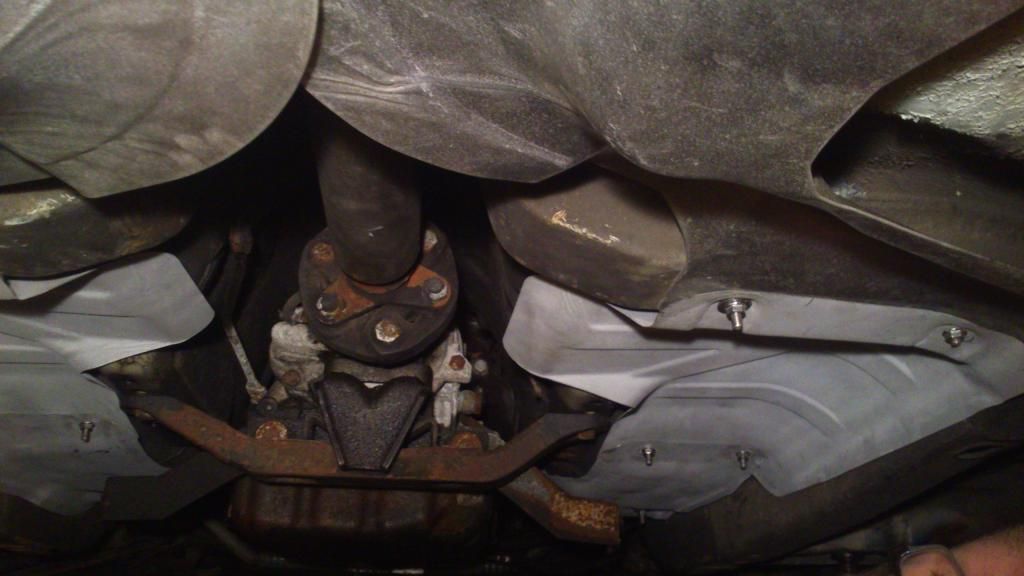
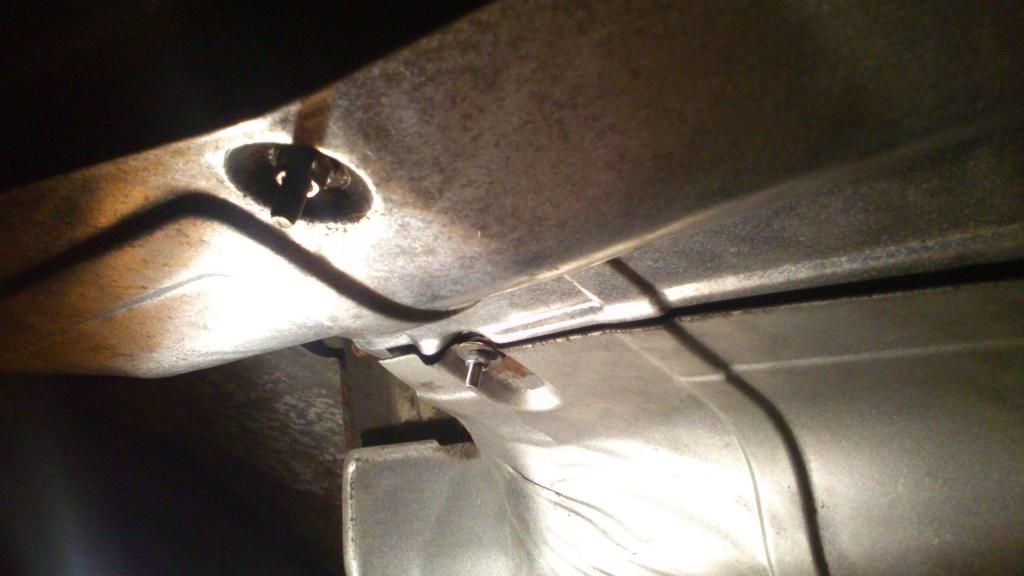
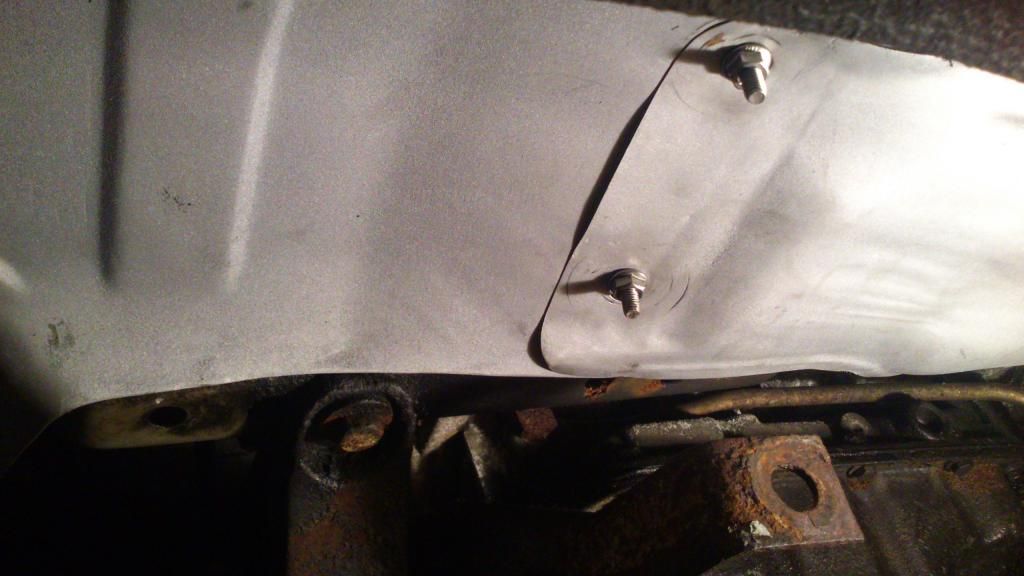


Not great images but they give you the general idea, and I don't think anyone can say that it isn't an improvement :)
Logged
Ex-Dealer Kent-Moore Rear Wheel Bearing Tool available for hire, PM for details.

"There's no point in being grown up if you can't be childish sometimes." 4th Doctor

The Red Baron

  • Omega Lord
  • *****
  • Offline Offline
  • Gender: Male
  • burton on trent.staffs
  • Posts: 6178
  • 3.0mv6 sal/3.0elite lpg/2.2dti estate
    • 2000 chipped mv6 3.0l
    • View Profile
Re: 'The' Omega... Progress Diary
« Reply #26 on: 09 October 2014, 16:59:41 »

i take it they arrived then  ::)
Logged

vauxhall & halfords trade cards.v6 cam locking kit.<local only.

Diamond Black Geezer

  • Omega Lord
  • *****
  • Offline Offline
  • Gender: Male
  • N E Lincolnshire & Warwickshire
  • Posts: 5694
  • Diamond Black '96 CDX V6 - 'Pissy'
    • & a silly coupe coming...
    • View Profile
Re: 'The' Omega... Progress Diary
« Reply #27 on: 10 October 2014, 09:08:47 »

i take it they arrived then  ::)


Yes indeed! Apologies for not mentioning. May I say a personal thank you as the condition of them is excellent! Thanks to The Red Baron!  :y
Logged
Ex-Dealer Kent-Moore Rear Wheel Bearing Tool available for hire, PM for details.

"There's no point in being grown up if you can't be childish sometimes." 4th Doctor

The Red Baron

  • Omega Lord
  • *****
  • Offline Offline
  • Gender: Male
  • burton on trent.staffs
  • Posts: 6178
  • 3.0mv6 sal/3.0elite lpg/2.2dti estate
    • 2000 chipped mv6 3.0l
    • View Profile
Re: 'The' Omega... Progress Diary
« Reply #28 on: 10 October 2014, 09:16:17 »

i take it they arrived then  ::)


Yes indeed! Apologies for not mentioning. May I say a personal thank you as the condition of them is excellent! Thanks to The Red Baron!  :y
cheers.  :y
Logged

vauxhall & halfords trade cards.v6 cam locking kit.<local only.

Diamond Black Geezer

  • Omega Lord
  • *****
  • Offline Offline
  • Gender: Male
  • N E Lincolnshire & Warwickshire
  • Posts: 5694
  • Diamond Black '96 CDX V6 - 'Pissy'
    • & a silly coupe coming...
    • View Profile
Re: 'The' Omega... Progress Diary
« Reply #29 on: 15 October 2014, 00:46:19 »

Update:

Seats are in. Carpets straightened out. Even cleaned the plastic trim panels round the runners in the sink!
 
This evening been working on trying to get her to run properly. Did a little 'let's just see, shall we?' last night, started, but only briefly. Not bad for having not run since 2007  ;) So tonight's problem is she won't idle, and only run with a fair amount of pedal travel.

Tonight is documented elsewhere better. Since checking back on kind replies, and all changed out of my smelly oily work gear, I decided to run out & borrow some thinners from the garage, and clean out the ICV. No idea if this has had an effect, as the one good battery I have is back on the Turbo Weasel, now. (after the original 'good' one earmarked for the project turned out to be pants  :D)

Next step is check correct location of the hoses, and placement of HT leads, which may be wrong, you never know.

Nothing pretty to show you, sadly!
Logged
Ex-Dealer Kent-Moore Rear Wheel Bearing Tool available for hire, PM for details.

"There's no point in being grown up if you can't be childish sometimes." 4th Doctor
Pages: 1 [2] 3 4 5 6 7   Go Up
 

Page created in 0.042 seconds with 21 queries.