Omega Owners Forum

Please login or register.

Login with username, password and session length
Advanced search  

News:

Search the maintenance guides for answers to 99.999% of Omega questions

Show Posts

This section allows you to view all posts made by this member. Note that you can only see posts made in areas you currently have access to.

Messages - Chopsdad

Pages: [1] 2 3 4 5 6 7 8 ... 270
1
Maintenance Guides / Headlight Cluster Lamp Replacement Guide
« on: 28 October 2007, 09:51:29 »
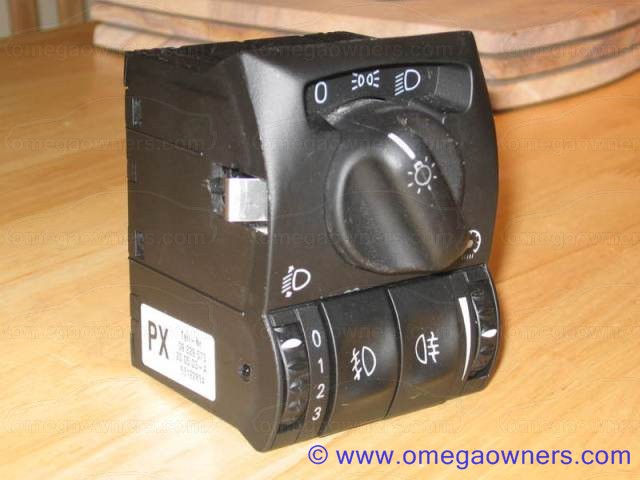
Tools required: Small flat bladed screwdriver & 2 Credit Cards - best to use old/free cards as they may get damaged. I used some readily available from Texaco ;)


Simply slide the cards down either side of the rotary switch to disable the locking pins...


Pull/prise the entire housing forward and remove...


Bulb is located via the back and is removed with a small flat screwdriver, this is the grey piece in the pic ...


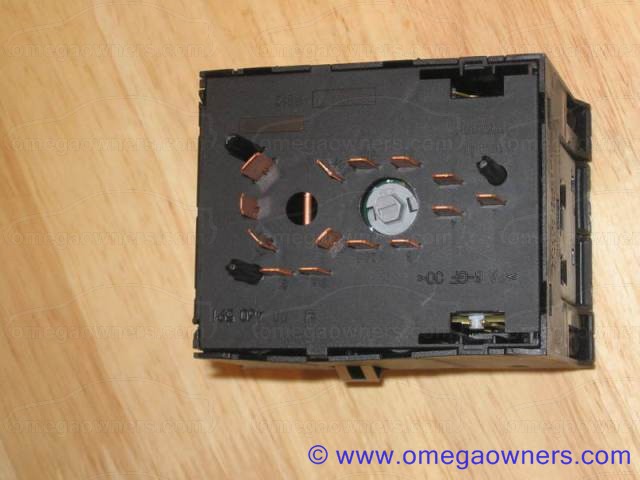
Once unlocked the bulb will simply fall out ...


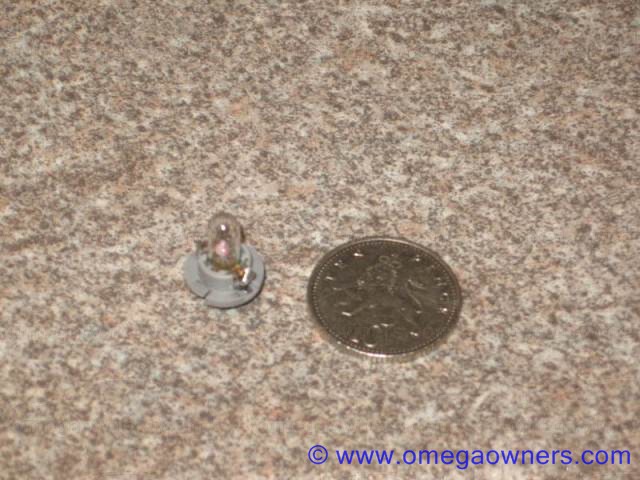
Bulb markings are : ALBA 12V 0.5W

To refit, simply replace the new bulb and slide the housing back into it's holder.  :)

2
Maintenance Guides / Guide for Safe Audio
« on: 23 July 2007, 21:42:26 »
To reset an audio system that displays the legend SAFE

You will need your radio code from your Car Pass and your car keys.


Turn the ignition off.

Press an hold the AS button and turn the ignition back on - keep the button pressed in until you hear a beep after a few seconds.

The display will then read 10  . . . .

Press 1 until the first number of your code appears in the display, ie 10   5 . . .

Press 2 until the next number appears, ie 10   5 6 . .

Repeat with buttons 3 and 4 until your display has the correct code showing.

Then press and hold the AS button again until you hear another beep and your radio will come back to life. :)


If the display changes to 9    . . . . then you have input the wrong code and should try again, if it's still not working consult your Vx Dealer to check the info on the car pass belongs to your car.

3
Quote
Quote
Quote
Excellent, thanks for the update :y

What method did you use to connect the wiring to the light loom?

The wires are too thin for scotch locks and there's not enough room for them anyway, so I stripped back a section of wire and soldered the ends to them and wrapped in tape. You could cut the wires and use the crimp connectors from Halfords if you don't have access to a solder gun - but I'd solder them for a neat solid job.

Pull the fuse first (no 7, bottom row, furthest right) and you'll have no problems. :)

Thanks for that, do you mean the straight crimp connectors?

Yeah, long thin things about 2cm long.  They come in different colours depending on the amp rating - you need 10a. Make sure you can get 2 wires in one side first before you cut the courtesy lamp ones.

When you take the lamp unit out if it is the same as mine it will start with red (perm live) on the left, then brown and the black you need is another 3 across.  If it's any different check it with a multimeter first or you may slice up the wrong wire.

4
Quote
Excellent, thanks for the update :y

What method did you use to connect the wiring to the light loom?

The wires are too thin for scotch locks and there's not enough room for them anyway, so I stripped back a section of wire and soldered the ends to them and wrapped in tape. You could cut the wires and use the crimp connectors from Halfords if you don't have access to a solder gun - but I'd solder them for a neat solid job.

Pull the fuse first (no 7, bottom row, furthest right) and you'll have no problems. :)

5
Quote
Quote
Quote
Quote
Quote
Quote
Thanks TB.  Just one question before I start, well 2 actually......

1. You say I need to connect 4 wires, but the guide only has 3 - I assume the 4th is the green/pink wire in pin 4 that connects to the courtesy light? Why?

2. Is there any benefit in connecting pin 3 to disable the dimming for reverse?

1. I think this stops the mirror dimming when you turn the light on (I'm not going to bother)

2. Again I'm not going to bother with this connection as I never look in the interior mirror whilst reversing.

So for us it just needs 12v and earth  :y
That will work.

Trouble is, Mrs Chopsdad, or Chops herself, would be able to use that mirror at night to apply makeup ;D

The reverse is useful - never connected it on my MV6, but it was on the Tractor. Next time I have any of it apart, I'd run the cable...

I have lights in the visors for my make up applications anyway but I'll have a look at the reverse connection before I click it all in place  :-*
To be honest, the courtesy one is so easy, may as well do it ;)

OMG How easy was that to do!

TB It may be worth adding to the guide that in a facelift all the coloured wires match up with their counterparts from the interior light.

Ie.  Brown from the mirror connector - brown on the interior light.
      Black joins with black switch wire (not permanent live - red)
      Grey/black - to grey/black switch wire for the courtesy lamp on.

There are 2 blacks coming from the mirror - choose the one connected to pin 2 per your guide.

And if you need to reverse when the mirror is dimmed - just pop on the courtesy light and hey presto it's back to normal. :y

6
Quote
Quote
Quote
Quote
Thanks TB.  Just one question before I start, well 2 actually......

1. You say I need to connect 4 wires, but the guide only has 3 - I assume the 4th is the green/pink wire in pin 4 that connects to the courtesy light? Why?

2. Is there any benefit in connecting pin 3 to disable the dimming for reverse?

1. I think this stops the mirror dimming when you turn the light on (I'm not going to bother)

2. Again I'm not going to bother with this connection as I never look in the interior mirror whilst reversing.

So for us it just needs 12v and earth  :y
That will work.

Trouble is, Mrs Chopsdad, or Chops herself, would be able to use that mirror at night to apply makeup ;D

The reverse is useful - never connected it on my MV6, but it was on the Tractor. Next time I have any of it apart, I'd run the cable...

I have lights in the visors for my make up applications anyway but I'll have a look at the reverse connection before I click it all in place  :-*

7
Quote
Quote
Thanks TB.  Just one question before I start, well 2 actually......

1. You say I need to connect 4 wires, but the guide only has 3 - I assume the 4th is the green/pink wire in pin 4 that connects to the courtesy light? Why?

2. Is there any benefit in connecting pin 3 to disable the dimming for reverse?

1. I think this stops the mirror dimming when you turn the light on (I'm not going to bother)

2. Again I'm not going to bother with this connection as I never look in the interior mirror whilst reversing.

So for us it just needs 12v and earth  :y

8
Thanks TB.  Just one question before I start, well 2 actually......

1. You say I need to connect 4 wires, but the guide only has 3 - I assume the 4th is the green/pink wire in pin 4 that connects to the courtesy light? Why?

2. Is there any benefit in connecting pin 3 to disable the dimming for reverse?

9
Quote
Quote
I've recently taken ownership of a new rear view mirror from the Twins but I'm not sure how to wire it in.

I know there are only 3 or 4 key wires for the auto dimming mirror but my short length of loom has 11  :o

Which colours should be connected where?

Funnily enough I've just got one as well and will be attempting the wiring tomorrow.

According to the maint guide for dipping function only.......

Blue/Grey to Ignition Live which should be pin 2 on mirror socket

Brown to ground which should be pin 5 on the mirror socket

Both of which can apparently be picked up from the interior light.

Guide here

http://www.omegaowners.com/forum/YaBB.pl?num=1158088953

Thanks Alex - I had tried a search but the guide is for auto dipping and I searched auto dimming. Silly me  :-/

10
I've recently taken ownership of a new rear view mirror from the Twins but I'm not sure how to wire it in.

I know there are only 3 or 4 key wires for the auto dimming mirror but my short length of loom has 11  :o

Which colours should be connected where?

11
Quote
sorry, don't know  :-[

I know something you don't! WOW  :o There's a first. (and last)

Yes it is possible to remove it. My 2003 had the same problem and I did manage to get to it and clean it too.

First the radio has to come out and then there are some screws/clips that you can then access to remove the while panel. With care you just have to fiddle around with a knife and small screwdriver to carefully prise off the plastic retaining clips that are part of the perspex strip. A quick clean and it pops back together easily enough.

Similar to this pre-facelift guide http://www.omegaowners.com/forum/YaBB.pl?num=1162120610

I've only done it once but it can be done and will be 100% better so it's worth the effort.

12
Omega Electrical and Audio Help / Re: No internal lighting
« on: 03 January 2009, 22:17:58 »
Quote
Quote
Quote
F7?

7--30A Electrically operated windows are fine.

Lights are still buggered  :-X
Windows from F1 according to my diags...

F7 feeds the delay relay, which seems to have connections to a few of the lights, and rear ciggy

Jaime, If I hadn't met you I could kiss you  :-*

F1 is a 10a fuse that indeed has blown and I now have illumination everywhere again  :) :) :)

Wait until I see that MDTM and get him to update is shi*te cabin fusebox guide  >:( http://www.omegaowners.com/forum/YaBB.pl?num=1161602008

And I thought he was perfect  ;D

TB is the best  :y

13
Omega Electrical and Audio Help / Re: No internal lighting
« on: 03 January 2009, 21:41:18 »
Quote
F7?

7--30A Electrically operated windows are fine.

Lights are still buggered  :-X

14
Omega Electrical and Audio Help / No internal lighting
« on: 03 January 2009, 20:32:35 »
Some time ago I broke the boot light cover, and then the glove box light whilst trying to fix the boot!

Since then I've lost all internal lighting inc, map lights, visor lights, kerb lights, boot, glove box and 12v supply to rear power socket.

Played around with a few of the fuses and all seem ok.

Ideas?

15
Omega Electrical and Audio Help / Unseated wiper motors
« on: 17 April 2008, 20:46:47 »
My wipers do stop but they sit at 11 o'clock now - electrical?

Original post here...http://www.omegaowners.com/forum/YaBB.pl?num=1208459567

Pages: [1] 2 3 4 5 6 7 8 ... 270

Page created in 0.025 seconds with 19 queries.