Omega Owners Forum

Please login or register.

Login with username, password and session length
Advanced search  

News:

Welcome to OOF

Pages: 1 2 [3] 4  All   Go Down

Author Topic: Getting her back to tip-top.  (Read 14078 times)

0 Members and 1 Guest are viewing this topic.

PhilRich

  • Omega Queen
  • *****
  • Offline Offline
  • Gender: Male
  • A bit further North of the Back of Beyond!
  • Posts: 10338
    • Mk 2 Volvo V70
    • View Profile
Re: Getting her back to tip-top.
« Reply #30 on: 20 December 2010, 21:51:21 »

Wow! This could end up being THE definative guide to V6 Maintenance! Well Done so far, looking forward to the next Instalment ;D :y
Logged
If it ain't broke keep fixing it 'til it is!

V6 CDX-er

  • Intermediate Member
  • ***
  • Offline Offline
  • Sheffield
  • Posts: 452
    • View Profile
Re: Getting her back to tip-top.
« Reply #31 on: 20 December 2010, 23:06:27 »

Quote
Wow! This could end up being THE definative guide to V6 Maintenance! Well Done so far, looking forward to the next Instalment ;D :y


Thanks all.  :)

The idea behind the thread was to give an idea what the jobs were like to do with basic tools from a novices point of view.
Logged

V6 CDX-er

  • Intermediate Member
  • ***
  • Offline Offline
  • Sheffield
  • Posts: 452
    • View Profile
Re: Getting her back to tip-top.
« Reply #32 on: 23 December 2010, 13:46:14 »

Right then, that's induction taken care of. Now onto cam covers and spark plugs.

Not the easiest job in the world as on some things it isn't too obvious what to do. So allow me to share a few tips that I picked up off others and a couple that I figured out for myself.

Tools for the job include female Torx socket E10, Vauxhall cam cover gasket set, and Vauxhall cam-cover gasket sealant. Whilst you are in the you may as well change the spark plugs, so add to that list 6 GM spark plugs, a small spark plug socket (14mm?), copperslip, a straightedge to check your cam covers aren't warped, (I used a mental ruler), and most importantly a torque wrench to torque up your spark plugs and cam cover / dis-pac bolts. Due to the low values that these get torqued up to, and the lack of room on the passenger side, I think that only a 3/8th torque wrench will fit.

Spark plugs need to be torqued up to 25NM (18 lb/ft), and the cam cover / dis-pac bolts to 8NM (6 lb/ft).


Once the plenumn and intake trumpet are removed, access at least to the drivers side is pretty good.

For me at least, how to remove the dis-pac wasn't obvious, but thank to a couple of helpfull chaps on here,I soon got pointed in the right direction  :)

Around the edge of the dis-pac, (the long dark grey box that sits atop each cam cover), is a rubber lip or seal. Once all the bolts are removed, gently prise away this rubber seal and gently prise out your dis-pac. Chances are that you will break the plastic edging of the dis-pac at a couple of points, but this should really cause any problems so long as it isn't too badly damaged.

If your lucky then the dis-pac will just pop right out complete with all it's shrouds. If your not lucky, some of the spark plug shrouds may stay stuck to the plugs, like in the picture below;


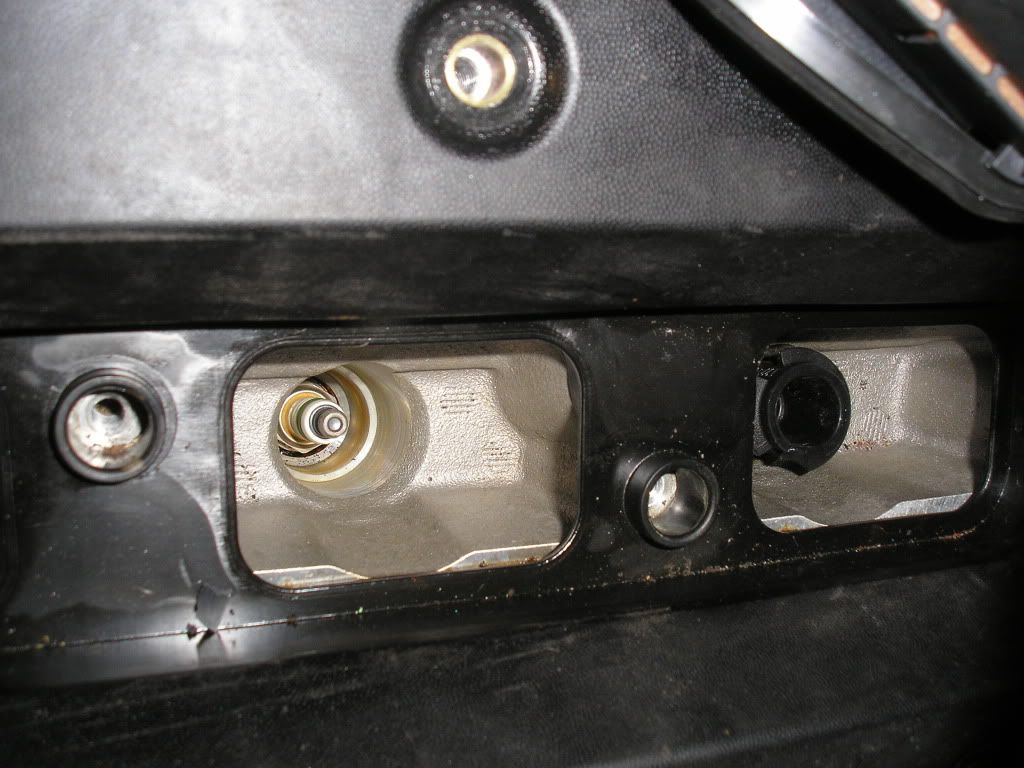
Then they are quite tricky to remove. After getting advice on here, I figured the best way to get a stuck spark plug shroud out was to put plenty of WD-40 / TT / Plus-Gas down there and try and break the seal and pop it out with a couple of screwdrivers. This does take time, is annoying, and will damage the sparkplug shroud. If the car is your only motor, I'd suggest trying to pick up a few spare shrouds prior to starting the job. These aren't available at Vauxhall, (unless you want to buy the dis-pac as well), nor did I have any luck on eBay, but if someone is breaking a car, or there is a scrapyard nearby then you may be in luck. Sods law will dictate that if you don't have any spares, you'll end up needing them. If you do have them, then you likely won't need them   :P

Once the dis-pac is removed it's time for changing the plugs. As I understand it Vauxhall suggest putting the plugs in dry, (not using any copperslip). On my plugs they were rather difficult to remove, and I fear that on a couple of them, if they had been done up much tighter then getting them out would have damaged the threads on the cylinder head.

old plugs out, (1/3/5 top and 2/4/6 bottom);


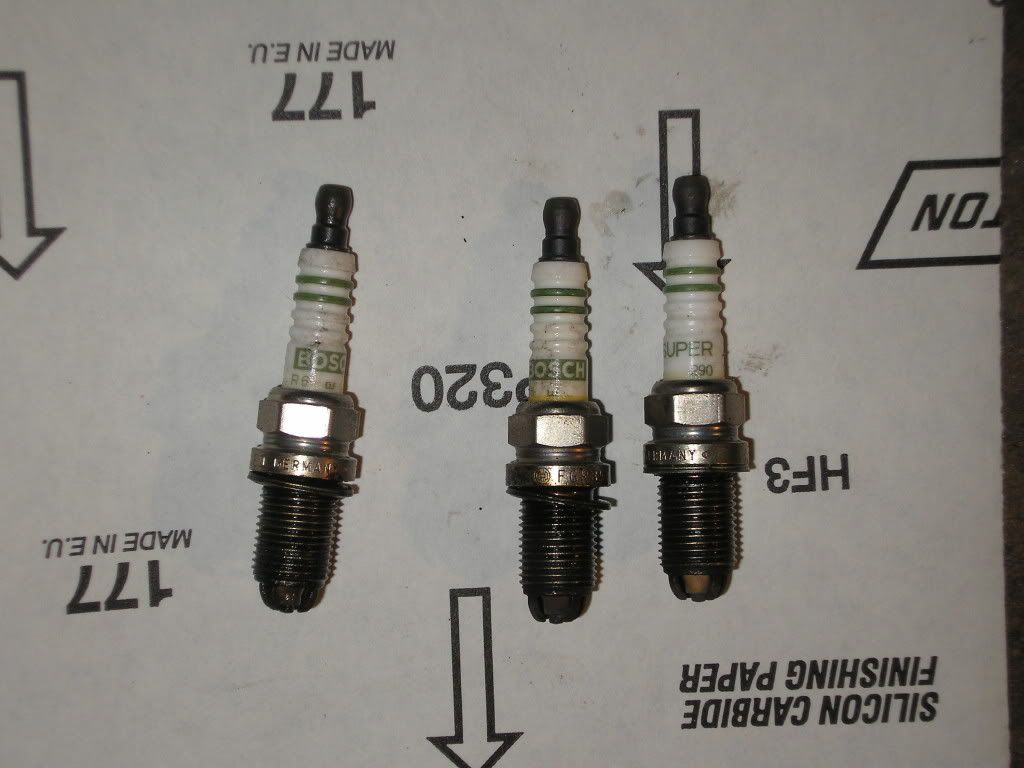
Although the old ones didn't look 'too' bad, I replaced them all anyway;


Upon doing so I added some copperslip to the threads in order for the spark plugs to come out a little easier next time. What I may also do is add a little copperslip to the tops of each spark plug, which should reduce the chances of the shrouds getting baked onto the plugs.

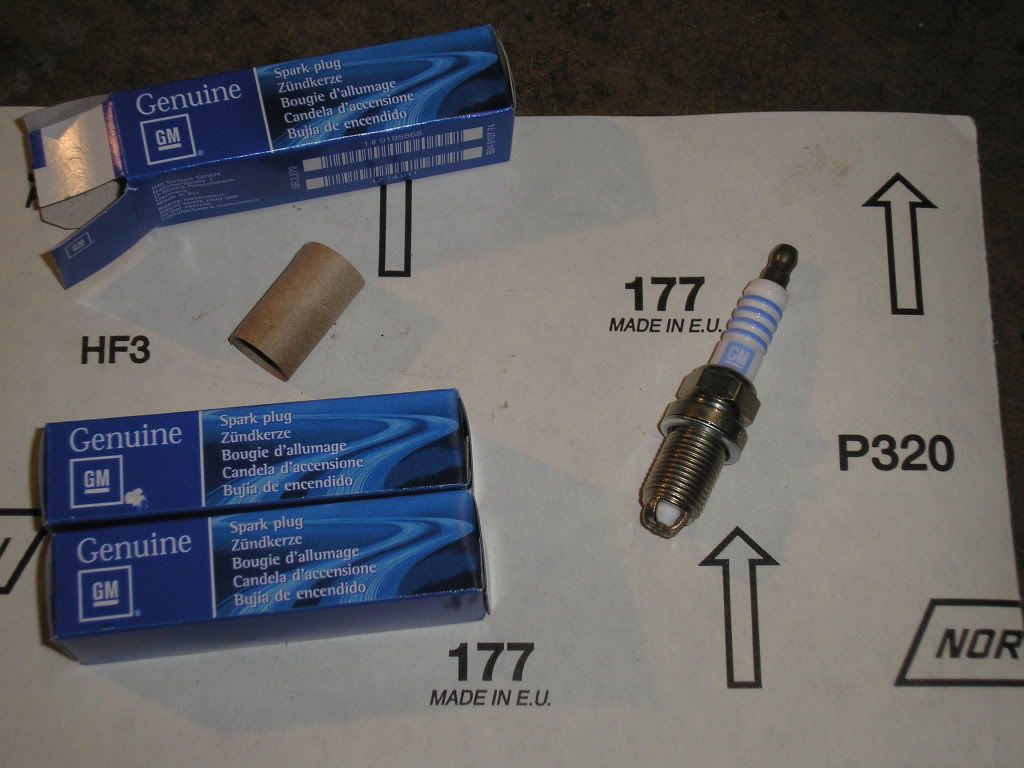
Putting the new plugs back in, I have heard of folk using an old piece of hosepipe in order to not get the plug cross-threaded. I didn't bother. Instead I just used a long extension for the ratchet, (but without using the ratchet). Doing it this way it was easy to feel any significant resistance when screwing the new plug back in, (at which point I un-wound and started again), doing them up finger tight, before finishing off with the torque wrench (25 NM).

The GM plugs are pre-gapped, but even so I would reccomend just giving them a visual check, just to make sure that the electrodes aren't damaged.

Now onto the cam-cover gaskets. Drivers side first and loads of room to work on this one.

Lift the dis-pac up and out of the way, placing in the recess where the intake trumpet would usually be. With the 8 cam-cover bolts removed you can now remove the cam-cover.

This may be stuck slightly, so I tapped mine gently with a rubber mallet, whilst using an old screwdriver to again gently tease the cam-cover away from the cylinder head.

With the cam-cover removed, carefully remove any old tracers of sealent and gasket from the face of the cylinder head using carb cleaner, an old cloth and a scraper, being very carefull not to drop any old sealant / gasket material into the camshaft workings or oilways. Once the face of the cylinder head is cleaned up, move onto the cam-cover itself.

Prise out the old gasket and the eight 'O' rings that sit in the recess of the bolt holes. I used this tool from Machine Mart; http://www.machinemart.co.uk/shop/product/details/cht161-4-piece-mini-pick-hook-set

Then once all the old gasket, sealant and 'O' rings have been removed, use the straight edge to check that the cam cover isn't warped. If all is ok move onto fitting the new gaskets and 'O' rings.

Here is why it is important to get the face of the cylinder head cleaned up first. The sealant that you will be using only has a short timespan before it goes 'off'. if you haven't cleaned the heads up first, then by the time that you actually have done so, the sealant will have cured already, reducing it's ability to make a proper seal.

Logged

V6 CDX-er

  • Intermediate Member
  • ***
  • Offline Offline
  • Sheffield
  • Posts: 452
    • View Profile
Re: Getting her back to tip-top.
« Reply #33 on: 23 December 2010, 14:44:35 »

Continued.......

here's the old gaskets. drivers side first, then passenger side;


Fitting the new gaskets I added a little sealant to all areas that were curved on the cam-cover, before pressing in the gasket and wiping away the excess. Then on the face of the cylinder head I added sealant to all four corners, the rear half moons, and the lumps / hills at the front of the cylinder head, (sorry for the crap description), before fitting the cam cover in place.

A little copperslip on each of the eight bolts, did them up finger tight, then torqued up to 8 NM working in a spiral motion, starting from the inside bolts. the fitted the dis-pac, again adding a little copperslip to the bolts and again, torqing up to 8 NM. Job done, (drivers side).

Now the passenger side.

There are quite a few more brackets, bolt, and other stuff that needs shifting out of the way on this one. Just take solice that if all goes well, you won't have to do it again for a long time.

DO NOT go dissconnecting your air-con pipes, as tempting as it may seems. There is a lot easier, and lot safer way.

Along the top of the passenger side cam-cover is a wiring loom. Gently prise away the plastic clips and remove both the top and bottom halves of the wiring loom cover. This will leave your wiring loom exposed. Get a load of cable ties and hook the wiring loom to the bonnet stay, stretching it as far as you can without damaging it. You should end up with something like this...

empty wiring loom cover;


exposed wiring loom;


and the wiring loom stretched out of the way with cable ties;


You can now remove the dis-pac. Due to the shape of the bulkhead, this isn't quite as easy on the passenger side as it was on the drivers side, and will require a little juggling. Once out, place it in the same area as before, (between the 'V's of the cylinder head. Now remove the old spark plugs and fit the new ones in the manner described in my previous post.

The only exception being the spark plug that sits nearest the bulkhead (passenger side). To get to this you will need to use a U/J between the ratchet extension and the spark plug socket as pictured below;


Yet again remove the cam-cover, clean up the heads and cam cover of old gasket & sealant, fit the new gasket and sealant, replace cam covers and dis-pac, torque up bolts, (8 NM), then re-assembly of intake trumpet, plenumn, throttle body etc, not forgetting and new gaskets needed for these parts. (I haven't actually got as far as re-assembling the induction yet as I'm doing the cam-belt, but I cant imagine re-assembly being difficult).


That's it for the next few days I reckon. So here's wishing you all a very merry Christmas and a happy new year  :y


Logged

V6 CDX-er

  • Intermediate Member
  • ***
  • Offline Offline
  • Sheffield
  • Posts: 452
    • View Profile
Re: Getting her back to tip-top.
« Reply #34 on: 27 December 2010, 23:58:37 »

Cam belt & tensioners part 1;

Special tools required:

Torque wrench
Torx bits (T40 / T45 T50)
30mm socket
Long extension bar
Cam locking tool and cam aliliegnment tool
A selection of female Torx sockets from E8 to E20
Some emery cloth
Mrak DTM's excellent 'How To' DVD, available from this fine forums webshop.
A large drip tray and large container to pour the old coolent into.

During this procedure I have been / will be replacing my auxillery belt, cam belt, water pump, cam belt tensioners and changing the coolent.

First up, jack the nearside front of the vehicle up a little and drain the coolent out of the rad. To do this undo, (but not remove) the red screw untill the coolent starts to make steady progress out of the rad.


I drained mine into a small oil drain container, then poured it into a larger 25 litre container. i find it usefull to keep two of these containers. One for oil / brake fluid etc, and the other for coolent. Once full, I'll take them to the tip.


Then using Mark DTM's DVD as instruction, I started to remove the induction trunking that goes up infront of the rad. However, because I'm a bit of an idiot, I wasn't paying that much attention to the video and tried to unnecessarily remove the radiator bottom hose. This I failed to do correctly as I couldn't get one of the dam clips off, so I cut through the hose with a saw, then took a Dremmal to the dam hose clip. Cost of a new bottom hose = £8.40. Cost of realising that you've wasted your time and your money = priceless  :-[

Anyway, it is possible to remove the item below without being as stupid as I was;


Next up is undoing the wiring loom protector. Pretty simple, even for a hamfisted fool like me. The bits round to the offside need unhooking by pulling up a little and left a bit. Carefull you don't break them.


You can now remove the cover which covers the aux belt,therefore fully exposing said aux belt;


Remove the tension out of the tensioner, leaving the belt slack, and remove belt. Mine, condition wise, was 'alright' bearing in mind that there is no evidence of it being changed for 54'000 miles and five years.

Aux belt off and close up's of it's condition. A few cracks visible on the inside of it;


At this point the PAS pulley, water pump pulley and crank pulley can be removed. On mine the PAS came off no problem, but the water pump pulley was well stuck, even after spraying TT on it for the last few days. I eventually got it off by using a big pry-bar and gentle(ish)ly trying to pry the pulley free like in the picture below;


I had to do the same with the crank pulley, but this only took a couple of yanks and it was off.

Next I undid the five bolts holding the cambelt cover in place, not forgetting the semi hidden one on the drivers side.

Then using an E20 female Torx socket I slowly turned the engine clockwise untill the timing marks on the cam drives were just before the timing marks on the cam casing. At this point I fitted the cam locking tool to the crank pulley housing, and turned the engine over a little more untill it locked in place against the water pump;


The timing marks on the cam vernier pulleys should resemble something like this, (or at least mine did);


Things didn't look 'too bad' untill I put the proper timing aliegnment tool on. Then  :o


My timing was a mile out on all four banks. who on earth set this up this time? Stevie Wonder? Ray Charles? David Blunket? David Blunket's guide dog? Pics below of timing a mile out (banks 1-4 in order);

With the aliegnment tool on the pics look a lot worse. I couldn't get the cam locking wedges in either side. Banks 1-4 are pictured in order;


Not to worry. We can fix this  :)  To do so you will need an extension bar with a 30 mm socket, and a ratchet with a T50 bit on the end of it.

Using the extension bar and 30mm socket, slacken off the adjuster / tensioner between your two 'V's;


Then with the ratchet and T-50 Torx bit, carefully adjust the timing more accuratly, like so;


Untill all four are spot on;


Continued.........


Logged

V6 CDX-er

  • Intermediate Member
  • ***
  • Offline Offline
  • Sheffield
  • Posts: 452
    • View Profile
Re: Getting her back to tip-top.
« Reply #35 on: 28 December 2010, 01:05:16 »

Continued as I was running out of charactors on the above post.......

With everything aliegned correctly, it's time to check, double check, re-check, and check again to really make sure that your timing is spot-on. I was happy that mine was. I then put in the cam locking tools. if your timing is spot on, these should slip easily into place;


Then the tensioner can be removed, (13mm bolt I think, or maybe an E12?). This will allow the cambelt to go lose so that it can be removed easily;


Belt removed and pics of it's condition;


The belt condition appeared good, with no cracks or fraying. Not bad considering that a belt change was 14'000 miles overdue  :o


 I had no noises coming from my water pump, but as what little history I do have shows that it has never been changed, and I was in here anyway, I thought it best to change it. I managed to get a OEM water pump for £26 delivered, and the gasket from my local VX main dealer was only a couple of quid. The old water pump is a piece of cake to remove, just make sure that you have a bucket handy!

Remove the locking tool that attaches to your crank pulley bracket and locks onto the water pump. So long as you leave the green and red 'wedges' in place the cams cant move.

Undo the three bolts that hold the water pump in place. My water pump needed a few gentle taps with the rubber mallet to set it free.

Water pump removed;


Old v new water pumps. Even though my new water pump is OEM there are differances in the impeller design and material used, although the shape of the backing plate remains the same. Pics below;


Before fitting the new water pump I cleaned up the mounting point on the engine block with some emery cloth, then some P-360. wiped it all down with a clean rag, then an anti-bacterial wipe in what was likely a futile effort to remove any tracers of swarf.  ::)

I also gave the face of the new water pump, and the new water pump gasket a quick, light smearing of copperslip;


And as seen a I struggled to remove the water pump pulley, I'll go around the inside of that with some emery cloth to clean that up a bit as well as giving it a quick and light smearing of copperslip too.

And that's were I left it for tonight. All that left to do is to remove the other two tensioners, (cant see that being a problem), fit all the new ones and fit the new cambelt and aux belt, then re-assembly.

I was quite concerned that as an amatuer I'd really struggle doing a cam belt change, but TBH, so far it's been pretty straight forward. if it's as easy to finish as I expect it to be, then I reckon that providing you had the tools and the parts to hand, any old joe could get it done in a weekend, even if they were working at a pretty relaxed pace. What would take longer is doing all the other jobs that you might as well do whilst in there, such as rocker cover gaskets, spark plugs, cleaning out the breathers, cleaning up the intake system and grinding / porting out all the casting steps.

Anyhow, part two coming your way in the next couple of days. Lets hope that finishing the job is as easy as the start of it has been so far.
Logged

sotmh

  • Intermediate Member
  • ***
  • Offline Offline
  • Gender: Male
  • london
  • Posts: 398
    • View Profile
Re: Getting her back to tip-top.
« Reply #36 on: 28 December 2010, 13:20:02 »

This thread is worth its weight in gold especially saving garage bills.  I'm really looking forward to more of this and has given more confidence in doing these jobs, especially being an absolute novice.

Keep up this excellent thread. Am sure many will find this an absolute boon. :y :y :y ;D ;D ;D
Logged

PhilRich

  • Omega Queen
  • *****
  • Offline Offline
  • Gender: Male
  • A bit further North of the Back of Beyond!
  • Posts: 10338
    • Mk 2 Volvo V70
    • View Profile
Re: Getting her back to tip-top.
« Reply #37 on: 28 December 2010, 15:52:55 »

Quote
This thread is worth its weight in gold especially saving garage bills.  I'm really looking forward to more of this and has given more confidence in doing these jobs, especially being an absolute novice.

Keep up this excellent thread. Am sure many will find this an absolute boon. :y :y :y ;D ;D ;D
[/highlight]


I can only agree! :y
At the moment I am a 4 pot owner but would love a V6 & your excellent attention to detail is invaluable!  So, a bloody big Thumbs Up from me :y ;D
Logged
If it ain't broke keep fixing it 'til it is!

P6UL K

  • Omega Knight
  • *****
  • Offline Offline
  • Gender: Male
  • Dartford, Kent
  • Posts: 1001
    • Vauxhall Omega 3.0 Elite
    • View Profile
Re: Getting her back to tip-top.
« Reply #38 on: 03 January 2011, 01:12:37 »

Top thread!!  :y
Logged
2008 Vx Vectra 2.8T VXR V6 Estate - ExNI Police • 1985 'B' Ford Escort Cabriolet 1.6 Rs Turbo

russ0205

  • Senior Member
  • ****
  • Offline Offline
  • Gender: Male
  • northants
  • Posts: 563
    • mondeo
    • View Profile
Re: Getting her back to tip-top.
« Reply #39 on: 03 January 2011, 10:07:25 »

can't wait for the next episode, well done  :y
Logged

V6 CDX-er

  • Intermediate Member
  • ***
  • Offline Offline
  • Sheffield
  • Posts: 452
    • View Profile
Re: Getting her back to tip-top.
« Reply #40 on: 04 January 2011, 14:30:14 »

Bad news chaps. I've had to admit defeat on the cambelt, (and it was going so well  :-[ )

Finding Top Dead Centre (TDC), lining the timing up with the old belt in place, removing the belt were all easy enough just so long as you keep on checking and double checking what you have done.

Fitting the new belt was a two person job for me / us. I had the car over the pit, with me stood under the car holding the belt tightly around the crank, whilst my wife followed the instructions on Mark DTM's excellent DVD and fed the cam belt through the tensioners and around the cams. Once we had done this we turned the engine through 360 degrees and checked the timing again.

At this point the timing was slightly out on banks 3/4, whilst still spot on on 1/2. Timing was adjusted, tensioners adjusted, engine rotated again through 360 degrees. This time 3/4 was out a little, 1/2 was spot on.

Again adjust, re-set tensioner, and rotate engine through 360 degrees.

What followed was a couple of hours of chasing the timing marks, each turn of the engine made the timing on 1/2 go further and further out.  :o   :'(

I've now decieded that it would be best if I got a mechanic mate round to help me set it up properly. I don't know what it is that I'm doing wrong, but it's bound to be something simple, (fingers crossed). I'd rather not go messing with the timing any more in case I make it a lot worse and end up bending a valve turning the engine over by hand.

So, failure? Well, yeah, I guess. Trying to put a positive spin on things, this was my first ever cambelt change, there is four cams to time up, (so it ain't the easiest job for a novice), but I have had a decent stab at it. So long as I haven't done any damage, (and I don't think I have), then even getting a mechanic round to help for a couple of hours is still going to end up cheaper than paying one to do the job. Plus with the job being done under my supervision, I can make sure that the timing is set-up perfectly, not just near enough(ish).

As my mechanic mate cant come round untill next week this leaves me at a bit of a short end, scratching round for little jobs to do. With the clock ticking in January, the Omega isn't going to be on the road untill the begining of Febuary, (it has no tax, and I'd rather get a full 12 months tax, not 11 1/2 months tax).

So the little jobs to be getting on with over the next couple of weeks are obviously finishing the cambelt,
bleeding the brakes,
adjusting my handbrake'
re-fitting the heat shields that cover the central handbrake adjuster.
cleaning my sunroof 'disc' (sunroof has a mind of it's own),
changing oil and filter, (lots of carb cleaner has made it's way into the engine, will change again in another 650 miles when the car gets to 95'000 miles),
changing fuel filter
collecting throttle body from machine shop,
re-assembly of intake system
add coolent, (system flushed, excluding heater matrix, by removal of water pump).


As usual I'll do the little write-up's for each job, but like I said, as far as timing goes, I've been defeated  :-[
Logged

Boditza

  • Senior Member
  • ****
  • Offline Offline
  • Gender: Male
  • Craiova, Romania
  • Posts: 601
    • View Profile
Re: Getting her back to tip-top.
« Reply #41 on: 04 January 2011, 20:18:54 »

Don't forget to take pics [smiley=dankk2.gif] [smiley=dankk2.gif] [smiley=dankk2.gif] [smiley=dankk2.gif] [smiley=dankk2.gif] [smiley=dankk2.gif] [smiley=beer.gif] [smiley=beer.gif] [smiley=beer.gif] [smiley=beer.gif]... too much?? just one more for your help :-*
Logged

Boditza

  • Senior Member
  • ****
  • Offline Offline
  • Gender: Male
  • Craiova, Romania
  • Posts: 601
    • View Profile
Re: Getting her back to tip-top.
« Reply #42 on: 13 January 2011, 14:36:46 »

so... nothing new yet?? changed the belt??
Logged

sotmh

  • Intermediate Member
  • ***
  • Offline Offline
  • Gender: Male
  • london
  • Posts: 398
    • View Profile
Re: Getting her back to tip-top.
« Reply #43 on: 13 January 2011, 21:23:20 »

Failure.  That dependends on whats meant by failure.
Yes I agree you only got to acertail n point but even that is a learning point and a success for the next time, assuming there will be.

I would say you can  pat yourself on the back as youve achieved sheds loads in my humbe opinion and have been a credit to the forum.
A big thumbs up from me :y :y :y :y.

Looking forward to next series. :) :y
Logged

V6 CDX-er

  • Intermediate Member
  • ***
  • Offline Offline
  • Sheffield
  • Posts: 452
    • View Profile
Re: Getting her back to tip-top.
« Reply #44 on: 14 January 2011, 22:29:27 »

Quote
so... nothing new yet?? changed the belt??


Just a quick update chaps.

At first I couldn't remove the oil filter canister, (it's welded itself to the block), but I think I've figured out an easy way to get me some more room to swing a bar in on it.

I couldn't remove the fuel filter as I couldn't undo the plastic clips. A mate has lent me a special tool for this job, (and I think these are sold in Machine Mart for not a lot). I'm about to go out in the garage and give it a go.

And for the cambelt, I had a mechanic mate come over yesterday to take a look. I'd got myself to the point of not being able to see the wood for trees, and also blinded by the fear of valves meeting pistons as the timing slipped further and further out.

Upon closer investigation, we, (or rather mainly my mechanic mate), could only really conclude that even though I ordered the parts from my local VX main dealer, either the belt is too long, or the tensioner is the wrong sort.

Each time we try and tension the belt, the belt will catch / wedge itself against it housing just above the tensioner located at 9 'o' clock in relation to the water pump.


So very little progress but at least (hopefully) a breakthrough.
Logged
Pages: 1 2 [3] 4  All   Go Up
 

Page created in 0.027 seconds with 21 queries.