Omega Owners Forum

Please login or register.

Login with username, password and session length
Advanced search  

News:

Please play nicely.  No one wants to listen/read a keyboard warriors rants....

Pages: 1 [2] 3 4  All   Go Down

Author Topic: Getting her back to tip-top.  (Read 14081 times)

0 Members and 1 Guest are viewing this topic.

sotmh

  • Intermediate Member
  • ***
  • Offline Offline
  • Gender: Male
  • london
  • Posts: 398
    • View Profile
Re: Getting her back to tip-top.
« Reply #15 on: 14 December 2010, 00:57:24 »

Realy enjoyed reading this and look forward to more of your work with great interest. would love to own a one in the future althogh currently own a 2.0 due to be easy to maintain. :y :y :y :y :y :y
Logged

sotmh

  • Intermediate Member
  • ***
  • Offline Offline
  • Gender: Male
  • london
  • Posts: 398
    • View Profile
Re: Getting her back to tip-top.
« Reply #16 on: 14 December 2010, 01:36:00 »

forgot to say earlier on getting my meg I started to experience water coming into passenger footwell. Became very worried as I did not know about pollen filter and area located.  After looking around area of glove box  and its removal, and further investigation realised problem, blocked drain plug, hence solved, lost several layers of skin off forearm and became quite sore, so I and others undestand your experience.

Finally congrats on the bairn.
Logged

V6 CDX-er

  • Intermediate Member
  • ***
  • Offline Offline
  • Sheffield
  • Posts: 452
    • View Profile
Re: Getting her back to tip-top.
« Reply #17 on: 17 December 2010, 03:26:04 »

Front discs and pads were a piece of cake. The only thing which I would advise being carefull of it perhaps getting a few spare disc retaining studs, as two of mine chewed up taking them off. Putting the new ones back on I used a little copperslip on the threads, and only nipped them up slightly.

So, front discs and pads. I bought a set, (discs & pads), from my local VX main dealers for just a touch over £80 inc VAT. Besides a torque wrench, no other special tools are needed for this job. Just remember to crack the bleed nipple off on the caliper, and unscrew the lid on the brake master cylinder before squeezing the caliper pistons back. I also read a very good tip on here, (I forget who from), about using the old pad to squeeze back the pistons, therefore the pistons are going back squarely.

Each side should take you between 30-45 minutes depending on how quick you work.

Discs and pads on all four corners were well and truely shot.

Front discs were wafer thin, with heavy corrosion between the vanes. I reckon if I had put the disc in a vice and given it a couple of hits with a chisel and lump hammer than I could have got it to split in two. I suspect that whoever owned this car before me tried to run it on a shoestring.


Wafer thin pads;


The job is a piece of cake, just so long as the disc retaining bolt doesn't need drilling out. On two of my wheels I 'only just' managed to remove the discs retaining bolt without the need for drilling it out. For how little they cost I bought a set of four replacements, (only ended up needing two though), used copperslip on the threads, and just nipped them up lightly. Hopefully next time the discs need to come off, they should do so with ease.

The only minor problem with changing the discs / pads was the need to file away some of the material on the caliper bracket in order to get the new pads to fit. I did this with the dremmal, (well, cheap Clarke copy), taking care to just file a little at a time so my pads were not a baggy fit.


Don't forget to give the discs a dam good clean with brake cleaner to remove any tracers of the wax / greese they use at point of manufactor to stop them rusting. My discs were plastered in the stuff! Also don't forget to torque up the caliper retaining bolts and nip-up the bleed valve after pushing your pistons back in. And a chap on here, (I forget who, sorry), gave me a good tip about using the old pads to push back the pistons, thus making sure that the pistons go back into the caliper squarely.

job done;


Next job was cleaning my wheels. These were a hell of a mess. I cleaned these with plenty of Wonder Wheels and some Autoglym spray-on machine cleaner, plus plenty of elbow greese. Finished off with some Autoglym alloy wheel sealent, which should hopefully mean that any future baked on brake dust is easy to remove.

before;


after;


Logged

V6 CDX-er

  • Intermediate Member
  • ***
  • Offline Offline
  • Sheffield
  • Posts: 452
    • View Profile
Re: Getting her back to tip-top.
« Reply #18 on: 17 December 2010, 03:29:59 »

Quote

Finally congrats on the bairn.

thank you  :)
Logged

sotmh

  • Intermediate Member
  • ***
  • Offline Offline
  • Gender: Male
  • london
  • Posts: 398
    • View Profile
Re: Getting her back to tip-top.
« Reply #19 on: 17 December 2010, 19:09:11 »

picking up up some good tips here.  Also gives whole new meaning to not doing job by half once some thought is given to any task.
Logged

V6 CDX-er

  • Intermediate Member
  • ***
  • Offline Offline
  • Sheffield
  • Posts: 452
    • View Profile
Re: Getting her back to tip-top.
« Reply #20 on: 18 December 2010, 02:55:22 »

Now onto the rear brakes.

Just like the front discs and pads, this job shouldn't present any problems, even for an amateur like myself.

A few of the tools or equipment that your going to need are brake cleaner, (at least a couple of tins), a tub of copperslip, (don't bother with the little tubes, you won't have enough), a rubber hammer, and some tie-wraps to secure the brake caliper out of the way without it straining the brakeline.

I'd also strongly reccomend getting one of these cheapo dremmel copys from Machine Mart. I've had mine for a couple of years now, and they are a very usefull tool to have; http://www.machinemart.co.uk/shop/product/details/crt40-40pce-rotary-tool-kit

The reason why I'd reccomend having this tool for changing discs and pads is that it will save you a lot of time when it comes to cleaning up your hubs, prior to fitting the new discs, (using the wire brush attachment).

A quick tip. If like me you find that your locking wheel nut key is very stiff to attach, smear a little copperslip into the recess of the locking wheelnut key. this will aid it going on nice and easy.

The rear discs may prove slightly more tricky to remove than the fronts, due to how much of a groove the handbrake shoes may have worn into the 'drum' part of the discs. As I was changing my handbrake shoes anyway, and my discs were fubarbed, I used the hamfisted method of banging away with the biggest hammer in my toolbox. if I was to re-use my discs, then I'd take a more gentle route of using a piece of wood placed behind the disc to hammer directly onto, and rotating them untill the came free.

As with the fronts, the caliper bracket will likely need a bit of filing in order to get the new pads to fit. Also I gave my retaining pins a going over with the wire brush attatchment on the multi-tool, as these were not in great shape.

Not too many pictures as I was wrestling with doing the handbrake shoes at the same time, (not a fun job!).   
Logged

V6 CDX-er

  • Intermediate Member
  • ***
  • Offline Offline
  • Sheffield
  • Posts: 452
    • View Profile
Re: Getting her back to tip-top.
« Reply #21 on: 18 December 2010, 03:25:46 »

Replacing handbrake shoes.

FFS. What an awfull job! So please allow me to try and make it a little easier for you.

Firstly, when I ordered the parts for mine I was unaware that as well as the handbrake adjuster running along the underside of the car, there is also an adjuster on each individual drum. So, if your handbrake is non existent, and the adjuster under the car is wound to max, try the adjusters in the drums first, as changing the shoes is a job to give you a few extra grey hairs (IMO).


As well as the tools described above, I would also suggest that before starting this job you grow a third arm & hand, plenty of Plus-Gas / TT, and buy a cheap pair of needle-nosed pliers, modifying them to be quite long and thin with an angle grinder. The reason why will be explained soon enough.

First off, knock the pins out of the brake caliper, remove the pads, and undo the caliper retaining bolts. these are going to be tight, dam tight, as in 20 million lb/ft tight if mine were anything to go by. To make matter worse, my 1/2" drive 18 / 19mm socket, (cant remember which size exactly), was just a little bit too deep to fit in the confined space between caliper and suspension arm. I'd suggest taking the wheel off yours, and before you go any futher, make sure that your 1/2" drive socket & bar will actually fit.

I managed to get around this problem by remembering where there was a couple of lengths of scaffolding tubes dumped, and going there with a hacksaw and cutting a length off. This I used with my 3/8" 18 / 19mm socket, (which was shallower) and my shorter 3/8" bar. you see, the job is turning into a swine already.

Whilst we are on the subject of tips, I wound off the central handbrake adjuster running by the exhaust. Typical me went blasting in, removing exhaust heat shields without paying too much attention to which ones needed to come off. It may be better for anyone else doing the job to learn by this a take a step back for a minute, figuring out which heat shields come off, and which don't, as some of them are a pig to remove and re-fit. If you are removing heatshields, take it as granted that the bolts will be in a bad way, so use plenty of penitrating fluid first.

So, adjuster wound off, pads removed, caliper removed and placed out of the way. (I know the picture below is of a front caliper, but the idea is the same front or back)


To be continued.......
Logged

Dishevelled Den

  • Omega Queen
  • *****
  • Offline Offline
  • Posts: 12545
    • View Profile
Re: Getting her back to tip-top.
« Reply #22 on: 18 December 2010, 09:31:27 »

Well done so far 6 - will look forward to the next instalment. 8-) :y
Logged

V6 CDX-er

  • Intermediate Member
  • ***
  • Offline Offline
  • Sheffield
  • Posts: 452
    • View Profile
Re: Getting her back to tip-top.
« Reply #23 on: 18 December 2010, 15:32:45 »

Handbrake shoes continued.......


Ok, so you've got your caliper and disc off, and the caliper is tied up out of the way. This is where the fun really starts.

You'll see a star adjuster sitting at 12'o'clock between the shoes. Wind this off to almost max. Not too far though as it will eventually buckle under itself, causing yet more problems.

I hope you've had your Wheetabix, cause your going to need it. Try and undo as many of the springs as possible. The one on the backing plate should be easy. Others won't be.

Next up is depressing the springs on the pins to get the caps off. Don't be fooled by how easy these come off, as you still have to get the buggers back on yet.

Now try and stretch the shoes apart, (easier said than done). hopefully after several trips to A&E to stitch back on missing fingers, you should have done this.

Now everything should be dissassembled? Cue lots of brake cleaner to tidy the job up, use of the cheapo dremmel to clean the hub and start re-assembling. Good luck!

Copperslip aplenty on the metal to metal areas, smearing it on the springs. Now all you've got to do is get those innocent looking springs back over the pins, and the caps in place. What could possibly go wrong?

Well, here's where that third arm I asked you to grow comes in handy, as does the patience of a saint.

So here's my top tips....

1; before even starting this job, I wish I'd taken the car to have the pins tack-welded into place on the back of the backing plate. This would have stopped the dam things rotating with the spring / cap every time I tried to get them back on.

2; if you are having real trouble getting the springs to compress, rotate, and the caps back on, then cut out a link from the little springs. Carefull not to take too much out of it though.

3; have a few spare caps handy, (not the sort that go on your head, but the ones that go over the shoes retaining pins), as these caps soon get chewed up.

4; remember the cheapo pair of needle nosed pliers I suggested you got? well now is the time to use them, assuming you have thinned them out a hell of a lot with your angle grinder.

On each side is two pins. One willbe alright(ish). The other won't. I wasted one full day getting the pins on one side, and two days doing the other. bear this in mind, and please don't expect changing the handbrake shoes to be an easy or quick job.

My 2003 omega has 94'000 on the clock. My handbrake was next to useless, but the handbrake shoes only looked about 30-40% worn, (I'd already bought the parts and decieded to do the job). What I think was the cause of my near enough in-op handbrake was a lack of any adjustment being used on the star adjusters on the drums, plus the severe wear on the 'drum' part of my rear discs.

In hindsight, (such a wonderfull thing), I reckon that if I had replaced the discs and fiddled with the adjusters, then the car would likely have done 200'000 miles without the need for the handbrake shoes to be replaced.

Whipping the discs on and off, even a couple of times, is a hell of a lot easier than changing the handbrake shoes,

Anyway, a few pics of the completed job;
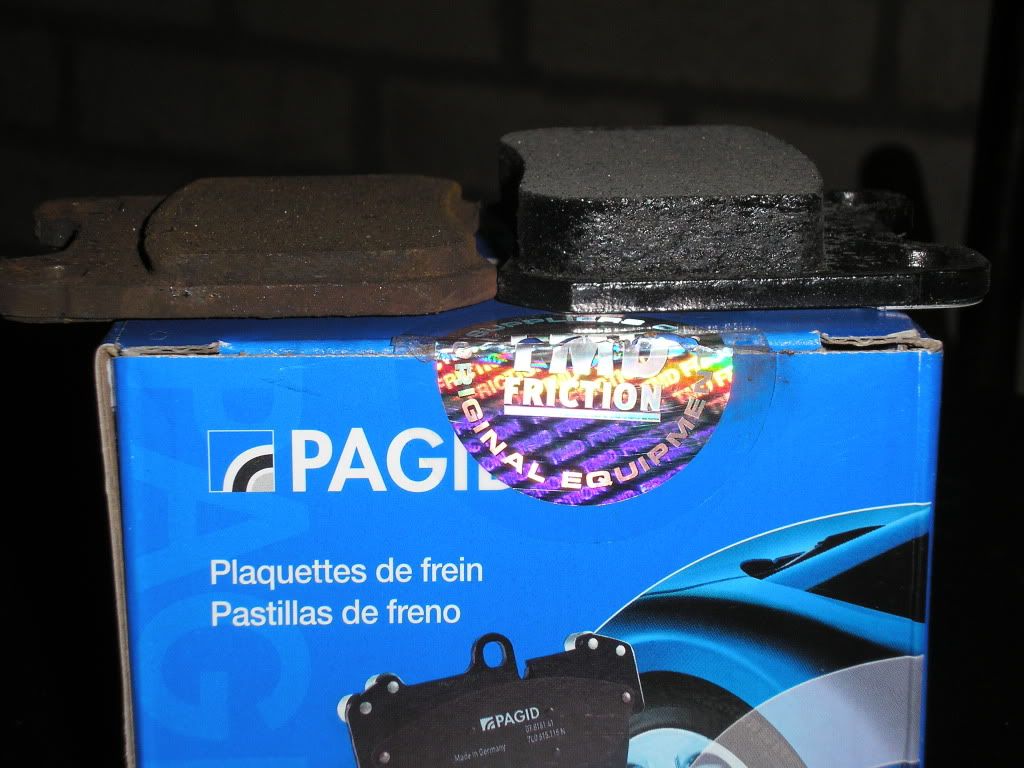
old v new rear pads


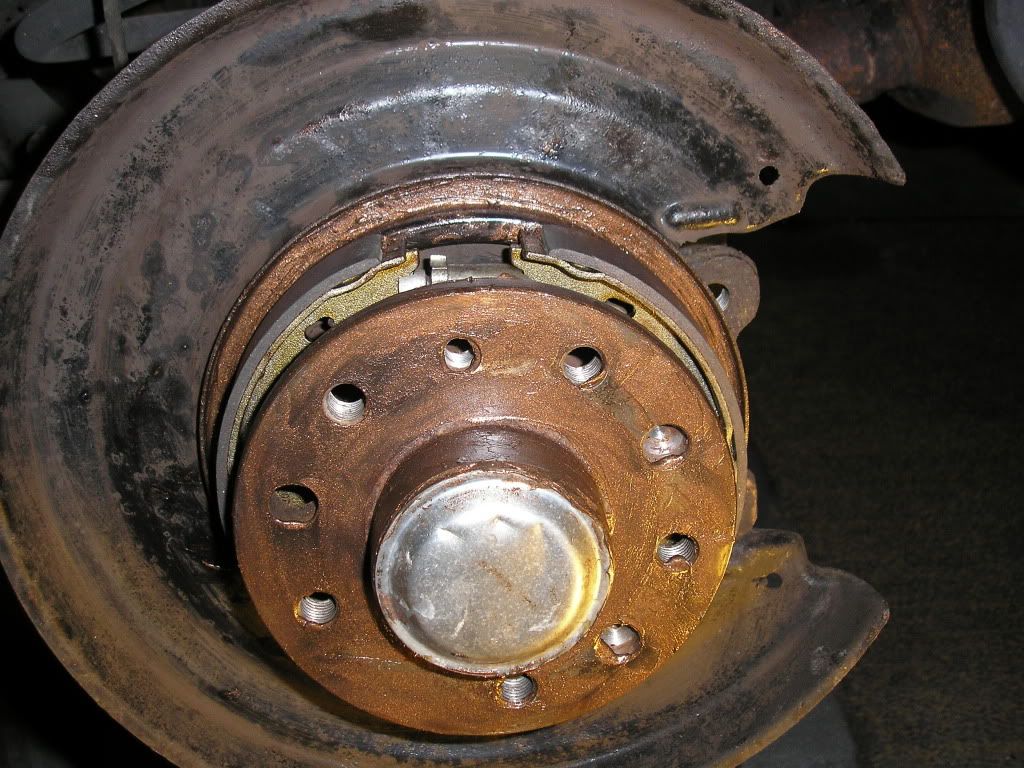
shoes done (eventually!)
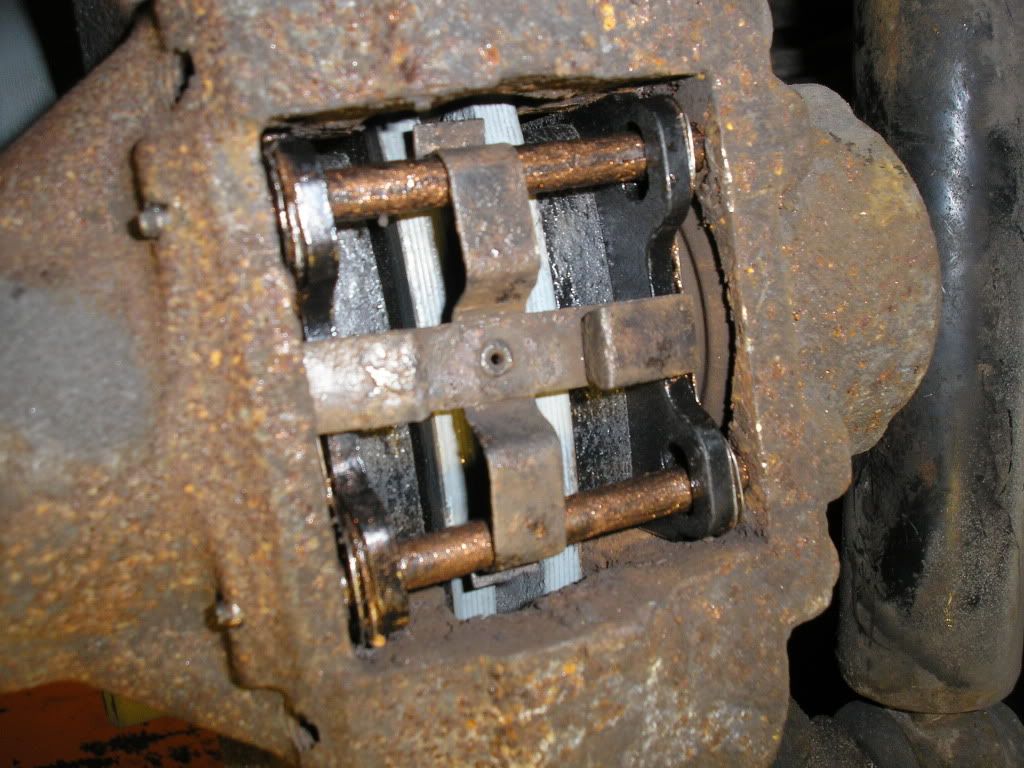


caliper on, pads in


Once your disc is back on, don't forget to wind the star adjuster through the hole in your disc untill the shoes bite the drum, then wind it off one notch.
Logged

sotmh

  • Intermediate Member
  • ***
  • Offline Offline
  • Gender: Male
  • london
  • Posts: 398
    • View Profile
Re: Getting her back to tip-top.
« Reply #24 on: 19 December 2010, 20:47:23 »

Well you've truly had an eppic time of this, however, it has been enjoyable and I look forward to further instalments. ;D ;D ;D :y :y :y
Logged

V6 CDX-er

  • Intermediate Member
  • ***
  • Offline Offline
  • Sheffield
  • Posts: 452
    • View Profile
Re: Getting her back to tip-top.
« Reply #25 on: 20 December 2010, 00:20:45 »

Next job on the list was to replace the cam-cover gaskets. the first step of this job is to remove the throttle body, plenumn and intake trumpet. You will likely need two tins of Carb Cleaner (or death spray as I now call it)


I used the above stuff. It's pretty good, but please, don't go using it in a confined area. Afterwards I felt like I'd got consumption and TB!

As seen as I was removing these anyway, now seemed like a good time to give them all a proper clean, as all of the above were caked in a carbon / oil residue sludge. Removing all of these is quite straight forward, with only two issues arising, (one of which I'll come to later on). The first issue is that some of the hoses that need to be removed are held in place with 'R' Clips, and I don't have the correct tool to remove these. What I did do was to cut them off with the angle grinder, and I'll replace the 'R' Clips with regular jubilee clips.

Throttle body first. A piece of cake, but you will require new gaskets for this, just like you will for the rest of the items which need to be removed. I bought genuine VX gaskets from my local main dealer, which came to quite an astonishing £63 including the Autobahnstormers discount  :o Yeah, I did feel like I had just been raped!

Having noticed the casting steps in the ports of the throttle body, and having read another members guide to porting said item, I thought I'd give that a go myself. First off I tried the Dremmel with sanding drums attatched, but this hardly touched it. I then tried some P60 sandpaper, but yet again, barely a scratch. In an act of desperation, I tried my heavy duty drill with a sanding stone on it. All this did was leave some very nasty score marks on the ports smooth surface, basicly buggering it up. I've since had to cheat and send the throttle body off to be machined properly, (at a cost of £45) as my attempts had made quite a mess of it  :(

Either through ignorance, stupidity, or stubburness, I decieded not to be put off, and also have a bash at smoothing out the casting steps in my plenumn and intake trumpet. Luckily these were a lot easier, (and clearly not made of Kryptonite).

There are a couple of Torx screws holding in place each butterfly on the throttle body. These need removing in order to clean the barrel properly, but just remove one at a time, or you'll have a right fight on your hands trying to get them back in without one butterfly in place to turn the arm that they are attatched to. Upon re-assembly, don't forget to use a little Loctite on the screws that hold the butterflys in place.

Here's the throttle body with one of the butterflys about to pop out. The machining / casting steps are quite visible on the left hand chamber.


And here are both butterflys, (I had to remove both as I was sending the throttle body off to be machined). One butterfly is clean, the other dirty.


Next up was the plenumn. Again, pretty easy to remove. To clean mine I used the death spray, (carb cleaner), along with one of these for getting in all the nooks and crannys.

Plenumn, (pre cleaning);


Alloy wheel cleaning brush. Perfect for cleaning the plenumn and intake trumpet;


The plenumn was not a pretty site, very gunked up;


And this too has some quite prominant casting steps on it;


Luckily these are a lot easier to remove than those on the throttle body, (casting steps shown on the right hand side, those on the left have already been removed with the dremmel);


And finally all cleaned up. I got rid of any swarf from filing out the casting steps by taking the plenumn to a mates garage, and swapping a four pack of Boddingtons for 30 minutes with their parts cleaner, finishing off with blowing it dry with the airline;


And don't forget to clean out the hole casting in the top of the plenumn.


Logged

V6 CDX-er

  • Intermediate Member
  • ***
  • Offline Offline
  • Sheffield
  • Posts: 452
    • View Profile
Re: Getting her back to tip-top.
« Reply #26 on: 20 December 2010, 01:19:57 »

Next up are the plastic breathers that sit atop the plenumn.

Dead easy to take off, and dead easy to clean out.

Here's mine looking very dirty;


No pics of after though (yet), as I forgot to take any. Sorry.


After that job it was the turn of the intake trumpet.

This did prove to be a little tricky to remove. Not in terms of access to any of the bolts, but there is a certain knack to persueding it to come out from between the 'V's of the cylinder heads. So a big thanks to Darth Loo Knee, dbug and tapper888 for their kind advice on the contortions needed to get the dam thing out.  :y

Once I'd removed the intake trumpet, it was obvious that someone had been here before me, as the base of the trumpet, (were it meets it's mounting plate atop of the bloke), was covered in this horrible yellowy / orange slimey sealent. with it being so dam cold in the garage, this soon hardened and was easy to peel off. The inside 'necks' of the trumpet were, like everything else on the induction / breather front, covered in heavy carbon / oil residue build-up. yet again, copious amounts of carb cleaner and the alloy wheel cleaning brush removed it nicely.

A few pics of 'before';

Old sealant on base;


Inside of necks pre cleaning;


And after.


Finally it's the turn of the breather behind the drivers side cylinder back. Follow the thinest black tube, (that you will have removed from the plastic breather that sits atop the plenumn), and it will end up at a metal (breather) box between the drivers side cylinder bank and the bulkhead. The pipe is a tight fit, and there isn't much room to lever it off, so it's just a case of slowly pulling and twisting untill it pops off.

When mine did come off, the breather hole below was quite mucky;


A good old squirt of carb cleaner, followed by poking the hole with a sewing needle, folowed by more carb cleaner, and it's clear. I also gave the pipe I'd just taken off a good squirt as well.

To re-attatch the pipe, as seen as it was such a tight fit, I poured a little boiling water into a cap from a tin of brake cleaner, and left the end of the tube to be re-attatched to the metal breather box to soak for a few minutes. This allows the rubber pipe to become softer, allowing it to slip on a lot easier.

It is advised that after cleaning out your breathers and intake system, especially if so much crab cleaner has been used, to change your engine oil and filter before starting the car, as i understand that the chemicals in the carb cleaner can do a lot of damage to any plastic or rubber componants that they come into contact with in the engine.


Personally I'm planning on picking up a dirt cheap oil filter from Euro Car Parts, changing my oil, and then changing it again with decent oil and a genuine VX filter 650 miles later, (my Omega has 94'350 on the clock). I'll proberly try an engine flush as well.


The next job is the cam cover gaskets, but I've only done one side so far. I'll do a write-up on that once I finished the job.


Logged

Ian_D

  • Omega Baron
  • *****
  • Offline Offline
  • Gender: Male
  • York
  • Posts: 2432
    • View Profile
Re: Getting her back to tip-top.
« Reply #27 on: 20 December 2010, 08:54:12 »

Fantastic thread - very intresting read.

Love all the pics too.

Keep it up!  :y
Logged
[size=12]
LMF are utter rubbish - dont buy steering idlers from them! You've been warned![/size]

Boditza

  • Senior Member
  • ****
  • Offline Offline
  • Gender: Male
  • Craiova, Romania
  • Posts: 601
    • View Profile
Re: Getting her back to tip-top.
« Reply #28 on: 20 December 2010, 11:39:50 »

w8ing for the next operation you have in mind :)
Logged

sotmh

  • Intermediate Member
  • ***
  • Offline Offline
  • Gender: Male
  • london
  • Posts: 398
    • View Profile
Re: Getting her back to tip-top.
« Reply #29 on: 20 December 2010, 19:10:49 »

Realy enjoying this which I will be using as referrence.

 :y
Logged
Pages: 1 [2] 3 4  All   Go Up
 

Page created in 0.023 seconds with 18 queries.