Omega Owners Forum

Please login or register.

Login with username, password and session length
Advanced search  

News:

Welcome to OOF

Show Posts

This section allows you to view all posts made by this member. Note that you can only see posts made in areas you currently have access to.

Topics - VXL V6

Pages: 1 ... 6 7 8 9 10 11 12 [13] 14 15 16 17 18 19 20 ... 24
181
Hello,

I'm looking for the metal clips that stop the exhaust sliding off the rubber mounts - enough for a complete V6 system, also looking for a drivers side (O/S) projector headlight (non-HID) for a facelift with working adjuster.

TIA
Andy

182
Car Parts, bits For Sale & Wanted / WANTED: DTI exhaust bracket
« on: 26 March 2012, 13:43:32 »
Does anyone have the bracket that clamps the downpipe of a 2.2 DTi exhaust (Just by the flexi join) to the floorpan / firewall area, close to the Starter motor.

No Longer available from VX....  :'(


183
General Car Chat / Another Big Thanks to Loo-Knee
« on: 17 March 2012, 23:02:01 »
Wanted to say a public thanks and recommend Loo Knee to anyone who is looking to get work done on their car.  :y

Today was the turn of my DTi Elite, after trashing a set of Lemforder wishbones (well the front bushes) within 10K the decision was made to fit a new pair but with polly bushes in from the start and while the car was up in the air it's rude not to whip the Cat off and remove it's internals (Cat not required fo Diesel on UK MOT test).

So many thanks to Loo Knee for all his hard work today  :y


184
General Car Chat / Re: 2.2 DTi Glow Pug Change
« on: 18 February 2012, 00:48:40 »
Great guide.  :y

One thing I would say (even though it's obvious when you do the job yourself) is to make sure that the connector caps are pushed fully home, they should click into place.


185
Sorry about the last post! I was a little confused!

I'm after a facelift O/S (drivers side) facelift standard (non-HID) headlight with working adjusters.

186
General Car Chat / DTi crank pulley locking tool
« on: 03 February 2012, 20:03:06 »
Sorry if this is in the wrong section but would anyone have one of these tools they can loan / sell me urgently?

Many thanks!

187
General Car Chat / Powerflex wishbone bushes
« on: 27 January 2012, 19:13:36 »
Was it ever decided where the cheapest / quickest place to obtain these?

TIA


188
Car Parts, bits For Sale & Wanted / WANTED: Facelift Bonnet Z157
« on: 26 December 2011, 19:27:28 »
As above please!

Ideally in excellent / good condition.  :y

Can collect if reasonable distance from Solihull.

Cheers.

189
Hi

Looking for a complete Passenger Wing Mirror for a Facelift (Non-Elite) in Petrol Blue - Z20 I think.

Many thanks

190
General Car Chat / Corsa D 1.3CDTi issue
« on: 03 December 2011, 18:33:59 »
Hoping someone may be able to help, I haven't read the codes yet (though no engine management light on) but my fathers Corsa occasionally won't rev past 4K, usually when under load (accelerating up a hill), can be hot or cold.

Just wondered if this was a common problem?


191
Maintenance Guides / Replacing 2.2DTi Crank Sensor
« on: 04 May 2010, 23:13:15 »
2.2 DTi Crank Sensor replacement

Symptoms

Usually the vehicle is fine until it reaches normal operating temperature then the classic symptoms are poor idling and acceleration coupled with no rev counter and the engine management light illuminated.


DTC codes raised

P1335: InjectionPump: no Engine Speed Input Signal from Control Unit
and sometimes P0725: Engine-Speed Sensor Input Circuit no Signal


Parts required

Crank Sensor - GM part no 90540188 - £29.40 on Trade Club (correct at time of writing)
2 x small cable ties


Tools required

8mm socket
E10 torx external socket
 Small / medium ratchet
Small extension bar (chassis / steering can get in the way)
Trolley Jack and axle stands


How to

This is a very simple job (certainly not as fiddly as the V6 crank sensor), in fact the hardest part of the job I found was to remove a couple of the undertray fixings that had rusted.

Ensure the handbrake is engaged, the car is in 1st gear and the car is on level solid ground,  put a couple of wedges up against the rear wheels and jack the car up at the front and support on axle stands.

As always, ensure that the car is stable and secure before proceeding to perform any work underneath.

Drop the undertray off (8 X 8mm hex headed screws), you may find it best to try and spray some ‘plus gas’ on the screw threads  if they look rusty.

The crank sensor is located on the nearside (passenger side – UK) rear of the block and is secured by an E10 bolt. Remove the bolt, pull the sensor off and pop the new one on in it’s place and tighten the bolt to 8Nm.


Follow the old sensor cable up the side of the engine and carefully snip the two tie wraps off, run the new cable up the same route and fit two new tie wraps (I used some quick release ones to make it simpler if it ever needs replacing again).

From above, unclip the connector at the metal bracket by pressing the wire clip inwards and pull up.


Press the two plastic lugs and the old sensor plug will drop out of the metal bracket, click the new sensor plug into place and reconnect the connector from the engine loom.


Double check everything, refit the undertray (I dabbed the screws in some copper ease so that they will come off easier next time).

Lower the car back onto the ground and that’s the job done. I found the car idled a lot smoother than even before the ECU started to log the failure codes so I presume the ECU has a certain level of tolerance to the signals it receives and it’s only when the signals reach certain thresholds that the ECU can no longer interpret them.

192
[size=14]CCR2006 / CCRT2008 / NCDC2013 / NCDC2015 CD Autochanger failure[/size][/b]


The issues

As these units start to age and with the use of CD-R media (for which they were never intended) the 4 disc autochanger laser starts to fail (generally giving focus errors) or due to a faulty disc caddy the internal changer mechanism becomes distorted and unuseable.


Why can Phillips / Siemens / repair centres not fix it?

Unfortunately the laser units on these devices are no longer available and prove to be virtually impossible to purchase, this situation has arisen as Phillips no longer have their In Car Entertainment arm having sold it to Siemens who then dropped the Phillips products for their own.


The OOF solution

The affected units can be repaired relatively easily and cheaply, basically the units affected are developed from earlier single DIN size units and as such are basically a single DIN head unit attached to a single DIN cd changer (that was originally marketed as a Phillips or Siemens CDC3) and a double DIN facia attached to the front.

In order to repair your unit you will need to obtain either a CDC3 or another headunit with a working autochanger element. Don’t worry about the headunit or the facia being damaged or the wrong colour as they are not required.


But what about the security code / NCDx pairing?

Fear not! The element that the coding / pairing requires will be swapped so you will not have to decode or de-pair/pair the units to effect the repair and in the case of the CCR2006, you will simply have to re-enter your code when you return the head unit to the car.


The How To!

OK, so you’ve obtained a replacement autochanger, next you need to locate these tools:-

Double DIN removal keys (not cheap Ebay ones!)
8mm socket and handle / mini-ratchet
T10, T9 Torx bits and handle
Small flat bladed screwdriver
A spring hook or small long needle nose pliers

It’s also useful to have a bowl to put all of the parts you remove into and ideally to either work on an antistatic mat or at least ground yourself before attempting this repair procedure.
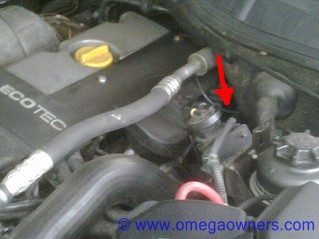
NB. The photo’s show the changer with the disc caddy in place, obviously you will want to eject the caddy when the unit is still in the car!


1) Remove your headunit from the car with your ‘quality’ double DIN removal keys, you will need to move the auto transmission selector to 1 to make enough room to extract the unit. To do this I suggest you pull up the selector surround, depress the catch at the top left of the selector mechanism then the selector can be moved without having to turn the ignition on…. Just make sure you have the handbrake engaged!

2) Now you have your headunit ready to disassemble, firstly remove from the rear the two 8mm nuts and then the joining plate.


3) Using a T10 torx remove the black Torx screw from either side at the front edge and the tin plate – mark which side is which!


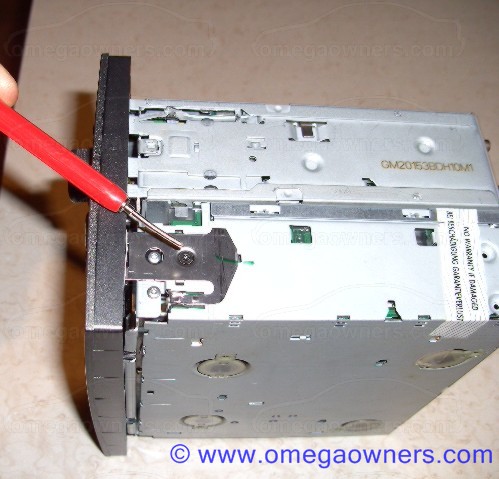
4) Using a T9 torx remove the two facia plate retaining screws from either side at the front edge.


5) Note: If purely swapping CD section, step 5 can normally be skipped.
Place the unit upside down and using the flat screwdriver gently lift the two plastic facia retaining clips and the two further plastic clips on either side while gently removing the facia.


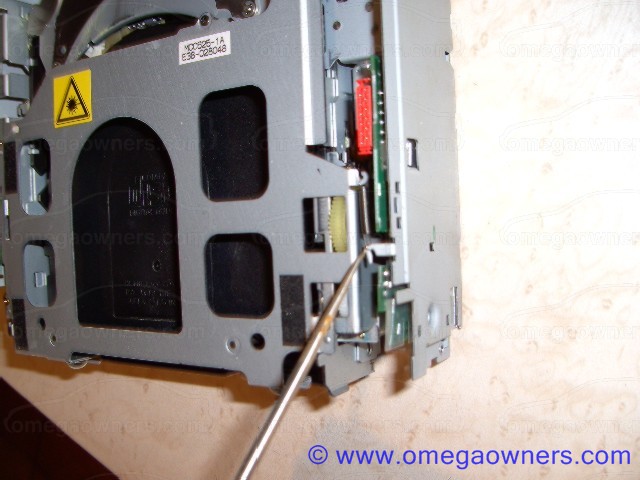
6) Using a T9 torx remove the two torx screws on either side,the CD autochanger should now be separate.


7) Very carefully remove the red ribbon connector plug from it’s socket on the autochanger


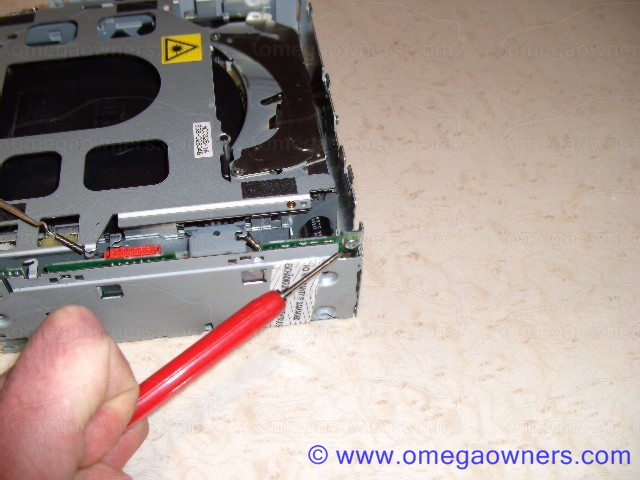
8) Using a T9 torx remove the two T9 torx screws from the rear of the autochanger that secure the lid then gently slice through the warranty sticker on the right hand side (I’m assuming that a) you have no warranty and b) if you are doing this you aren’t bothered about a warranty anyway!), you can now remove the lid.


9) Using the spring hook or the small needle nose pliers unhook and remove the spring that hooks from the right hand edge of the autochanger mechanism to the chassis (this is the spring that goes over the top of the upright printed circuit board.


10) Using a T9 torx remove the T9 torx screw securing the printed circuit board on the rear right hand edge and then gently manipulate the board out of the unit (it’s plugged into the main lower board), NB. The board is held in place by two metal clips, when refitting the board make sure that the board sits in the clips correctly.


11) You now have to get your replacement unit to the same point, if you have managed to obtain the single CDC3 unit used in other GM models (Astra / Vectra etc) then you obviously have slightly less dismantling to do!)


193
Omega Electrical and Audio Help / Trafficmaster loom
« on: 20 May 2011, 21:59:41 »
Is there a difference in the length of the loom between facelift and prefacelift?


194
Omega Electrical and Audio Help / Immobiliser issue
« on: 12 November 2010, 18:05:31 »
On the 3.2 Elite

Car has been sitting on the drive for about a month and now cannot start (Previously running fine with no DTC's).

Immobiliser lamp flashes when using either key, the battery voltage was low so I have popped another charged battery in but still have the same problem.

I cannot get Opelscanner to communicate with the immobiliser or the engine management ECU's (It previously could) so I cannot read off the codes from either....


195
Omega Electrical and Audio Help / NCDC/R GPS Antenna connection
« on: 05 August 2010, 22:26:35 »
Quick query, What connector type is this? MCX?

Pages: 1 ... 6 7 8 9 10 11 12 [13] 14 15 16 17 18 19 20 ... 24

Page created in 0.025 seconds with 17 queries.