Omega Owners Forum

Please login or register.

Login with username, password and session length
Advanced search  

News:

Search the maintenance guides for answers to 99.999% of Omega questions

Show Posts

This section allows you to view all posts made by this member. Note that you can only see posts made in areas you currently have access to.

Messages - Vega

Pages: 1 ... 4 5 6 7 8 9 10 [11] 12 13
151
Omega Electrical and Audio Help / Re: Aerial replacement F/L estate
« on: 15 December 2012, 08:20:41 »
First you have to find the right one.
Second yes they are, about £200 - £250.

152
Omega Electrical and Audio Help / Re: RAIN SENSOR RETROFITTING
« on: 11 December 2012, 08:39:17 »
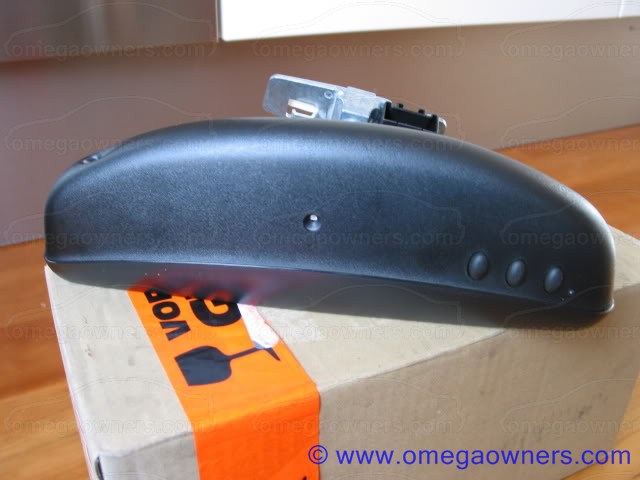
I will buy a stalk without dial and give it a try in the shortest time. As I understand, if I replace the stalk with the one without dial, no need to use an XC plug...Is that true?...
I will write down here about the progress...

No not correct, if you have a stalk with an dial and you replace it with a stalk without a dial have to make loop, the easiest way to do that is with an XC plug (or cut the wires and solder them together).

153
Omega Electrical and Audio Help / Re: Aerial replacement F/L estate
« on: 10 December 2012, 18:36:14 »
If you have the old connectors (FME) than you could use a Astra aerial.


If you have the new connectors (Fakra) you could use the Vectra C Estate aerial (ident HA)


The Vectra C Estate does not have a radio amplifier in the base, so you could have some less reception on the radio.


154
Omega Electrical and Audio Help / Re: RAIN SENSOR RETROFITTING
« on: 06 December 2012, 23:11:19 »
Thanks for your very helpful information and the pictures Vega...
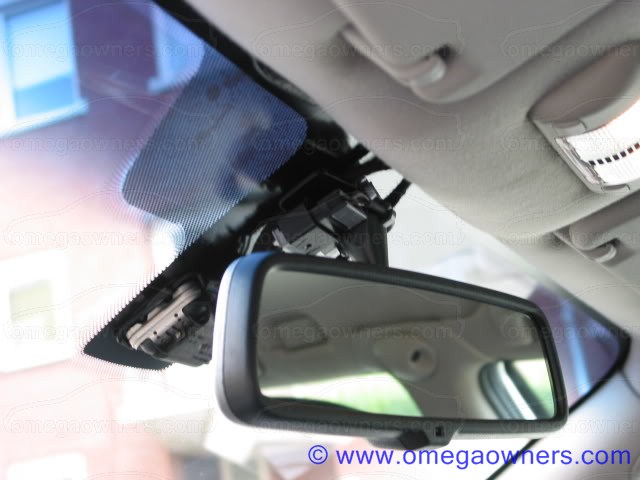
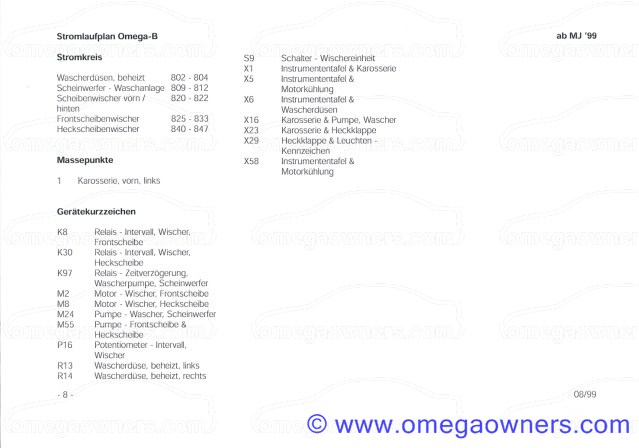
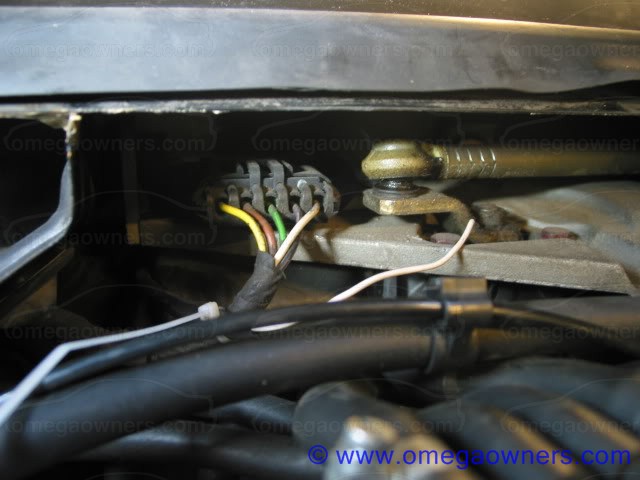
I have already fitted cabling from the rain sensor to the relays and wiper motor in line with the GM schematics. I spent much time with an Opel electrician yesterday but we could not make it.

Copied this from the maintenance section, can not reply there.

What was the problem? Its not so difficult.

Quote
At this stage, I just want to ask couple of questions:

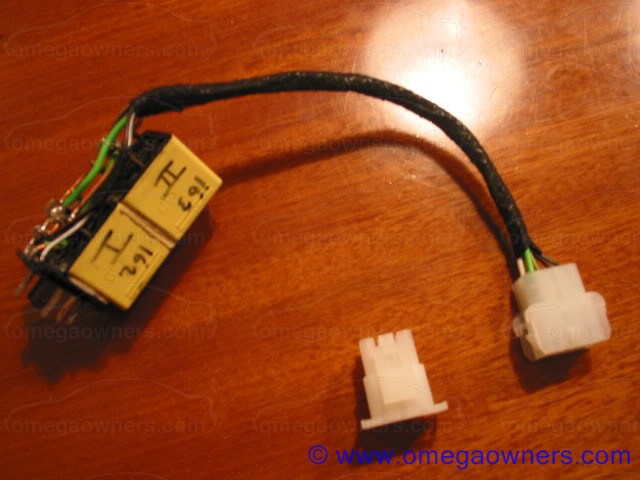
* I have a variable stalk and have to make some modifications on that, as I understand. So, could you please provide more details on the variable stalk modifications with the XC plug such as which cable goes to where exactly, if I want to keep the variable one instead of replacing with the standard one without dial?

You have to replace a stalk with one without the dial, because the rain sensor will receive his powered through this line, when you remove the old stalk and you do not want to cut any loom the easy way is to use the same plug, the XC plug in the fuse box is the same but you need to move the wires to a different position, to position 4 and 6.
The dial is a variable resistor and if the dial is in the wrong position the rain sensor will not work, because it will not get any power.

Quote
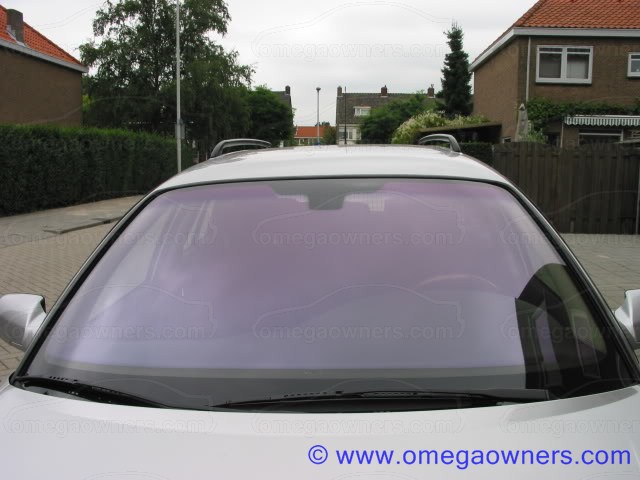
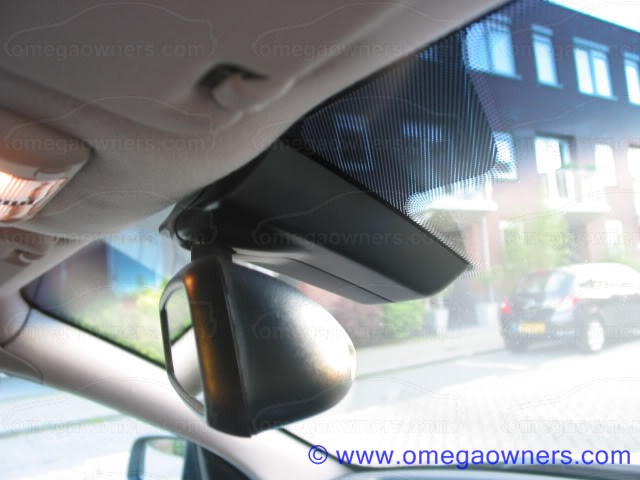
* Do I have to buy a new rain sensor type windshield or is sticking a darkening film or similar thing to hide a rain sensor enough for that?  Is replacing the windshield a must?

A normal windscreen does not have a bracket to hold the rain sensor, so you have to make your own bracket and use some kind of film to camouflage the rain sensor.

Quote
* Is there anything related to the "multitimer module"? Do I have to replace it with a multitimer module with rain sensor type or do I have to keep the original one in my car?

No, not related. Keep the one you have.

Peter

155
Omega Electrical and Audio Help / Re: Solar Sensor
« on: 17 November 2012, 16:22:27 »
Question

If you have a heat reflective windscreen fitted (where previously a normal screen was fitted) is the climate ECU supposed to have a little chat with a Tech II?

Had heat reflective screen fitted in the DTi now for about four months but never bothered to check before.

There is a difference in de code index for a normal and a heat reflective windscreen in the ECC.

156
Maintenance Guides / RAIN SENSOR RETROFITTING
« on: 31 October 2012, 09:35:45 »
Here is how I retrofit the original rain sensor in to a '98 Omega.

I replaced the  original windscreen for a windscreen suitable for a rain sensor and heat resistant.

Because the prefacelift models do not have this option you have to make the loom yourself.

The starters kit.
Auto dipping mirror for rain sensor. Two relays + feet. The rain sensor + plug. A new stalk. Trim.


New windscreen with rain sensor.


Auto dipping mirror.


Schema.


Adjusted for rain sensor.


I glued the two relays together and placed them on the base off the original wiper relays (take it apart).
In this way it is plug and play, if you remove this mod and put the standard wiper relay back you have normal wiper function.


Connection plug for the loom that will come from the rain sensor.


You have to make one extra white wire directly from the wipermotor.


The new rain sensor wiper relays.


Remove the old wiper relay and put the new one in.
.

New stalk.


With trim.


Supplement.
If you have a wiper stalk with a adjustable wiper wheel you have to make a modification.

Old wiper stalk.


You need a plug (it the same that is in the fuse box).

XC plug.


Place the wires in 4 and 6 for the right loop.

Peter

The original story (in Dutch)

157
Omega Electrical and Audio Help / Re: DRL relay
« on: 28 September 2012, 18:07:51 »
The DRL (in the red circle) is located at the A pillar above the locking ecu
Also you have to place F8 = 10A


In the fuse box there is the country plug.


If you move the loom from pin 5 to pin 2, the license plate lights will also go on.


Peter

158
Omega Electrical and Audio Help / Re: Remote key coding
« on: 16 May 2012, 19:47:31 »
Did you get anywhere with reading the dump?

No did not receive the programmer yet. >:(

159
Omega Electrical and Audio Help / Re: diagnostic
« on: 15 May 2012, 23:00:21 »
what is the best diagnostic tool to buy for my omega 2.0 xreg.

This

160
Omega Electrical and Audio Help / Re: Remote key coding
« on: 15 May 2012, 17:55:04 »
Yea, I have that problem anyway.
But doesn't matter, I think I can open the boot with the key I have, once I get it paired (I got a 3 button spare).
The biggest ball ache really is not having to take the key out of ignition, but the fact that if I want to put something in the boot I have to first get to the car, get in, then press the boot release button, then get out again, because my remote doesn't work :/

You will need the YP ident, than its possible to open the boot with the key in, just hold the boot release button for 3 seconds.
Or modify it with a TIS solution.

Ident release ES ES LT YP

161
Omega Electrical and Audio Help / Re: Recoding remote keys
« on: 12 May 2012, 12:47:52 »
I am not convinced  I still have the correct one though there are two Megamo types for mine one with alarm and one without he thought it is the one with, which I have bought

There about five different fobs.

Without alarm, Kiekert
2 button
3 button

With alarm, Megamos 1998-2000
2 button

With alarm, Megamos 2000-2003
2 button
3 button


162
Omega Electrical and Audio Help / Re: Remote key coding
« on: 10 May 2012, 08:42:24 »
So, this started to become hopeful, with Vega offering to take a look

Be patience, just ordered a new programmer, it will arrive within a few days.

163
Omega Electrical and Audio Help / Re: Remote key coding
« on: 06 May 2012, 14:28:38 »
Can you tell me where the eeprom is located, photo?
I can take look over here.

164
Omega Electrical and Audio Help / Re: lane change indicators
« on: 29 April 2012, 21:14:38 »
It is like this to give you an idea, this is not the PEKATRONIC module.


Put these wires on the windshield-stalk
    Contact 15 to 4 on the turn stalk
    Ground 31 to 6 on the turn stalk

Put these wire direct on the Turn-signal stalk
    Turn-signal 49a to 4 on the turn stalk
    Turn-signal right 49R to 8 on the turn stalk
    Turn-signal left 49L to 9 on the turn stalk
   
This is the turn-signal stalk S5.3


Like this.

Pages: 1 ... 4 5 6 7 8 9 10 [11] 12 13

Page created in 0.035 seconds with 19 queries.