Omega Owners Forum

Please login or register.

Login with username, password and session length
Advanced search  

News:

Welcome to OOF

Show Posts

This section allows you to view all posts made by this member. Note that you can only see posts made in areas you currently have access to.

Messages - CateraMV6

Pages: [1] 2 3 4 5 6 7 8 ... 41
1
Omega Gallery / Re: A few good shots....
« on: 02 January 2012, 06:46:37 »
Here is one after the first snow fall of the year...

350mi of hell... icy roads, etc.. .


Here are some vids too.

http://www.youtube.com/watch?v=c8e9VLVwry4

Good engine sound..
http://www.youtube.com/watch?v=es7zuLzFKEg
http://www.youtube.com/watch?v=EuCTiuQ2y_I

2
Omega Gallery / Re: A few good shots....
« on: 18 December 2011, 21:45:46 »
Rear spoiler was taken from a 05 GTO and paint matched so no paint was required.  They are available in the states although rarely in silver.  In the UK you can get one from the Vauhall Monaro.  I dont know how much it will cost ya but it should be reasonable if you find one at the scrap yard. 

I have 2 more but shipping will be outrageous due to the size of the actual part.

BTW here is one more...


Here is an interesting sticker I got recently... Kinda fits the area I live in.


3
Omega Gallery / Re: A few good shots....
« on: 15 December 2011, 15:16:01 »
I found the set rear and sides from a polish guy and back in the summer he quoted me 330Euro shipped to the USA... I think I may go through him and grab the set. 

In a mean time next summer I am thinking of trading a deck lid for one of the european ones from someone who owns a Omega too..

4
Omega Gallery / Re: A few good shots....
« on: 14 December 2011, 23:27:59 »
Thanks, I need to find someone to assist me with the purchase of the Rear and side skirts for the Steinmetz kit.  I guess they make it in poland or at least you can buy it from there. 

I hope there is someone on here that knows a bit more about it that can perhaps guide me for the best way to purchase and ship to the states.

5
Omega Gallery / Re: A few good shots....
« on: 13 December 2011, 18:59:47 »
Is it just me or are the pics not showing up?

6
Omega Gallery / Re: A few good shots....
« on: 13 December 2011, 13:27:33 »
Thats true, almost every 2/3 stops at a gas station someone comes over and  :o  Asks what kind of car it is, as they have never seen one.  The Cateras of this facelift style are quite rare.  Pulled some records a while back and found that only 1000 Sports were ever sold in 2001.  369 were in silver.  So its quite a rare car.

Waiting for some good snow on the ground so I can take some even better snow shots of her with the snow shoes.

7
Omega Gallery / Re: A few good shots....
« on: 13 December 2011, 03:14:01 »
Cady grill is hanging on the wall but if you really want it we can work something out. 

As for the front suspension I replaced the rear wishbone bushing with just OEM replacement one.  should last me another year or two.  Poly bush would have been nice but I dont know anyone that makes replacements for us.

8
Omega Gallery / A few good shots....
« on: 13 December 2011, 02:20:57 »
These were recovered from a crashed SD card in my phone... only images that survived from the car this year. 

Oh well.. .time for new ones...

Hope you like them.
Any suggestions are welcome.


The car from a Cars and Coffee Detroit, mini gathering. 

Night shots with Iphone.


And my favorite spot on a bridge near my house...


9
Maintenance Guides / Re: THROTTLE BODY PORT POLISH
« on: 09 March 2010, 04:55:06 »
Stage 2

This part requires removing of the plenum and the lower intake runners.

Once you remove the two bits, you mate them and you flip them over.

Take a look down through the ports and you will see the plenum is not exactly centered on the intake runners, so at this point you can shave some material off the plenum to even out the step.

Te less steps you have the smoother your flow will be.


10
Maintenance Guides / Re: THROTTLE BODY PORT POLISH
« on: 08 March 2010, 01:16:54 »
The two differen parts of this build were simplicity and ease of work...

Removing the manifolds on the V6 is next to impossible, and building new ones is the only way to go... not much you can do with the stock cast iron ones...

Where the intake side can get a few improvements by just shaving a bit of material here and there.


The screws are installed with locktite and they are in there quite snugly... I torqued them to a higher values then what the OEMs were...

The actual manifold has a few casting flashes left behind the TB which screw up with teh flow too... if you shave those down and you do the TB poring you are surely going to get a bit more air in the engine.... how much you may say, well maybe enough for 1-2hp, but its free and it helps the power band of the engine by smoothing those areas where air gets turbulent or just doest want to flow like just before 4000RPM...
.

I have been driving around super happy for the last 2 days, the WOT experiance has totaly changed the way the car breaths all the way to the red line.....  it used to fall on its face right at 6100rpm and now it still pulls all the way to red line...

I was impressed that such a little change can have that kind of effect.

I am planning on dropping the fuel injectors and FPR this week with the new manifold and I will report as soon as I figure out how to get rid of the EGR>..

11
Maintenance Guides / THROTTLE BODY PORT POLISH
« on: 07 March 2010, 21:19:42 »
This thread is going to cover how to free up some free HP from your engine.

These engines are produced in mass quanitites, and often the attention to detail is...  not that great.

To my surprise the build quality of our engine the X30XE is quite good, and everything fits perfectly but there is always room for some more.

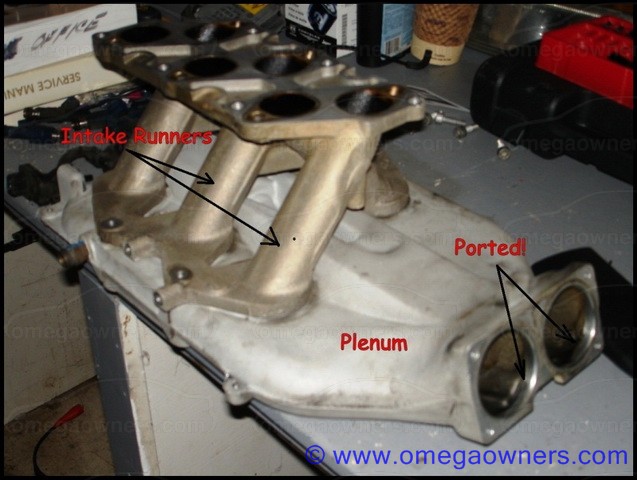
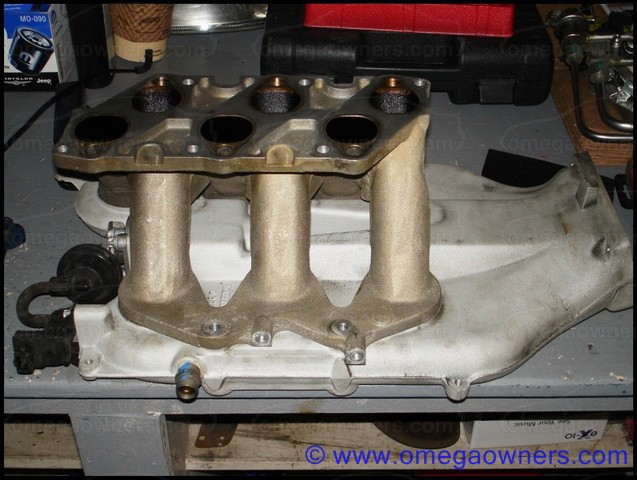
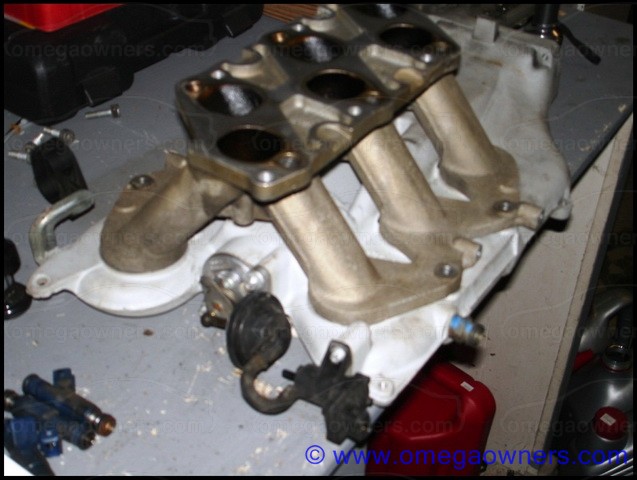
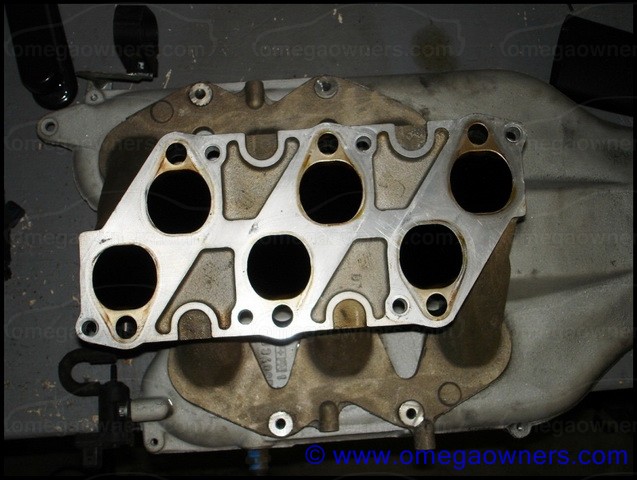
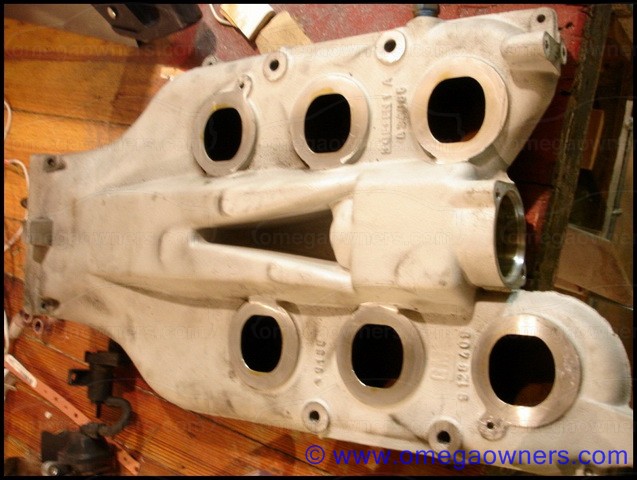
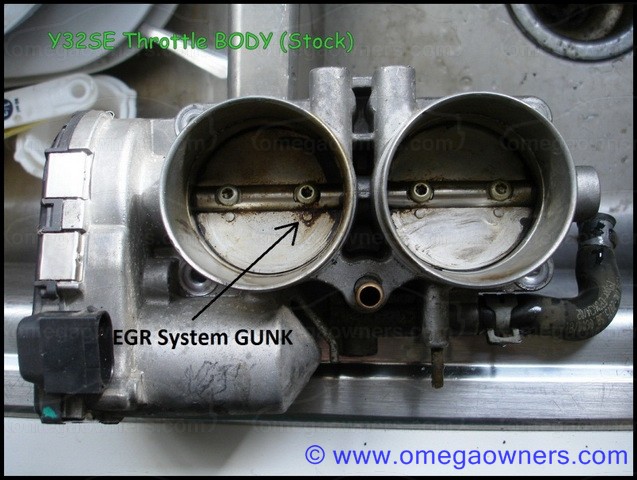
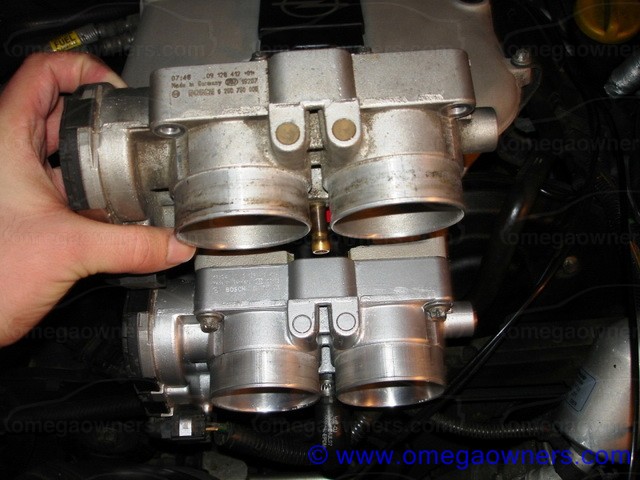
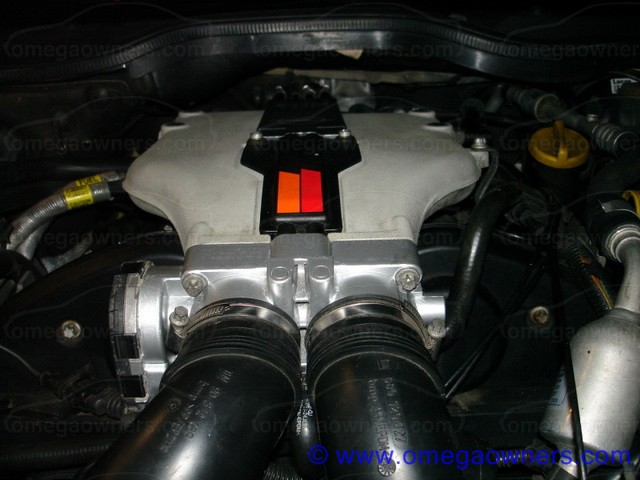
The parts I got are Y32SE Throttle body, and Intake manifold, combined with 3.2L Fuel injectors.
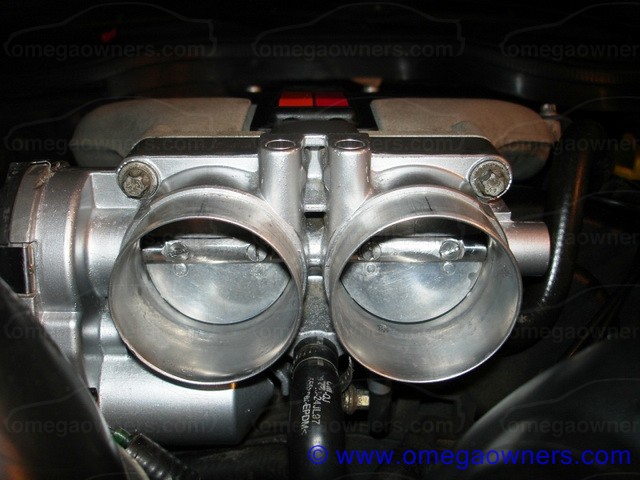
The throttle body has around 50K miles on it and as you can tell the EGR system sure got it dirty!


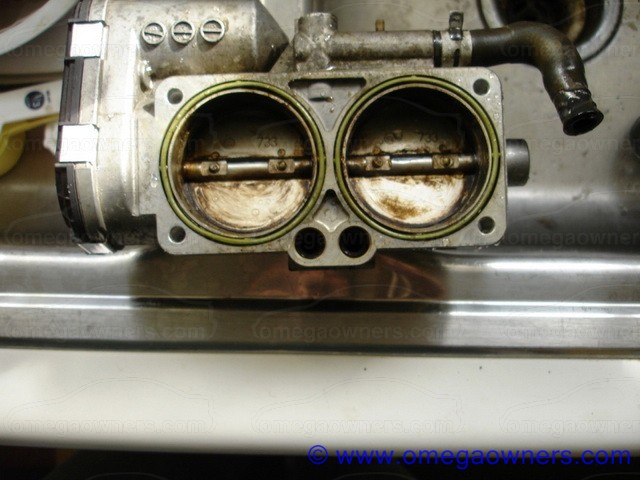
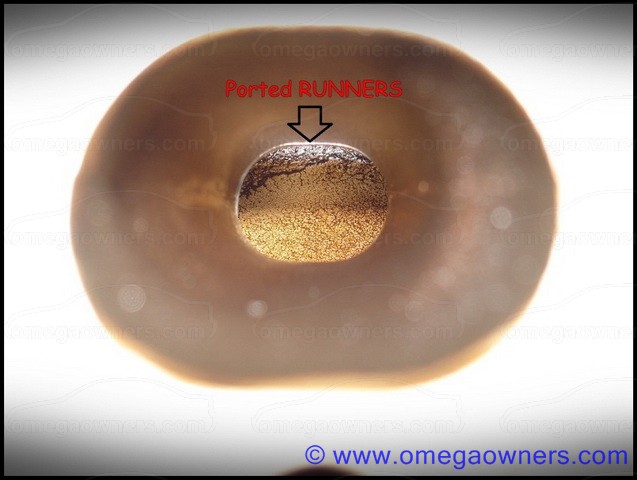
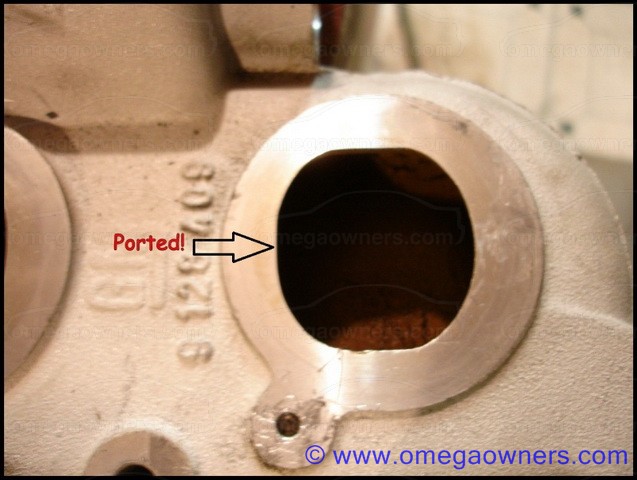
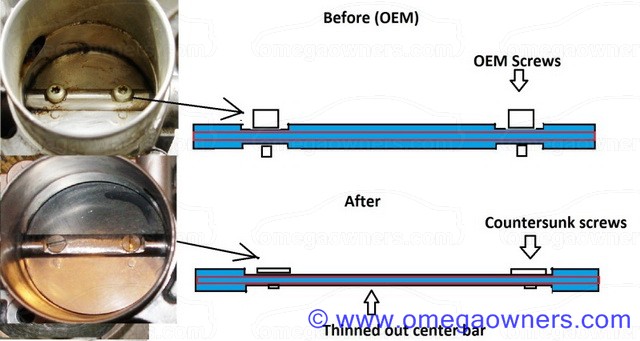
Each of the throttle plates, as you can see there is quite a bit of room to remove material from the center bar and free up some flow.


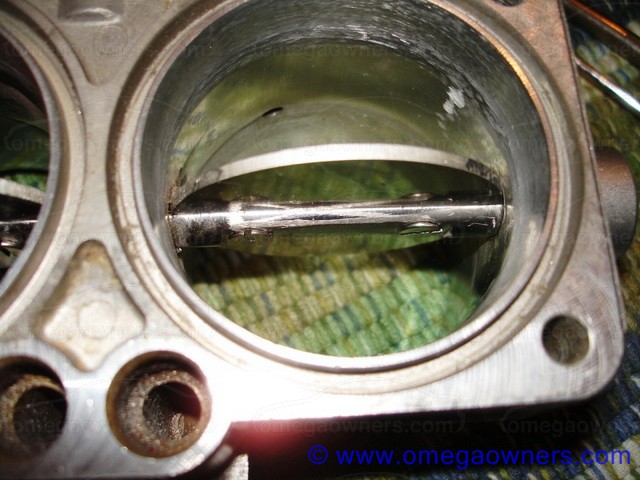
Here is the 1st stage of porting, I took 150grit sand paper, and a dremmel and sanded off the edge found inside the throttle body, I also opened up the front part so now its a smooth bore all the way to the narrowest part.


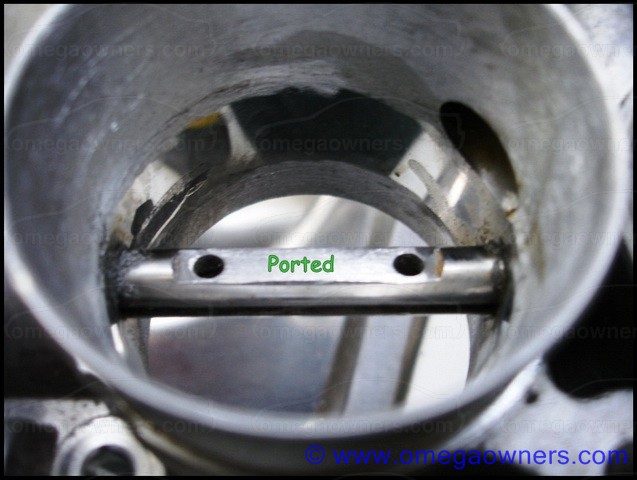
Next up, I need to clean both TB openings and move to a 600grit for a finer finish, and then finish it off with 1000grit.


1.  Installation.
You need 7mm and 8mm sockets. 1 wratchet, and a screw driver. 1 pair of needle nose pliers.

First you need to loosen the hose clamps from the rubber connectors between the Multiram and the TB, both are 7mm bolts...  Also disconnect the power connector to the TB.
Second rotate the trumpets around to gain some room around the TB.
Third, remove the 4 bolts holding the TB with the 8mm socket, they are star shaped but the socket works jsut fine.
Fourth, remove the two water hoses form the TB and spaw them on to the new TB.
Fifth, remove the vacuum line from the TB and swap it to the new TB.
Sixth, reinstall the new TB.  Reconnect the electrical connector.
Reinstall all the rubber hoses and tighten all bolts and lines.
Finally turn the ignition on for 5min, the TB will cycle to off-WOT-off and recalibrate itself.

Once that is done Ignition off, then ignition on, wait 3sec for the fuel pump and start your car, you should see 500rpm once the engine is warmed up.
Upon start up mine ran at 1100rpm until it got warm, so thats about 100rpm more then stock..
Once it warmed up it was fine though.

2. Test drive.

I got the car warmed up to 190deg and took it for a spin before and after the install.  My first impressions are drives like before, no issues, no hesitations, the fun part is when you git the high notes of the engine, somewhere north of 3500rpm there was a slight dead spot before the multi ram kicked in at 4000rpm, now with the new TB its a very smooth transition so I am certain that the car gained some power in that area.

Then the spring from 4000-6600rpm is just a blast, its stabbing power and very smooth and predictable output, and thats where the new TB job really shines.  To my surprise a fella with another silver Catera driving down one of the main roads, I rolled up next to him, gave him the thumbs up and he took off,, of course i followed him and messed around a bit, to my surprise I was pulling on him gaining 1/2 a car from 4000-6000rpm in 2nd gear, from a dead even roll... so you can imagine the TB and exhaust have a lot to do with the extra bit of power.

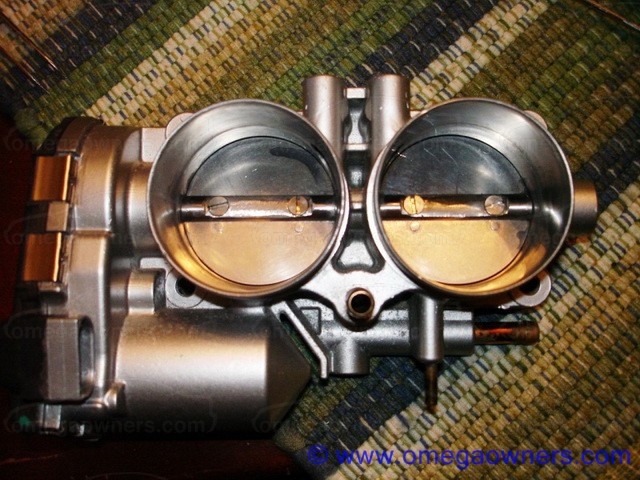
All and all it was well worth the trouble.  The TB took maybe 2hrs all together to port it with 60grit paper on a dremmel, then 150, 300, 400, 800, and 1000 by hand.  entire job can be done in less then 4hrs...
As far as power increase well its not much to feel it but it maybe good for 1-3hp... < FREE

With the ported manifold, and new fuel injector
s and FPR, i am expecting more like 5hp...  Last dyno showed 194-195RWHP, so if next time I get 200, I will be quite happy.


3.  Install Photos.


Here is a quick paint drawing explaining the actual porting of the TB.

I used the center rib to remove the most of the material.  The overall bore of the TB is the same as I didn't feel like creating a new throttle body plate which can get kind of complicated.
Instead the center rib had plenty of room for improvement and thats where you should look when trying to find more room for flow.

Also smoothing out the edges of the inner bore will help with the flow over the surface.


12
Omega Electrical and Audio Help / Re: xenon wiring help!
« on: 26 March 2009, 13:12:35 »
Sorry to bring this old post from the dead... but I got a question on the wiring of the Motors...

THere is the:

Brown
Yellow/Brown
Yellow...

Which one does what...

I assume the Brown is (-)
Then the other two are (+) and depending on which one you power the motor spins one way or the other causing the lights  to go up and down...

Question is which one is which? and am I correct on the wiring order?

I need to make these work with a manual switch on the dashboard and I am trying to figure out how...

THanks.  

 :o IP

13
Omega General Help / Re: LARGEST Front Brake ROTORS?
« on: 07 December 2010, 01:08:16 »
Are teh A8 and the ML rotors similar to the oem ones... because I paln on using the GTO/monaro pad brackets... and they have to line up with teh rotors perfectly...

14
Omega General Help / LARGEST Front Brake ROTORS?
« on: 05 December 2010, 08:10:52 »
I am trying to find the largest front brake rotors that can be purchased that would sit where the current ones are but would allow for larger caliper to be used.

I have a pair of GTO brakes ready to go but they use a  315mm front Rotor...

OEM rotor on the Omega is 296mm...

Question is...is there another car out there like the Vectra or Astra that carries such a rotor but is close enough in dimentions that it would fit the Omega without the rotor surface moving too far in or too far out?

Anyone have any input on this?

15
Omega General Help / Installing 3.2L Injectors on my 3.0L
« on: 26 February 2010, 21:32:07 »
My question is this, I came across some 3.2L Injectors from the Y32SE, and was wondering if installing those on my 3.0 X30XE Engine with some Throttle body Porting will increase HP in any way.

If the fuel pump provides same PSI to the injectors and the pulse is the same then the injector should squirt just a bit more fuel.

Correct me if I am wrong but is the 3.2L injector rated at 240cc/min while the 3.0L is only 225cc/min?

I believe that if I can manage to get some more air past the throttle body and match that with just a bit more fuel, the car should still see AFR of 14.7:1 and everything else should remain unchanged.

Please let me know if those injectors are compatible with the system.

Also would this really work or will the ECU simply adjust the values and bring back everything to stock making the entire deal one very worthless experiment.

Pages: [1] 2 3 4 5 6 7 8 ... 41

Page created in 0.047 seconds with 16 queries.