Omega Owners Forum

Please login or register.

Login with username, password and session length
Advanced search  

News:

Please check the Forum Guidelines at the top of the Newbie section

Show Posts

This section allows you to view all posts made by this member. Note that you can only see posts made in areas you currently have access to.

Messages - MV6Driver

Pages: [1]
1

I had to take the wipers and scuttle off to get easier access to the matrix heater pipes.

The heater inside the car wasn't working very well, so I had to flush the matrix.

I've put some photographs of it here:
http://www.omegaowners.com/forum/index.php?topic=111307.0

2
There was no difference between the air coming in to either side of the car. Also, I could feel the pipes leading to and from the matrix were hot, from the engine compartment side.

I decided to go for it and flush the matrix. Afterwards, I couldn't believe how hot it was! With the setting on 'HI' I cannot hold my hand against the vent for more than five seconds. Since I had a camera to hand, I took some pictures. I've posted them below.


Firstly, I had to remove the wipers and scuttle, as shown here:
http://www.omegaowners.com/forum/index.php?topic=111517.0


Then I followed Jimbob's maintenance guide for flushing the matrix, as shown here:
http://www.omegaowners.com/forum/index.php?topic=90620.0


The heater hoses look like this when they're attached and locked - you can see a coloured band:


When the outer sleeve is pulled back, it's unlocked and can be twisted and pulled away from the matrix metal pipes (I had to wrap it with a cloth to get a better grip):


There's not much space to get your hand in to twist and pull the hoses. I ended up with a few bruises.

To answer my own question, a tiny amount of coolant leaked out after pulling the top hose (less than 20ml), and no more than 100ml leaked out from the bottom hose.


Attaching a standard garden hose was the biggest and most time-consuming part of the whole exercise. Even with the ends softened with near-boiling water, it still took me about two hours to do this. One problem may have been that I was trying to do this with a stone-cold engine. As the matrix pipes were cold, the hose seemed to lose its flexibility as soon as I brought them together. If I was doing this again, I might try it with a warm (NOT HOT) engine. Anyway, here's what I ended up with:


As I'd read that I'd have to flush in both directions, I rigged up Hoselok connectors to make the job easier:


This is the pressure I set the water to for the first flush (basically to test the strength of the hose connections to the matrix pipes). I increased it once I was happy everything was going to hold together:


Here's the muck that was flushed out at the beginning of the first flush:


After about two minutes, the water ran clear. I then swapped the flushing direction. I continued to do this swapping-and-flushing about a dozen times. This picture shows the initial water quality after the eighth swap:


Once it flushed clean in both directions, I put everything back together. Job done!

3
Maintenance Guides / Remove wipers and scuttle - with photographs
« on: 28 January 2013, 22:50:39 »
After using this site for for yet another successful piece of Omega-DIY, I thought I'd give something back.

Removing the wiper scuttle is necessary for a few jobs. So, especially for newbies like myself, I've gathered together some photographs to show the various stages. Note, this is for an MV6 first registered in 2000.

Tools required:
* 13mm socket and ratchet
* Torx T25 screwdriver
* Torx T20 screwdriver
* Thin screwdriver

Difficulty: easy, one-person job
Time: 20 minutes disassemble, 20 minutes reassemble

(1) First, the wiper arms need to be removed. With the wiper arms flat against the glass, open the bonnet. Use the thin screwdriver to prise off the plastic caps covering the wiper arm bolts, then use the 13mm socket and ratchet to remove nut and washer. If the nuts are on really tight, hold the wiper arm to stop the wiper mechanism from being damaged. Do this for both wiper arms. With the nuts off, the wiper arms will seem to be stuck in position and cannot be lifted.


(2) Next, close the bonnet and lift the wiper arm. The wiper arms sit on tapered, ridged spindles and should lift straight off. This is almost never the case. Gently rock the fixed part of the wiper arm away from the windscreen to free it from the spindle. Some may suggest a puller is needed here, but violently wiggling on the hinge never fails.


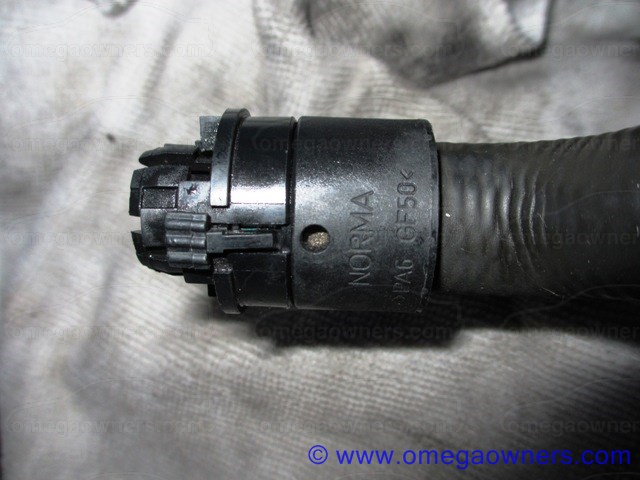
(3) Close-up of a tapered, ridged spindle.


(4) Next, remove the short driver-side and passenger side scuttle rubber seals, and the long seal running the width of the car. These just pull off.


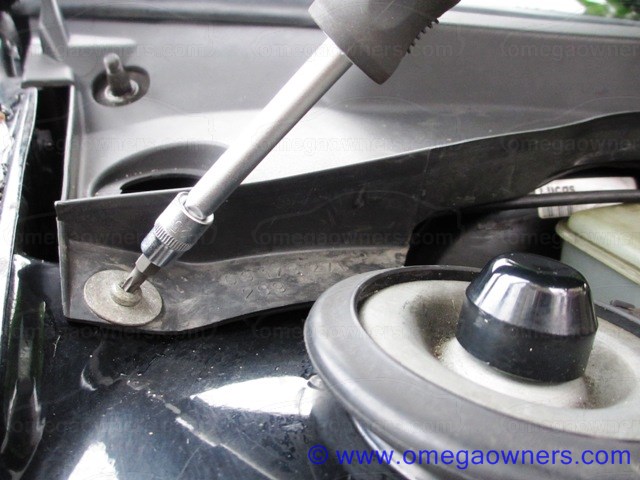
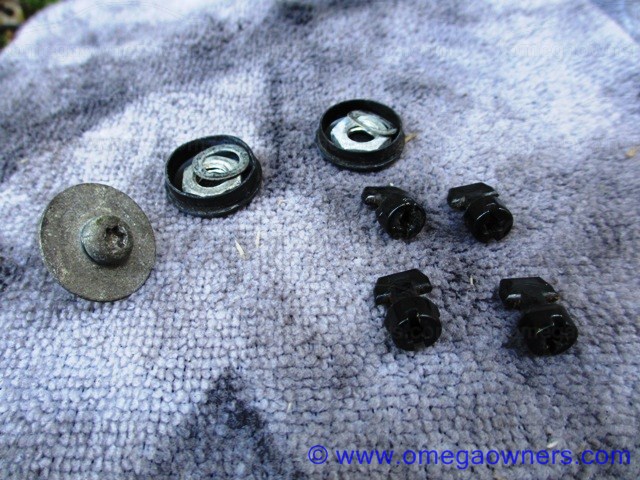
(5) Using the Torx T25 screwdriver, remove the screw and washer that attaches the scuttle to the wing.


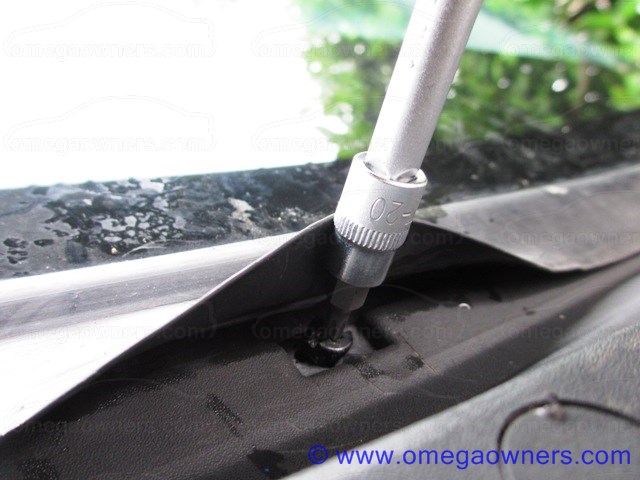
(6) Next, by gently lifting the rubber seal at the bottom of the windscreen, you'll be able to see small black 90°-turn fasteners. Use the Torx T20 screwdriver to remove these - they don't screw out, they just turn 90°. The driver side scuttle has five fasteners, and the passenger side has three.


(7) By now, you should have a collection of fixings as shown here (there should be eight fasteners).


(8 ) Next, remove the metal clips on the passenger side scuttle using the thin screwdriver.


(9) Now, both driver side and passenger side scuttles can be lifted away. Lift the driver side scuttle free from the tapered, ridged spindles.


(10) That's the removal completed.


(11) Reassembly is the opposite of disassembly. However, to make things easy, fit the passenger side scuttle first.


(12) Also, when fitting the driver side scuttle, gently run the thin screwdriver under the rubber windscreen seal to stop the seal becoming trapped under the scuttle.


(13) When fitting the wiper arms, note that the driver side wiper arm has a dog-leg on the lower part. Driver wiper on the left, passenger wiper on the right.

4

Yes, I used a countersunk-head chipboard screw. It wasn't so tight as to wreck the rubber L-shaped connector, but it also wouldn't pull straight out. The seal would have been made between the rubber connector and the countersunk head.

If I've to assume that all is well with the HBV, it looks like an attempt at matrix flushing will happen this weekend.

I've some questions regarding matrix flushing:

* should the wiper cowling be removed for access to the bulkhead connectors?
* the cooling system expansion tank is higher than the bulkhead connectors. Will it all drain out?
* how much of the cooling water will drain out of the matrix and the rest of the system before I connect the flushing hoses?

Thanks in advance.

5
Okay - tried the easy one first. I pulled the vacuum line off the HBV. It was a minor struggle for about 10 seconds, and it made a slight sucking sound for about 2 seconds as it came away.

I then took the car out for a hard drive to make sure the engine was fully hot.

No joy - the heater is still giving luke warm air.

Before I embark on the matrix flushing exercise, how can I tell if my HBV is stuck 'in the wrong position'?

If it was stuck in the wrong position, all the hassle of the flushing would be a waste of effort. And I might not get all the bits back the way I've found them!

6

I've got a 3.0 MV6, first registered 2000.

I've read quite a few of the posts regarding heater matrix flushing and disconnecting/replacing the heater bypass valve. I'm not too handy, so I'd like to get this fix right, first time.

Symptoms/observations as follows:

* the engine seems to work fine, with the temperature gauge reaching around 90°C after 5 minutes normal driving
* the coolant level in the expansion tank is up to the cold/kalt level - none is getting lost
* all the air con 'routes' work fine, i.e. air can be directed to the windscreen, footwells, dashboard, etc
* the auto/off air con manual reset causes clicks and buzzes for around 10 seconds
* there is no difference between the air temperatures for the driver and passenger sides
* the fan blows freely, both in auto and speeds 1 to 9
* the hose to, and the hose from, the passenger compartment bulkhead gets warm
* the heater used to work fine - I've no idea when it started to 'not work fine' - I've had no recent work done on the car
* the air from the heater is barely luke warm, at best
* the air from the heater does not seem to get any hotter/colder with changes to the fan speed
* none of the approx 2mm diameter vacuum tubes have any sign of damage/wear
* the heater bypass valve is between the engine and the passenger compartment bulkhead - I do not know how to tell if it is opened or closed

I'd be grateful for any advice on how to find out what's wrong with my car.

Ta.


7
Omega General Help / Misted front fog lamp
« on: 05 April 2009, 20:52:33 »
I've got a 3.0 MV6, first registered 2000.

My driver side front fog lamp seems to have misted up with condensation. I've looked through the maintenance guides, but I don't see how the lens is removed. The handbook says I've to put the car into a dealer.

Does anyone know how to get the lens off?

8
Why would they have been deleted?

Can anyone remember if the photographs were originally posted?

9
Newbie Welcome Area / Problem downloading some of the pictures
« on: 29 March 2009, 14:36:57 »
Hello to everyone. What a brilliant site! I wish I'd looked here a while back - it could have saved me quite a bit of cash.

However, I've got a problem. I don't know if it's something to do with my browser (Microsoft Internet Explorer 7), but some of the pictures in the maintenance guides don't download.

Here's an example (removal of centre console):

http://www.omegaowners.com/forum/YaBB.pl?num=1212562967

Am I doing something wrong, or have these pictures been deleted?

Pages: [1]

Page created in 0.048 seconds with 17 queries.