Omega Owners Forum

Please login or register.

Login with username, password and session length
Advanced search  

News:

Welcome to OOF

Show Posts

This section allows you to view all posts made by this member. Note that you can only see posts made in areas you currently have access to.

Messages - Matchless

Pages: 1 2 3 4 5 6 7 8 [9] 10 11 12 13 14 15 16 ... 106
121
Omega General Help / Re: Air conditioning pump
« on: 02 April 2011, 20:22:50 »
Sounds like the bearing in the pulley.
In theory they can be changed without removing the compressor, a special puller is used to withdraw the complete pulley and the old bearing can then be pressed out. In practice there is very little room to get the puller and re-insertion tools in there. Try your local a/c specialist, they should have the tools to do the job.
In the short term you can fit a shorter aux belt, missing out the a/c compressor....either listed as V6 without a/c or (I think this is correct....a 2.0 with a/c will fit).

122
Steering code index is 008 for normal assistance as far as I remember.

The symptoms of tacking down the motorway and not improving with tightening the damper matches my experience. I even set the damper so tight it wouldnt self centre and the play was still there.
It sounds to me like one of the torque sensing valves on the input shaft / worm is stuck or leaky. A box swap will fix it but try a fluid change first.

Box swap is fairly easy by omega standards, drop the RH exhaust down-pipe and make a careful note of how the old box comes out.....you will need to reverse the twists and turns exactly to get it in again and its heavy on the arms if you end up faffing about to get it in place.

Balljoint to the centre tie rod will be the hardest bit, I had to use the two-hammer method. Dont even think about pulling the pitman arm off..it wont move.

123
It also sounds as if your steering box isnt centred properly, there is a 'high' spot on the sector which must be centred on the mid-point of the worm for mimnimal play in the straight-ahead position.

There is an alignment mark on the box case and input shaft which sets the centre position for the box. (very awkward to see in-situ...need mirrors); you then fit the column to the box (one master sline to set alignment) and the steering wheel should be straight....move the steering wheel on the splines if not. Now when you drive the car, if the steering wheel is off-centre get the wheel alignment done properly which should reset the steering arm lengths and result in the box 'tight spot' being back in the centre position again.

124
Chris,
had a similar problem with my steering box about a year ago, no play in the linkage and tightening the damper didnt help.
In the end I changed the 'box.
On dismantling the old box there was no play between the worm and nut or between nut and sector shaft. The only lost motion was between the input shaft and the worm.....the shaft isnt solid, it allows some movement which operates the hydraulic valves to provide assistance.
I guess one of the valves was stuck or leaky, I seem to remember there being more assistance in one direction than the other.

You could try a fluid change to see if new fluid can flush out any dirt or deposits in the valves.

What level of assistance is your 'box programmed for? Have you had the steering stiffened-up using Tech 2 at some point?

125
Omega General Help / Re: Handbrake adjustment
« on: 23 December 2010, 10:26:26 »
Maintenance guide here: http://www.omegaowners.com/forum/YaBB.pl?num=1152564750


It sounds like the handbrake hasnt had any maintenance or adjustment in a long time.

126
Omega General Help / Re: Broken headlight adjuster
« on: 26 December 2010, 15:50:11 »
97 can have early or late headlamps iirc. 96 definately has the earlier type with full ribbing on the lenses, late 97 definately has projectors but early 97??

Are you sure it has HIDs? with the high voltage pack on the back of the lamp? or is it just projector lenses with halogen H1 bulbs?

If the broken adjuster is black plastic (look for bits or use a mirror to look up into the top of the lamp through the hole in the back) then the metal adjuster should fit. If it is a white adjuster then you have the earlier lamp and the metal replacements will be too long. I have some spare white adjusters if you need one.

127
Omega General Help / Re: Heater flap thumping...
« on: 09 December 2010, 12:11:28 »
Try this Tonka:

steady acceleration up a hill for as long as possible then come off the throttle completely....if the heater goes thump as you close the throttle then you have a vacuum fault.

Likely culprit is a faulty non-return valve on the heater vacuum tank (beside pollen filter) or a hole worn in the pipe from vacuum tank to the bulkhead. Other possibilities are dislodged pipes behind dash but unlikely unless you have had the glovebox or centre panel out recently.

128
The bolts are fairly big diameter so I would be trying to centre punch them and drill a pilot hole to get an extractor in. Removing the engine would be a last resort unless there is damage to the crank from the loose drive plate wobbling around.

Just seen you last post...if the holes are damaged it probably means a replacement crank / engine. :'(

129
Omega General Help / Re: crank oil leak
« on: 03 December 2010, 13:17:08 »
Cambelt has to come off so need locking & timing kit.
Check your oil pressure sensor is OK and the engine breathers are clear before condeming the front crank seal.

See similar thread here: http://www.omegaowners.com/forum/YaBB.pl?num=1290628831/0#11

Its about time I wrote a guide for this job.

130
Omega General Help / Re: Crank seal replacement
« on: 03 December 2010, 13:13:54 »
Once the centre bolt is loose the sprocket is a sliding fit on the crank....no need for pullers.

131
Omega General Help / Re: Crank seal replacement
« on: 02 December 2010, 12:32:38 »
Thanks Henry :y

132
Omega General Help / Re: Crank seal replacement
« on: 02 December 2010, 12:20:39 »
I didnt explain very well,

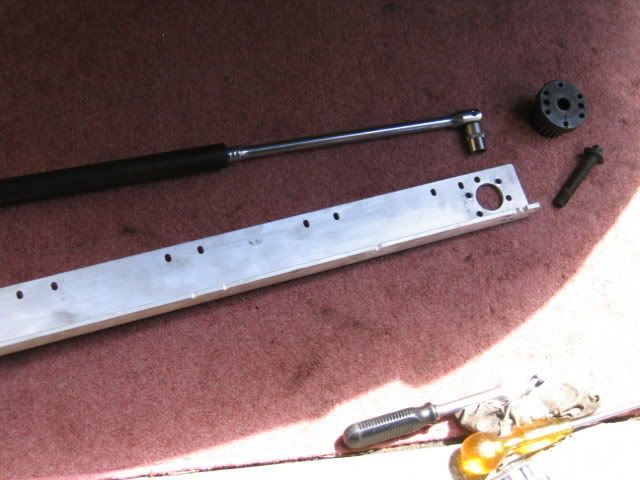
The crankshaft sprocket is keyed to the crank and is held in place by one central bolt.
The aux belt pulley bolts to the crankshaft sprocket with 6 M6 screws.

You remove the aux belt pulley then bolt your angle iron etc to the crankshaft sprocket using as many of the 6 holes as you can. I took a paper rubbing of the bolt hole pattern and use this to drill all 6 holes plus a large central hole in a piece of angle. (the 6 holes are not symetrical)

The crankshaft sprocket will only fit back on in one position so no worries there.

I will have to look up the bolt torque setting..I dont think 250Nm is right. You do need a new bolt....you can feel the bolt stretch as you put the angle tightening on.

Found a pic of the sprocket, bolt, angle, breaker bar and essential scaffold tube:

133
Omega General Help / Re: Crank seal replacement
« on: 25 November 2010, 13:39:34 »
Quote
My question is, once the belt is off, what else do I need to do to replace the crank seal? Will I have to drain the oil and take the pulley of then just fit new seal?

The cambelt sprocket has to be removed to change the seal and because it is made from a sintered material (metal powder pressed into a mould at high temp) it need special care.

You have to bolt a long bar or piece of angle to the sprocket using the aux belt pulley bolt holes. Use this bar whilst removing the centre sprocket bolt (v.v.v.tight). Do not use an air hammer, do not lock it in gear and wallop it etc, you will shear the keyway off the sprocket.
Once the sprocket is off you can lever out the old seal. Now pull out the spacer / sleeve that the seal runs on, turn it back to front and refit it. This gives the new seal an un-worn surface to work on.
Replace the sprocket and fit a new sprocket bolt (it is a stretch bolt). Restrain the sprocket with the angle iron as before and tighten the bolt to 250Nm then a further 60 degrees. (check this...its a while since I did one)
Ideally its a job for two people.

134
Omega General Help / Re: urgent lead layout
« on: 24 November 2010, 13:13:01 »
The arrangement you have will work OK. There are 3 separate double-ended coils within the pack so the 1-4 coil can be connected to plugs 1 & 4 or 4 & 1, it doesnt matter if they are swapped. (if you see what I mean) When plug 1 is fired, plug 4 also fires, but since that cylinder is on the exhaust stroke it has no effect.
Best to make the leads match up with the numbers moulded into the pack though, less chance of an error that way.

Edit, just re-read and realised your coil pack is fitted the opposite way to normal. I will shut up now.

135
Omega General Help / Re: 2.2 16v misfire
« on: 23 November 2010, 14:21:43 »
ECU is reporting injector electrical faults so that is where I would be looking. It does not need a camshaft signal to validate the state of each injector driver so the fault code is likely to be correct.

Check the connectors are pushed onto the injectors properly and that the locking clips are there (not some lazy bugger left them off previously) Look carefully at both wires to each injector, has one snapped?
Check the earth wires that attach to the fuel rail, are any broken, loose or corroded.
Follow the injector loom back, looking for any connectors, i think the 4 pot goes direct from the injector to the big engine loom connector by the battery so should be OK but I have seen broken / corroded wire on the V6s big injector plug & socket.
If the fault code has moved from #4 to #3 that suggests a bad earth or loose connector.

Pages: 1 2 3 4 5 6 7 8 [9] 10 11 12 13 14 15 16 ... 106

Page created in 0.031 seconds with 17 queries.