Omega Owners Forum

Please login or register.

Login with username, password and session length
Advanced search  

News:

Welcome to OOF

Show Posts

This section allows you to view all posts made by this member. Note that you can only see posts made in areas you currently have access to.

Topics - hotel21

Pages: 1 ... 8 9 10 11 12 13 14 [15] 16 17 18 19 20 21 22 ... 57
211
It was supposed to be loon... Can we the edit button back please :y

Now well into the realms of repetative tedium.  ::) ::) ::) ::) >:( >:( >:(

It has been explained numerous times, some nicely, some not so nicely, that for technical reasons, it is not possible at this time.

Other than using capslock to SHOUT IT AT YOU ALL, can the greater masses PLEASE give the admin team a break?

When it can be safely restored, it will be.

And not before, howsoever often it gets requested.

Indeed, in the admin area, its been earnestly suggested that temporary banning is a viable option to get the point across.

Something has to get through to the OOF community.  Eventually......   :'(

212
General Car Chat / Another clean sheet
« on: 11 October 2011, 17:43:49 »
Took the big gold toyshop for its MOT today.  Another pass without advisories.

Braw!! :)

213
General Discussion Area / Oh cock......
« on: 04 October 2011, 13:55:48 »
The monitor packed up on my desktop pc several weeks ago and I had to press an old CRT back into service, once I blew the dust out of it.

On Sunday evening, turned the pc back on after a weekend away and it will not power up. Starts to make the correct noises. It fails each time after perhaps a second and a half and repeats. Guessing it's the psu I went to transplant an older one and failed at the first hurdle as they are incompatible connectors.

Looks like I will finally have to move from a desktop to a laptop. Anyone got thoughts on asus as a make?  Seems to be a few on offer at the mo with the i5 processor and fair ram and hard drive specs. Ta...... :y

214
General Discussion Area / Whats the attraction of the old site?
« on: 28 September 2011, 22:40:13 »
I look back at old OOF now and again since the change over and see assorted 'elevated' members still online there and remaining there for some time.

Why?

All is the same here and the search functionality is just as good, if not substantially better?

 ???

215
Maintenance Guides / Pic of Crank sensor/Eng No. location V6
« on: 28 October 2007, 16:37:14 »
Pic taken when doing a quick oil and filter change last week.....


216
Maintenance Guides / Fitting prefacelift cruise howtoo
« on: 17 December 2006, 16:57:28 »
Fitting cruise to a pre facelift.
Part numbers are:

Clutch switch 90458543 to chassis S1221920
Clutch pedal switch 90494519 after S chassis
Water pump bracket (cruise) 90469353 (not really the right part)
E-clip for cruise cable 11051532 (come in pack of 10)
Brake switch for cruise 9149766

Basic hand spanners and socket set as well as a cross head screwdriver are about all the tools you need.   The electrical wiring should already be in place.  

You will need to obtain a control stalk, actuator motor, mounting box, the control cable and the metal carrier end on the cable if your car does not have the additional hole for the cruise cable.  The standard ‘kit’ you find on E-bay looks like this.


The control stalk should look like this.


Note the extra buttons to I increase or set, R resume and switch O off the cruise.   Sometimes a brake switch is included in these assorted kits but not always.

You need to get the combined motor/control unit which is fitted under the bonnet, connect the cable coming from the motor to the throttle housing, then install the replacement stalk, and fit a new 4-pin brake switch (not always necessary, depends on your car) and a clutch switch.  


Wiring location

Normally on the offside turret top, plugged into a holder.


Fitting the control stalk    

Remove the control stalk cowling.   It's in two halves, separated horizontally.  The bottom half is secured to the car with 3 crossheads in triangle pattern underneath, the top half is secured to the bottom half with two crossheads on front face.   Screws are under plastic covers, not visible until steering wheel turned through 90 degrees to the left and right.  No need to remove the steering wheel as instructed by the Haynes manual.  The steering column adjuster stalk on the left side of the column unscrews to allow removal of bottom half casing.

Stalk and switch body slides out after pressing in side retaining clips.   Wiring plug held in with grey slide.   Remove slide and release plug.

Fit replacement stalk which has one extra little plug on a flying lead.  The additional socket is tucked away beside main socket.   Fit retaining slide and slide main switch body back in until it locates.

Re-fit cowling. Getting the rubber boots to locate properly can be a bit fiddly so take care.

Pedal switches

Access to the pedal switches can be achieved after the large foam sheet thing is removed.  The black plastic holding plugs need a quarter turn anticlockwise to remove.

Brake switches    There are two types.  

A 2 pin looks like this – VX part number 90460325 for petrol models (90458542/90563455 for diesel)


and


but for cruise operation, you will need a 4 pin switch – VX part number xzxzxzxzxz - irrespective of whether you drive a manual or an auto.  Some cars have a 4 pin switch as standard.  If you do, congrats!!   CAUTION - On all switches, there is a red plastic part that moves.  Check out the two pictures above.   This is like a locking mechanism which prevents the release of the locking tangs to allow the switch to be removed.   Take a look at the switches when in place and you will see similar.   These need to be moved outwards, away from the switch body, to allow the switch to be removed.   If you don't, the switch may well break and you will be far worse off.

Note the largish cylindrical bit nearest the connection.   If it looks like this, you are lucky, do nowt else in this area, other than the clutch switch, if manual.    It looks like this when in place.


Clutch switch wiring

The clutch switch wiring is normally taped up next to the brake wiring loom.   Its a white connector and two of the opposite corners of the plug are  'chamfered'.   This corresponds with the connection on the clutch switch.   When in place, it looks like this with the wiring connector beneath the bottom of the switch.


If you are fitting brand new switches ('cos the clutch switch is not fitted as standard and is as rare as rocking horse poo at the scrappies) then take care not to play with them before fitting.

CAUTION - There is a green plastic keeper fitted from the factory to prevent the depression of the switch prior to fitment.   Once removed there is a sort of ratchet mechanism in the switch so that, on first depression, it assumes a 'working' position.   If you play with it before fitting and do this early, it is an absolute bu**er to locate as the moving plastic bit (as in the two pin switch) moves, preventing the depression of the locking tangs.   Ask me how I know....

Brake switch fitting   

The brake switch locates in the furthest away (highest) of the two square cut outs on the brake

217
Omega Common Issues and FAQ / Normal V6 running temperature
« on: 08 February 2010, 17:23:39 »
Question - Just curious but why higher temperature on pre-facelifts?  Is there a correct running temperature?

Answer - Facelifts and prefacelifts actually run at the same temp (if you check with specialist equipment).  The markings on the gauge are in no way even close to accurate, particularly on the prefacelift - they are purely a guide.

Prefacelift Running Temperature


Facelift running temperature


The gauge is heavily biased to keep the needle around midpoint on the gauge - for example, on a prefacelift, that bit between 92C and 98C actually covers from around 85C to 110C in reality, as is subject to a 12s delayed average, so as to keep the needle stable, even if the true temp peaks and troughs...

Bear in mind that the engine temp is also proportional to the ambient air temp in that, if its cold outside, its probable the temp on the guage will be a wee bit lower.  Likewise, if its a blistering hot summer, the engine temp will rise a bit as the fans work hard to pass air through the rads.  Temp may also be affected with aircon on as the condensor radiator will dispate a shedload of heat - straight into the path of the main rad!!

All said and done, if the needle barely rises off the bottom of the guage then its possible that the thermostat is stuck open allowing too much coolant through the radiators.

If the temp guage needle sits at half guage or slightly less, then that is more or less 'normal'. 

If it climbs a tad above normal and is then brought back down by the fans cutting in then, again, that is normal.

If the temp rises a little when you use the 'eco' button that is also normal.  When you are using the aircon (eco off) then the aircon condenser (or radiator as its normally known) is getting coolant cooled by normal airflow, thus keeping it cooled further than 'normal'.....  ;)

If the temp continues to rise then the fans will cut from low speed to full speed to enhance airflow through the rads in an attempt to bring the temperature down.  In cases of emergency (motorway with no stopping places etc) then if the heaters are placed on high and the windows opened then you are further attempting to cool the system.

If it gets so hot that the red overtemp light illuminates then stop at the earliest safest opportunity and check the contents of the header tank.  Remember DO NOT remove the header tank cap when its hot and pressurised.  You WILL get hurt....   :o

219
Omega Common Issues and FAQ / Vauxhall paint codes, 1991-01 approx
« on: 21 September 2008, 14:49:47 »
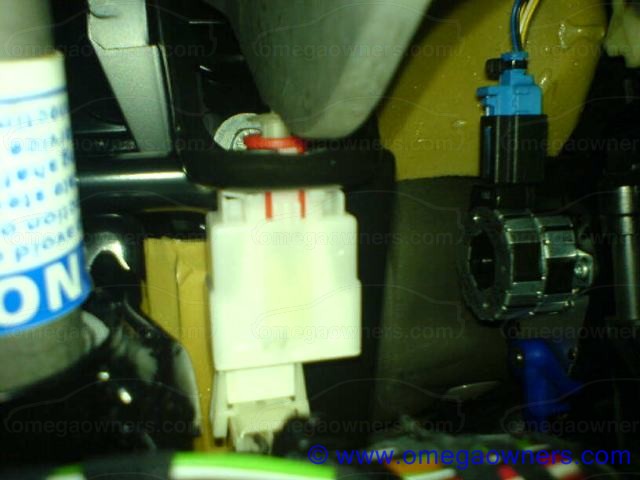
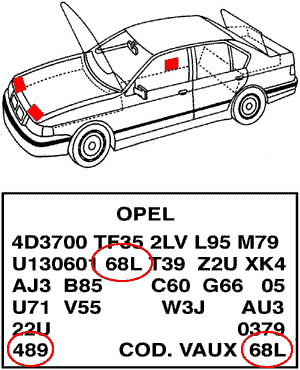
On Omega, code plate on drivers door lock pillar


031/38U,45U: Deep Sea Green (00-)
0389/11U,40A: Enamel White, Artic White (98- )
0719/??: Signal Red (98- )
0423/??: Aqua Blue (98- )
14U/??: Prata Escuna Met (00-)
16U/??: Branco Maler (00-)
18U/??: Preto Liste (99-)
20A/24L,20U: Aruba Blau Met [Bertone] (99-)
20C/87L,90U: Black II (00-)
20H/34L,36U: Nocturno Blau Met [Bertone] (99-)
20M/69L,77U: Petrol Met (00-)
20N/04L,80U: Breeze Blue Met (00-)
20Q/2BU: Prestige Blue (01-)
20R/2HU: Black Sapphire (01-)
20W/2QU: Black (01-)
20X/3DU: Midnight Black II (01-)
21U/??: Azul Ensearda Met (99-)
23U/??: Ink Blue (00-)
24U/??: Nordseeblau (00-)
30A/48L: Yellow Green Mica (99-)
34U/??: Azul Rivera (99-)
40A/03L,88U: Corn Yellow (00-)
40B/43L: Capri Yellow Mica [Bertone] (00-)
40C/2PU: Yellow (01-)
44U/??: Verde Regata Met (99-)
53U/??: Safrangelb (00-)
54U/??: Verde Esquadra Met (99-)
58U/??: Duene Beige (00-)
60U/??: Vincirot Met (00-)
73U/??: Vermelho Carena (99-)
74U/??: Poppy Red (00-)
75U/??: Vermelho Radar Met (00-)
76U/??: Vermelho Sonar (99-)
98U/??: Saffron Yellow (01-)
99U/??: Mandarin (00-)
112/50: Platinum Met (91-93)
114/82: Steel Grey Met (91-94)
119/83L: Mistral Grey Met (91-94)
125/85: Silver Grey (92-93)
128/86: Astrosilver Met (91-93)
132A/354,35U: English Green Met (97-)
137/87L: Rembrandt Silver Met (92-96)
138/88L: Star Silver I Met (91-97)
139/58U: Dune Beige (01-)
140/96L,964: Smoke Grey Met (92-97)
141/56L: Desert Shadow Met (94)
143/UX: Flint Grey Mica, Saturn Grey (94, 96)
144/86L: Magic Grey Mica (97-99)
145/85L: Stone Grey (95-99)
146/97L,97U: Olive Grey/Titanium Silver (96-)
147/82L,83U: Star Silver II Met [Bertone] (99-)
148/TC Diamond Silver [Bertone] (97-00)
149/92L Yukon Silver Met (99-)
151/94L: Mirage Met [Bertone] (99-)
152/09L: Meteorgrau Mica (00-)
155/54L,3KU: Moonland Met (00-)
157/2AU: Star Silver III Met (01-)
158/2FU: Oyster (01-)
161/2OU: Silver (01-)
162/2MU: Dolpine Grey (01-)
200/80L: Black (91-00)
208C/474,47U: Olympic Bronze Met (97-00)
234/16: Stratos Blue (91-93)
249/29: Monaco Blue Met (91-93)
251,273/27L: Cosmos Blue (93-97)
253/18: Nordic Blue (91-93)
255/14: Enamel Blue Met (92-93)
256/90: Black Starmist Met (91-93)
257/12: Laser Blue Met (91-93)
258,407B/AA: Blue Mica (91-93)
259/16: Halit Blue (92-93)
261/21: Haze Blue Met (91-93)
262/23: Baical Blue Met (93-93)
263/20: Cobalt Blue Mica (91-96)
264/15L,15U: Porto Blue, Breeze Blue (91-96)
265/19L,19U: Technical Violet Met, Silk Violet (91-96)
266,866/81L: Nova Black Met (91-)
267/UW: Saturn Met (91-93)
268/23: Admiral Blue Mica (91-93)
269/22L,22U: Kings Blue (92-)
270/24L,24U: Spectral Blue Mica (92-96, 00)
271/26L: Lagoon Blue Mica (93-96)
272/17: Miami Blue (92-94)
274/32L: Frost Blue Met (94-96)
275/30L: Aquamarine Blue (94-96)
276/31L: Lifestyle Blue (94-96)
277/33L,33U: Caribic Blue Met (94-96)
279/20L: High Voltage Mica, Aurora, Heliotrope Mica (94-)
280/UY,07L: Carbon Black Met [Bertone] (94-96, 98- )
281/??: Blue (94)
282/13L: Polar Sea Blue Mica [Bertone] (95-)
283/14L,14U: Nautilus Blue Mica (94-)
285/28L,28U: Atlantis Blue (95-)
286/29L: Ceramic Blue Mica (95-)
288/13,64L: Dove Blue Met, Magnetic Blue Mica (93, 95-99)
289/21L: Glacier Blue Perl (91-93, 98-99)
290/90L: North Cape Mica (96-99)
291/12L: Arden Blue Mica (96-)
293/25L: Premium Blue Met (00-)
294/23L: Europa Blue (99-)
296/X4: Lago Blue Met [bertone] (97-99)
298/83L: Midnight Black Mica (99-)
299/58L: Persia Mica (00-)
321D/094,09U: Canyon Red (97-)
339/32: Turquoise Met (92-93)
341/41: Silver Green Met (92-93)
349/30: Aquamarine Met (91-93)
351/48L: Emerald Green Mica (91-94)
352/31: Amazon Green Mica (91-94)
353/43,051: Florida Green (93)
354/33: Petrol Blue Mica (91-93)
355/36: Empire Green Mica (92-93)
357/37L: Neptune Turquoise Mica (94-96)
359/46L,46U: Jungle Green Mica (94-)
361/47L: Mint Green (95-99)
362/39L: Purple Rain Mica (95-96)
363/95L: Graphite Mica (95-97)
364/??: Lemon Green (96)
366/43L,43U: Bermuda Green Mica (95-96)
367/BH,DH: Sherwood Green Mica (95-)
368/67L: Iceland Met (96)
369/65L: Rio Verde Met [Bertone] (96-)
370/66L: Khaki Hell, Light Khaki Met (96-97, 99-)
371/36L: Apple Green (97-99)
372/??: Leaf Green Mica (96-97, 99-)
374/45L: Classic Green Met (99-)
375/44L: Forest Green (99-)
376/??: Rio Verde Met [Bertone] (97)
377/42L: Cypress Green Mica (99-)
378/RS: Canyon Met (98-99)
379/30L: Mambagrun (00-)
380/41L: Krypton Green Mica (00-)
382/80L: Ural Mountain [Bertone] (99-)
384/49L: Kiwi Metallic Red (00-)
385/89L: Graphite II Mica (00-)
386/02L: Fifties Green (00-)
387/32L: Jade Green Mica (00-)
388/06L: Space Green Met (00-)
389/31L: Verde Perl [Bertone], Carabo Verde (00-)
392/2EU: Fern Green (01-)
394/2LU: British Racing Green (01-)
395/3MU: Tundra Green (01-)
405/58: Soveriegn Gold Met (92-93)
423/24U: North Sea Blue (01-)
474/10L,10U: Glacier White, Casablanca White (91-)
475/56: Mustard Yellow (91-93)
477/57: Marble Beige (91-93)
478/52: Pale Yellow (91-93)
480/60: Chestnut Brown (92-93)
483/51L: Solar Yellow (95-96)
484/61L: Apache Orange Mica, Apache Mica (95-)
485/57L: Pineapple Yellow (95-)
486/??: Eldorado Mica (96)
487/11L: Colorado White (96, 99-)
488/53L: Light Curry Met, Brocade Yellow Met (96-00)
489/68L: Champagne Met (96-)
490/91L: Antelope Mica (98- )
491/63L: Siamese Beige Mica (99-)
494/51L: Sun Flower Mica (99-)
495/15L: Copper Met (99-)
497/05L: Aztec Gold Mica (99-)
498/JC: Hawaii Green Met (98- )
520F/31U: Fernmist Green Mist (99-)
535/76: Carmine Red (91-93)
538/77: Ruby Red Met (92-93)
539/71: Mexico Red (91-93)
540/75: Calypso Red Met (91-93)
541,408B/98: Red Mica (91-93)
544/74: Aubergine Red Mica (91-93)
545/73: Bordeaux Red Mica (91-93)
546,549/72L,72U: Baccara Red Mica, M****ille Red Mica, Satin Red

220
Omega Common Issues and FAQ / front suspension piccy (wip)
« on: 20 August 2008, 00:56:15 »

221
Omega Common Issues and FAQ / Sensors
« on: 30 April 2008, 09:27:38 »
The following covers the majority of the sensors etc across the Omega range but, that in mind, the comments shown below are mainly V6 specific.  The 2.0, 2.2 and deisel variants will be a little different in some respects.

Sensors
Crank shaft sensor - Can be problematic but, normally lasts for 100K miles
Cam shaft sensor - Not seen one fail yet
2 knock sensors - Only seen trouble with these when they have been physically damaged through carelessness.
Throttle pot - In theory they wear out but, not seen any hard evidence of this personally
Mass Air Flow (MAF sensor) - Uber reliable!
Air temp sensor - Never seen one fail
Coolant temp sensor - Very reliable, rare failure point
2 Lambda sensors - Very reliable, can be damaged by contamination

Actuators
3 Vac actuators (2 for multi-ram, one for air injection) - Only seen them damaged, not failed
EGR - very rare failure, normally possible to recover through cleaning.
Carbon canister solenoid - not seen one fail yet, could be damaged though.

Others
DIS pack - good for 100K plus and may last longer, tends to suffer from the iron core resulting so water leaks can cause failure.
Various relays - Uber reliable

Yes, there are quite a few but, only really one that causes an issue and that is generally good for 100K miles and if you consider a carb engine, the carb would be well buggered by that mileage!  
    
ECU's
Engine
Autobox (for the infirm)
Servotronic steering
Self leveling suspension
ABS
Airbag
Headlight leveling
Alarm/central locking
Radio
CD changer
Display
Instruments
Immobiliser
Sunroof
Climate control
Electric windows
Sat Nav
Traffic master
Seat memory

They all have thier own microprocessors.

Even some of the sensors have micros (i.e. the headlight leveling sensors!)

222
Omega Common Issues and FAQ / Flow chart - HG or Oil Cooler?
« on: 25 April 2008, 12:30:16 »

223
Omega Common Issues and FAQ / Tyre markings
« on: 08 October 2007, 23:27:18 »
With thanks from Tony at Wheels in Motion www.wheels-inmotion.co.uk and www.carbibles.com

Confused by the coloured lines and dots on your new tyres??  Read on...

All new tyres have visible coloured markings which form a radial band on the tyre.  They serve double purpose - who the tyres are intended to be made for if made by a secondary manufacturer i.e. non Goodyear/Bridgestone/whatever - as well as the softness factor of the tread wear face.  More importantly, they indicate how the constructional layers of the rubber are laid upon the carcase during construction which affects the eventual way the tyre will run whilst in use.


It's nearly impossible to make a tyre which is perfectly circular.   You would be hard pushed to actually be able to tell that a tyre wasn't round without specialist equipment.  Every tyre has a high and a low spot, the difference of which is called radial runout.  Using sophisticated computer analysis, tyre manufacturers spin each tyre and look for the 'wobble' in the tyre at certain RPMs.  It's all about harmonic frequency (e.g. the frequency at which something vibrates, for example a ruler on a desk edge or the Tacoma Narrows bridge collapse).  Where the first harmonic curve from the tyre wobble hits its high point, that's where the tyre's high spot is.  Manufacturers typically mark this point with a red dot on the tyre sidewall, although again, some tyres have no marks, and others use different colours.  This is called the uniformity mark.  Correspondingly, most wheel rims are also not 100% circular, and will have a notch or a dimple stamped into the wheel rim somewhere indicating their low point.  It makes sense then, that the high point of the tyre should be matched with the low point of the wheel rim to balance out the radial runout.

Once the rubber is laid upon the tyre constructional forms, it is 'vulvanised' in a mould where the soft rubber is cured into a useable tyre.  Integral with the vulcanisation process is the use of 'release agents' to ensure the rubber releases properly from the mould.  This is what gives a tyre its new shiny look but, more importantly, is what stops the tyre actually gripping the road properly until the shiny stuff is worn off.  Take care with your new boots until they wear in, normally a few hundred miles.

Once released from the moulds tyres are tested for various important balance/conformity factors.

The dots on the sidewall typically denote unformity (how circular the tyre is) and weight (where the heavy/light spot is).  It's impossible to manufacture a tyre which is perfectly balanced and perfectly manufactured in the belts.   As a result, all tyres have a point on the tread which is lighter than the rest of the tyre - a thin spot if you like.   It's fractional and you would never notice it unless you used tyre manufacturing equipment to find it, but its there.   When the tyre is manufactured this point is found and a coloured dot is put on the sidewall of the tyre corresponding to the light spot.  Typically this is a yellow dot (although some manufacturers use different colours just to confuse us) and is known as the weight mark.  Typically the yellow dot should end up aligned to the valve stem on your wheel and tyre combo.  This is because you can help minimize the amount of weight needed to balance the tyre and wheel combo by mounting the tyre so that its light point is matched up with the wheel's heavy balance point.  Every wheel has a valve stem which cannot be moved so that is considered to be the heavy balance point for the wheel.

But there is also important information held within those lines that most consumers and tyre centres are not aware of, in particular the position of the outer line (colour does vary).....


Depending on how the belts are positioned during construction imperfections will allow the casing and the tyre tread to 'run out'. This disparity allows the compression of the tyre to steer the tyre laterally regardless of any actions taken by the driver thus generate a pull.

The manufacture measures the degree of run out and marks the severity onto the tyre by the position of the outer band, typically the colour is Red or Blue, if the colour band is central then the run out is considered 0, if the band is toward the outer edge the tyre will need a 'reactive' partner to belay any pull. So the positions are vital to you and your car.

Realising this problem then it's easy to conclude if the tyres are symmetrical in tread construction, if the tyres are asymmetrical or directional then the centre will need to find a suitable match with an opposite reactive lateral partner.

Imagine the effect if you get two directional tyres where, after reading the above, you now know that both are meant to be fitted to the nearside.  One will be fitted correctly as regards rotation direction and run out, whilst the other side will be correct in rotation but incorrect in runout potentially causing the car to track or fall to one kerb or another....

So next time you buy tyres have a look for the banding and decide what match you want.  Remember most centres will have no idea of your request due to misunderstanding and lack of knowledge so you need to be wise.  Your turn to tell them, not the other way round.....   :y

224
Omega Common Issues and FAQ / Calibrated Speedo picture
« on: 15 August 2007, 10:50:17 »
For the assistance of those who are shopping for a new 'Meega and perhaps unfamiliar on how to spot ex-Police vehicles, here is what a 'calibrated speedo' as fitted to Police and some military vehicles looks like.  Accompanied by the general lack of a sunroof, its one of the first give aways to show previous Police parentage.


This particular speedohead is from a pre facelift.  

  • There are either 1 or 2 mph increments instead of 5 mph.  
 
  • This particular one reads to 160 mph.  Some only go to 155 mph.


  • Perhaps most important, the calibration sticker which has a certificate number upon it and the white screen printed 'Calibrated by I.R.S. Limited Nottingham' on the actual face of the dial.  
Dont get caught out by the one or two previous owner descriptions.  Forewarned is fore-armed!!

B

225
As title.

Replaced the solenoid in the drivers door lock mechanism yesterday and all appeared quite well.

Mrs H21 went to the shops in the car this morning and returned, telling me that the drivers seat adjustment is u/s.  Drove the car later and it certainly is.

Checked the fuses (5/30 amp for the seat) and all appears OK.  Indeed, the front passenger seat works as it should.

Plugged my phone into its charger (powered from the rear aux socket) and its rubber ducked as well.  Plugged said charger into the front socket and all working fine.  Checked fuse 14 which covers the power sockets and all good.

As far as I can see, everything powered from the door connections are working so all should be OK?  Likewise, powersounder is working OK so nowt appears amiss there.

Anyone any ideas?    :-/

signed

Confuddled from Scotland....

Pages: 1 ... 8 9 10 11 12 13 14 [15] 16 17 18 19 20 21 22 ... 57

Page created in 0.051 seconds with 17 queries.