Omega Owners Forum

Please login or register.

Login with username, password and session length
Advanced search  

News:

Search the maintenance guides for answers to 99.999% of Omega questions

Show Posts

This section allows you to view all posts made by this member. Note that you can only see posts made in areas you currently have access to.

Messages - Eyal2002

Pages: 1 [2] 3 4
16
Omega General Help / Re: Fault code 15 - Struggles to start
« on: 21 September 2021, 20:31:53 »
I don't know about lower thermoswitch, I don't have it (2.6L), or if it is indeed one (maybe temp sensor?).
Anyway the 3-pin one is controlling the fans. Again, make a temporary U-shape from a metal clip, unplug it and short the ground to any of the others. You can send a temporary wire from the battery negative terminal to each one of the three, two of the wires should respond by turning the fans on, and if so then the one not responding is the plug's ground.
Note that as this is always a live plug, if you short it with a paperclip and fans are on then it can deplete your battery after a good few minutes. And of course always EXPECT the fans to kick in, so before troubleshooting clear them from wires, tools, fingers etc.

17
Omega General Help / Re: Fault code 15 - Struggles to start
« on: 21 September 2021, 18:30:47 »
The thermoswitch activates the fans that are on the radiator towards the engine. When looking at the radiator from the engine side the thermoswitch plug is visible. If disconnected, the plug (2 or 3 contacts) can be safely shortened with a paperclip or wire (one is ground, other wires receive that ground for half/full fan speed). If all is healthy (fuses etc) then the two said fans should kick in regardless of key/ignition position.

18
Thanks for all tips, I think I start from rear discs as they are badly corroded and should be changed anyway due to MOT in Nov. -21. My prop shaft was off some years ago due to change of rear crank seal. I believe it is correctly fitted but could you explain how it should be; three bolts in gear and diff. If one of the three in diff side point down should one of the three point down also in hear side or what this fig is showing to me. Explanation needed please.

OK, typed here is same for diff and gear sides, but focus on diff:
Connect donut to diff, and as the photo shows bolts go into donut and diff entering towards rear of car (so nuts come from back). As you hold the rubber donut, identify the three 2-hole pairs (thicker area for each), and have one pair point towards the floor/road. Put a bolt through the LEFT hole and into the diff, secure loosly for now with a nut. I assume the car is rear jacked or in a lift. Rotate the rear wheels and again do the  LEFT hole to diff for the other two 2-hole pairs. As you look at the donut, prop bolts always go to the RIGHT hole when the thick donut area point downwards. Not that with the prop to donut mating the bolts enter behind the donut so the nuts in the prop connection are holding the prop (study the photo closely).

I installed my prop on and off many times, always with the car lifted (not jacks). This way gear was in Neutral plus the rear would spin by hand (easier than try to rotate the diff by hand). Also, it was impossible to insert the donut-to-prop bolts from the rear unless you find that sweet spot where it is possible, I would say  when you face the donut, it is in its 4 o'clock position IIRC. To tighten I use a spanner to holt bolt/nut behind the donut and in front I used 1/2" air impact wrench with 2 long extensions to get a down angle if exhaust is intact (and often a friend on the spanner).
Lastly, try use paint or white correction fluid to mark 3 lines on one of the prop to donut mating and two lines for diff to donut, for future reference.


19
Milwaukee do an 18v cordless in their M18 range that delivers 1356nm of tightening torque. It also delivers upto 1898nm of nut loosening torque when required. Fantastic piece of kit, and if you shop around it can be bought with a charger, case and two batteries for less than £395. You have to check you are ordering the correct one though - there are similar models / nos that look the same but aren't as powerful...but they are one hell of a cordless impact wrench.

Amazing kit. Prob too much for me. I wish I had started with Milwaukee, but I have a huge collection of Ryobi and they fit my needs (plus an army of batteries  8) ).

20
Hi Nick,
I was very much hoping someone would say that.
Thank you.
If you were doing it, would you blitz it (within reason) with an impact wrench or try with a longer lever?


I would, and do, use a suitable torque wrench.
You would need a seriously good impact for this; the ordinary 1/2" air tool or <£500 cordless won't be enough

Just got the Ryobi P261 18V One+ 18 Volt Li-ion 1/2 Inch Impact Wrench (to my Ryobi family) on Amazon, great price and these have true 406 Nm unlike the chinese model claims. Recommended.

22
Had same issue, took many parts to replace but the solution wasn't a part at all. Same "whole car" vibration even in N, and definetly under accelleration.
As it turned out, the prop rubber at each end connect to diff (back) and gear (front), and when they were replaced the mechanic connected them "wrong", and I will try to explain.
The rubber doughnut has six holes arranged in 3 pairs (It is worth checking this, everyone, all you need is a flashlight), and the rule is as follows: Front or rear, when you flash light on that rubber coupling, look at the botton 2-hole pair (thicker area), the prop shaft must connect to the right hole (ie NOT the left). Sounds like a silly observation? well, looking at other cars, and some YouTube "expert" mechanics videos, many miss this rule and connect the prop shaft bolts to the left whole in each 2-hole pair (again, when pair facing down towards road). It looks fine, but generate vibrations and leads to accelerated failure if these rubber couplings. I know some OOF members will see their propshaft connected wrong. BTW that mechanic said he didn't think there is a difference with regards to which hole to use... I have photos if someone is interested.

23
I initially bought 6x9 Pioneers and put in matching boxes I bought for cheap. Placement is on rear shelf fit exactly behind rear headrest. Sound imaging is far better with speakers high rear as opposed to low in the rear doors...
Current mod is an actual wooden box I built to fit exactly between headrests and rear sun screen. If you visit Israel I will give for free you the 6x9 boxes I initially bought... 8)

24
Omega Electrical and Audio Help / Re: front door speaker
« on: 05 September 2021, 04:30:44 »
A good replacement is a component set, as long as you can secure the provided x-over box in the door securely (not hard).
In my car I initially put a component set where the woofer/mid where a replacement for the factory speakers and the tweeters went near the windshield (x-over boxes installed in the trunk).
Later and current mod was Pioneer 6x9s in the front doors - sounds amazing but required cutting openings in the door (in the metal and door cards), but is well worth it. The Pioneer set has are very good even with stock radio (mine are amped).

25
Omega General Help / Re: Vacuum hoses
« on: 02 September 2021, 01:38:21 »
Good news - Both Multi rams work!!!
In fact, since the rebuild of the vacuum system everything worked, but...  As per the "Vauxhall College" document, there are expected RPM points in which you expect the Multi ram to engage, however these points are not correct for the 2.6L and thus misleading.
Starting with the rear MR, it works only above 4100 RPM, and ALWAYS turns on at that RPM when testing (a person steps on the gas while I flash a light at the actuator). This constant response confused me as the front MR NEVER WORKED no matter what RPM WOT etc., even though vacuum, solenoid, wiring, all verified OK separately.
So tonight I plugged a voltmeter in parallel to the front MR solenoid, put it under the wipers facing driver seat - and went for a ride in only 1st and 2nd gear:


I wish I had a better way to document with a picture, but here's what happened: Every time I accelerated HARD the front MR got full voltage, and it was seen in as low as 2800 RPM. Under very slow or no acceleration it was off. And of course, the biggest confusion - never works in parking. So the only easy way I came up with is to test it under driving load, and clearly the results are way different than the "Vauxhall College" explanation of Multi ram, and I can only assume the 2.6L/3.2L has totally different Multi ram operating schema.

Does anyone has actual ECU "rules" for the Multi ram in the 2.6L?

I thought my car is fantastic because the rear MR got fixed and working - turns out they both were. Hard to believe a 20 years old car accelerates and drives so smoothly. Thanks for all who helped!

26
Omega General Help / Re: Vacuum hoses
« on: 01 September 2021, 02:31:05 »
Got it!!! (sleep is overrated :o 
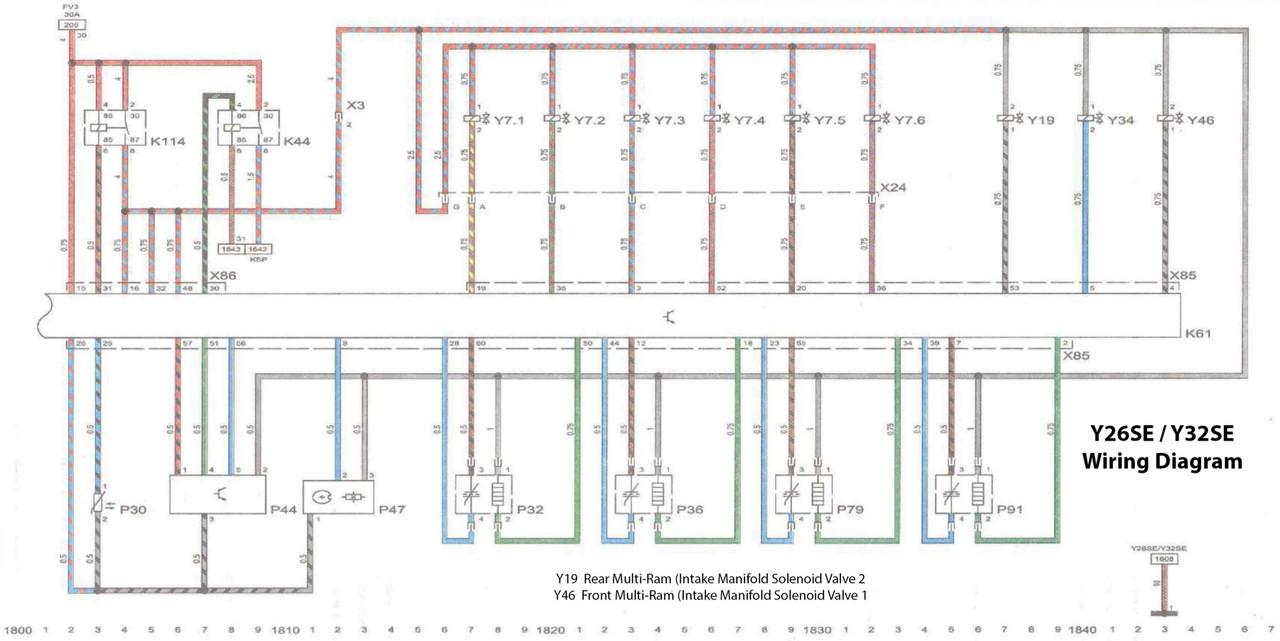
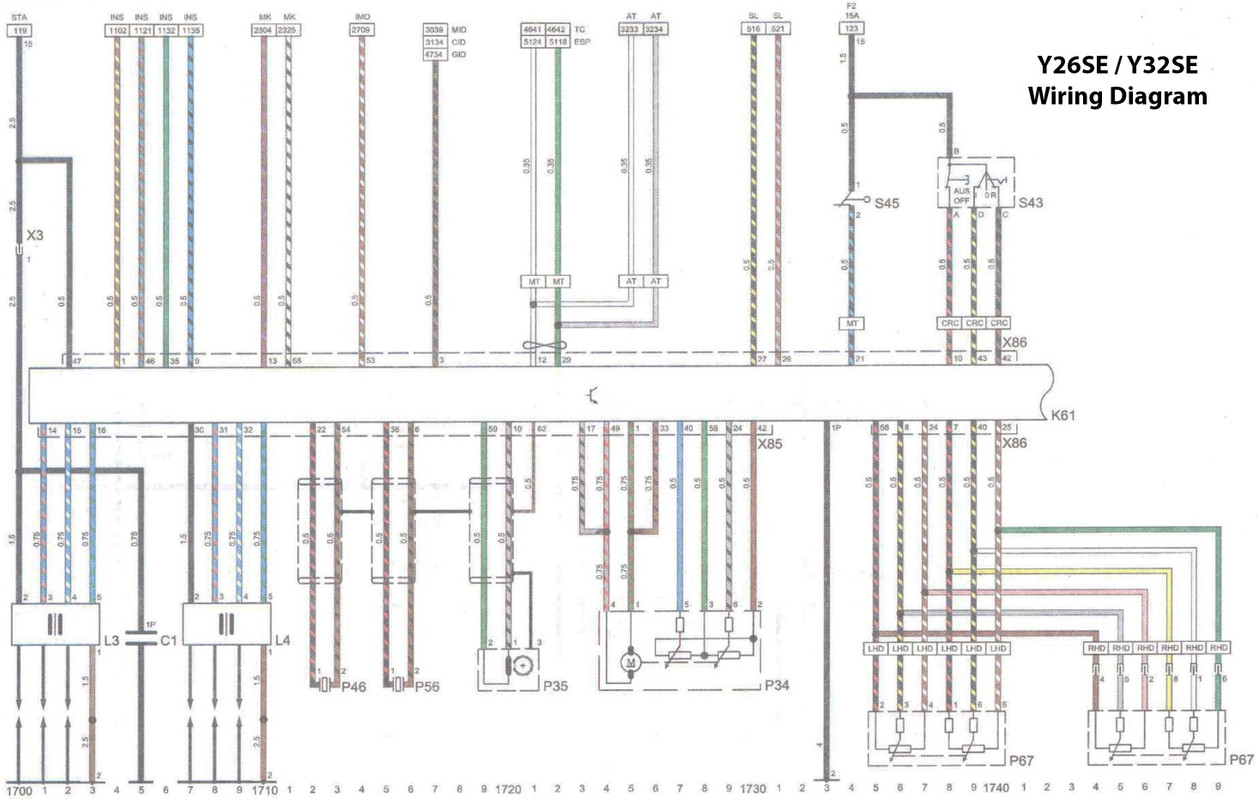
) I got the original PDF but it's in Russian, PM me if you want it.
And it confirms pins 4 and 53. So back to square one, why the ECU will not command the front multi-ram to open.
Anyways here are the drawings for OOF reference:


27
Omega General Help / Re: Vacuum hoses
« on: 01 September 2021, 00:48:42 »
I did. The opposite end is pin #64 :D


When you are right you are right. My bad, low on coffee. Pin#53.

What are the chances you or other OOF admins can get the 2002 V6 wire diagram?

I doubt Opel/GM has anything here in Israel, I might have the last Omega here. But if you have connections with UK Vauxhall...
Cheers


28
Omega General Help / Re: Performance air filter
« on: 31 August 2021, 21:30:44 »
If you require any more convincing, Robseys LS1 powered Omega uses the factory intake behind the headlight with no trumpet in front of the radiator. With the Supercharger running at full chat, it draws enough air behind the headlight to produce 600bhp. Which is nice 8)

Amazing. I wonder if he changed the prop shaft.
As for the "switch to manual" offer... I wish. Never saw a 2.6L manual here.
...Plus, a manual tends to make you:

29
Newbie Welcome Area / Re: Hello from Israel (2002 2.6L Omega)
« on: 31 August 2021, 21:25:20 »
Thank you all, will post photos of exterior and interior projects.


30
Omega General Help / Re: Vacuum hoses
« on: 31 August 2021, 20:59:42 »
They are the same.

The difference/issues will be with the wiring harness if they used the Vectra engine harness.

The pin rows are all numbered on the socket. If you zoom in your picture you can see them. Also what you are interpreting as pin #45 is in fact pin #53.

The plugs are numbered in a similar fashion where the wires enter them.

From memory, with the ECU correctly installed, the top plug is the engine loom only. The bottom plug is the Body harness.

Did you remember to "mirror" the socket image?
Knowing the old mechanic, he prob disconnected all plugs from old engine and just planted new one instead, same loom, the whole inlet "bagpipe" is original.
Again, lots of things wouldn't work if a Vectra loom was used. But who knows maybe a wire was cut and reconnected to something else (but then you will get the wrench dash icon).
Bottom line the entire car works - except from Multiram - and no one can blame solenoid/vacuum/setup as it works when ground is given to the from solenoid.
I am more than ready to research wires, just need the proper wire diagram please.

Pages: 1 [2] 3 4

Page created in 0.039 seconds with 19 queries.