Replacing the Omega heater Matrix.
This is the 'cheats' method that involves cutting some trim, which isnt very noticable, the real method involves removing the dash.
1) Under the bonnet release the inlet and outlet quick release connections on the bulk head, also remove the cap from the expansion tank.
2) Inside the car in the drivers footwell, remove the fuse box lid (the hinge pins are over length and if gripped with pliers they can be drawn towards the steering column, also detach the check strap (mine was broken off)
3) Underneath the dash in the footwell there is a board with various holes in it. It is secured with a couple of quick release fixings ¼ turn remove them and the board.
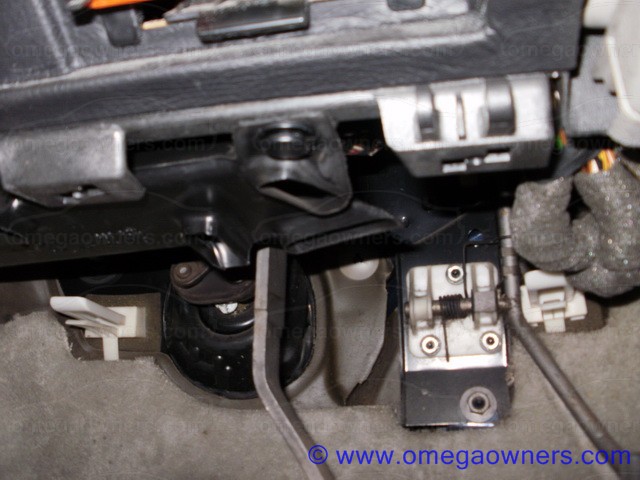
4) You should now see the heater ducting tube on the far end is a double push in clip, prise the centre section down and then prise the rest of it out (see picture)There should be another one where it fixes to the main section, but mine was missing. Remove the duct.
5) Back to the fuse box. We are only interested in the left hand side of the steering column the one with the OBD socket.
6) Lift the latch on the bottom edge and pull it out a little then remove the screws at the top edge now waggle it and it should come free,gentley pull it out and up-right and secure ( I used a length of wire to secure to the steering wheel)
7) Looking through the hole you will see the harness branch, it has two fixing points (one at 6 oclock and another at 9) they need to be detached from the dash as you will need to cut in this area.


Now cut a hole in the side of the facia large enough to get your hand in see picture. (I used a rotary tool with a flexi drive and a circular cutter) but be careful as there is wiring behind there.
9) Make sure any wires are out of harms way and start increase the hole size so that the matrix can pass through. Also extend the cut to the left side of the fuse board position.
10) Cut from the fuse board hole straight down.
11) Remove all cut material and you will see plastic box section cut-out enough and remove to allow the matrix out without snagging anything (see picture)
11a) Hints from other people....
It is possible, with patience, to peel the vinyl trim away from the 'underlayers' in the area to be cut. It does tear pretty easily though; don't know if a bit of warmth from a hairdryer might help it off?
It can then be stuck back after all the work is done, resulting in an almost invisible repair.
Having recently done this I found I did NOT need to cut through the centre console section to expose the fixing bolt for the metal tube blocking the matrix. It will bend sufficiently to undo fixing bolt - this will be neater once jobs completed!!
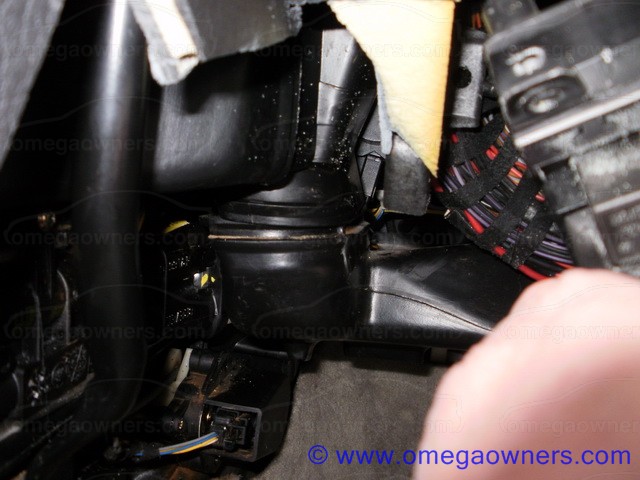
12) Blocking the matrix is a metal tube; you will need to cut the centre consul section to expose the fixing bolt.


13) Remove the bolt with M13 socket note it has thread lock on it and appears tight, up the tube a little is a plastic position clip just unlock it from the body and pull the tube towards the rear (see picture)
14) Disconnect the 2 electrical connectors and stow out of harms way.
15) Lastly to the matrix it self
16) Remove the T20 screw holding the matrix to the body then remove the T30 screw holding the pipes to the matrix then remove the T20 screw holding the pipe aligning clamp.
17) Ease the pipes forward (There will be coolant loss)

18) Remove and replace the o rings on the pipes
19)Gently slide out the matrix, with it out of the way remove the rubber end gasket from the hole and use the new one that came with new matrix.
Could the contents of this post be added to the "How To" guide that covers the procedure for changing the heater matrix please?
It is concerning the O-Rings on the water pipes.
The Vx part number for these is 9194857 but the profiteering so and so's want £3.68 EACH for them! Or you can go to your local plumbers merchant armed with their dimensions and probably get the pair for just a few coppers!
OD = 20mm; ID = 14mm; Thickness = 3mm.
With a bit of luck I have just bought the last two that they'll ever sell!!


