Background
The clutch setup in the Omega is a very good one and is reliable - failures are rare.
Just as a quick explanation, the clutch is a component (or series of components) that seperates the drive from the engine (flywheel), to the back wheels. This enables easy gear changes, and allows the engine to continue to run when the car is stopped - by dis-engaging the drive to the back wheels.
This isn't exhaustive, but the clutch kit consists of the following main components:
Pressure plate:

Friction plate:

Clutch thrust bearing:

Symptoms that the clutch may be failing or worn, are usually:
A) Slip. This is where engine revs increase, but no drive is going to the back wheels. This happens because the friction plate cannot grip the flywheel for a number of reasons, either a tired pressure plate (rare on the Omega's) or contamination, possibly from a leaking crankshaft oil seal or a leaking HBV dripping coolant into the bellhousing.
B) Drag. This is where the clutch doesn't "let go" when you press the pedal down, and it's still hard to change gear. Often noticed by difficult gear changes, and difficulty selecting first stood still with engine running.
Anyway, onto the procedure:
1) Raise the front of the car using a sturdy trolley jack. You are aiming to get the car as high as you safely can, and support on axle stands. Usual safety precautions apply so don't get under 'till it's safe. You can also use ramps but always work safely.
2) If V6, Remove both Catalytic converters. If 2.0 - remove the one cat. If TD - I think you can leave exhaust alone. Using a socket on a long extension bar (or 2 bars joined), and plenty of plus gas, undo the Nuts holding the downpipes to the manifolds on both sides. Then (again using plus gas) undo the 13mm bolts holding the cats to the mid sections. If they break, it can't be helped, just drill out the remains when it's off and use a nut and bolt. Once you've done this - unplug the lambda sensors. Then remove the 13mm bolts holding the cats to the gearbox bracket, and remove them clear of the car. You now have much needed access to the bellhousing bolts.
3) Remove the gear linkage. People have different preferences, but I usually just remove the clip and pop the pin out, where the black linkage bar joints onto the bottom of the gearstick. Access looks tricky, but it's a peice of cake. You can see it in this picture, at the very back of the gearbox:

4) Remove the propshaft - this will require a 19mm spanner and a 19mm socket on a ratchet. 3 bolts here.
5) Remove the electrical connector at the back of the gearbox.
6) In the engine bay, undo the clip that holds on the hydraulic clutch pipe to the clutch cylinder, and seperate.
7) Remove all of the bellhousing bolts which hold the gearbox to the engine. They will be 19mm and 13mm from memory.

Support the gearbox on a hefty jack. Carefully undo the 2 15mm bolts holding the gearbox to the chassis of the car making sure the gearbox remains supported. Once they are all out - lower the jack a little. It helps to have an assistant for this part but isn't 100% necessary. You now need to ease the gearbox away from the engine. When you do this, be careful not to catch the splines. Put the gearbox clear of the car, and go for a cuppa!

9) You will now see the clutch kit, attached to the flywheel. Remove the E12 torx bolts around the pressure plate (outer edge) and gently work the pressure plate away from the flywheel. The friction plate will just fall out. Inspect these components for damage or signs of failure - look for contamination on the plates and excessive wear.
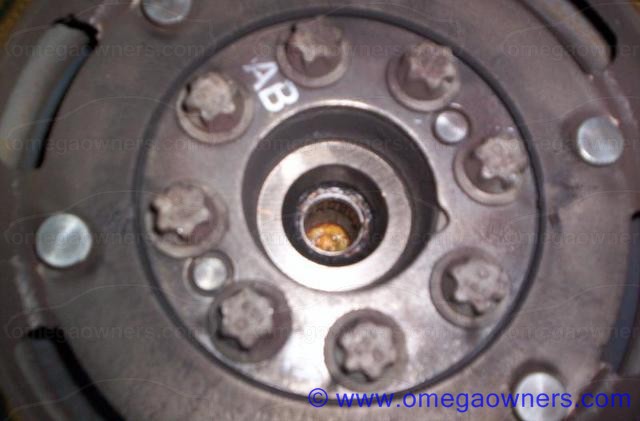
Once you have removed this, you will now see the dual mass flywheel:

(Note, this one had been sat a while!)
Look to ensure the flywheel surface is not excessively pitted or worn out. Clean it up as much as possible with some clutch cleaner. Also look for signs of oil leaking - from the seal behind the flywheel. If it's all dry down there, chances are you're OK.
You now need to inspect the Spigot bearing. You can sometimes do this by just popping your finger in the hole in the middle of the flywheel, and ensure it turns smoothly:
10) Once satisfied with that - on with fitting the new clutch kit! You need to align the friction plate to the pressure plate, and there are two ways of doing this. Some do it by eye (to be fair there is enough room) - I prefer to use a cheap alignment tool.
The friction plate will be labelled which is flywhel side, so offer it up to the pressure plate, and centralise using your favourite method. Here is mine, held with the tool:


Then offer the assembly up to the flywheel. Once loosly on, refit and torque the bolts.
11) Now refit the new thrust bearing. This is easy, the thrust bearing is the red component below:

Simply pull the old bearing off by hand and push the new one on firmly, you can't go wrong and no tools are needed.
You are now ready to start re-fiting the gearbox.
To quote haynes, re-fitting is the reverse of how you removed it, just note the following points:
A) DO NOT snag the gearbox


 Author
Topic: HOW2: Omega Manual Clutch Kit Change (all models) (Read 15789 times)
Author
Topic: HOW2: Omega Manual Clutch Kit Change (all models) (Read 15789 times)