Omega Owners Forum

Please login or register.

Login with username, password and session length
Advanced search  

News:

Please check the Forum Guidelines at the top of the Newbie section

Pages: [1]   Go Down

Author Topic: Fitting Wishbones and drop links.  (Read 11850 times)

0 Members and 1 Guest are viewing this topic.

feeutfo

  • Guest
Fitting Wishbones and drop links.
« on: 01 October 2010, 00:57:31 »

 Quick over view.
This really should be undertaken with a bigger picture in mind, ie diagnose any steering and suspension faults, rectify, set up at wheels in motion, then fit new tyres.
See handling guide in FAQ.

There are several makes of omega wishbones available ranging from £50 a pair to genuine Gm at £235 a side. Neither of these extremes are recommended on the forum, although some members have had good results with cheap wishbones. It is something of a gamble to buy £50 sets as they are invariably unbranded with inferior bushes and no oil bladders set into the bush. They also, in some cases, don't have the whole drilled for the the hid sensor if you have hid lights.

Genuine wishbones are supplied to Gm by Lemforder, these can be obtained from Lemforder dealers allgermanparts via mail order for a fraction of the Gm price, at time of writing roughly £120 will see a set land on your door step the next day. Most motor factors should also be able to supply lemforder. They are not supplied with wishbone bush bolts, up to you if you replace them, thinking on the forum is that new are not necessary. However the nuts for the bolts and nut and bolt for the steering knuckle clamp on the hub assembly are supplied.There are links provided at the end of the bush bolt tightening procedure, it's vital to follow this procedure by the way, or the bushes WILL fail early regardless.

 Avoids? Wishbones from first line and buypartsby are known to fail early.
Delphi wishbones I have seen have incredibly soft bushes, and some members have reported a recall. Very strange steering issues can result from these. 

 Always fit wishbones in pairs, as with any suspension components, odd parts will give uneven performance on one side of the car. 

Check the parts. Make sure you have a left and right wishbone before you start.

Fitting.
Safety first....due to the tension on the anti roll bar it's easier to do this job with both sides of the car on stands. You will be working under the car at some point and there well be some considerable pushing and shoving if things get awkward. 

MAKE SURE THE CAR IS STABLE, NEVER work on the car with just a Jack for support, always place on stands, hand brake on, leave in gear, place the road wheels under the sills once removed, for extra safety if the car should drop.      

Drop links, these attach from a bracket on the inboard side of the shock body to the anti roll bar. They are held with an 18mill nut inboard of the bracket, the spindle is held by the flats provided outboard of the bracket with a 17 mill open ended spanner. The nuts may seize as the exposed end of the drop link thread gets covered in road grime and rust. Plus gas penetrating oil, wire brush or heat can help, or in extreme cases cut through the nut with a small angle grinder or windy disc cutter.

Leave re fitting the drop link until the wishbone is fitted as it makes pulling the shock out of the way, and locating the steering knuckle pin in the hub assembly easier.

Wishbones, start with the drivers (uk car) side IMO. This side spends less time splashing through puddles so the bolts will/should be easier to undo, plus, owners with hid headlights will have a sensor to remove on the passenger (uk car) side, so get used to the procedure on the drivers side first, then you will be less likely to damage the sensor wielding spanners and hammers around on the pass side.

Remove the caliper and holder from the hub assembly via the two 18mill bolts,  these will be tight and thread locked, make certain your turning the bolts the right way as your coming at them from the back so to speak. Tie the caliper up to a spring securely to take the strain off the brake line. What ever you do make sure it can't drop on you and or damage the brake lines.

Remove the pinch bolt holding the clamp to ball joint on the bottom of the hub assembly, plus gas and wire brush the thread where possible. With nut and bolt removed you now need to remove the wishbone ball joint from the hub clamp. Spread the clamp with a cold chisel and hammer, then either thump the wishbone down or if you have a long round punch, hammer the centre pin of  the ball joint out from a slight angle from above, as the shock is directly above the pin. Once loose force the wishbone down and pull the shock to the side to allow the wishbone to sit level. Note, the steering knuckle pin will not come out until the bolt is removed as it sits in a grove in the steering knuckle itself.
Remove wishbone bush bolts, STOP and block the top of the subframe opening next to the rearward bolt with a rag on both sides, it's possible to drop either the bolt or the socket down the subframe which is a right pita to get out. 21 mill bolt from the top, rearward bolt can be accessed from the engine bay on the drivers side with a long, or series of, extensions and an assistant, or if your on your own your up in amongst the steering linkage from under the car with a ratchet and small extension. Be careful not to drop the ratchet, it's fiddly and awkward and done by feel when locating the socket on the top of the bolt, very doable, but keep your head to the side of where your working if possible. Now undo the 22 mill nut from underneath. Note which bolt goes where and the direction fitted. The bolts are different lengths so make sure the correct one is used on re fitting.

Then undo the the front bush bolt noting the bolt direction, this ones easy.

Now, with all bolts removed and keeping the wishbone level, and holding the shock out of the way, pull the wishbone out sideways from the car, if not level the rear bush can twist and catch in the subframe holes. Lever it out with a screw driver through the bush hole if it catches.

« Last Edit: 06 October 2010, 11:12:13 by jimbob »
Logged

feeutfo

  • Guest
Re: For Jimbob
« Reply #1 on: 01 October 2010, 00:59:05 »

Fit new wishbone. Refitting is the reversal of removal as they say, with some extra notes... Again, holding the the shock out of the way place the wishbone in the rear subframe bracket first as it's easier, and important to keep the wishbone level, or as with removal, the rearward bush will twist and catch in the subframe bolt holes. Place the correct bush bolts in from the correct direction noted earlier with the new nuts and leave loose for now....

Fit the new steering knuckle pinch bolt and nut, if you have lemforder parts, this is a bit of a battle as it involves forcing the wishbone down and lining the the pin up at the right angle with the whole in the hub, note the grove in the  steering knuckle pin, this is to allow the bolt to pass through and to stop the pin falling out if the nut comes loose. It must line up with the level of the bolt for it to fit correctly, or the bolt will not go in.

 Now re fit the the drop link and torque all the bolts correctly, EXCEPT THE FRONT BUSH BOLT! LEAVE THIS LOOSE AND FOLLOW THE BUSH BOLT TIGHTENING PROCEDURE LISTED BELOW! 

Lower balljoint to knuckle is 100nm/74lbs ft.
Anti-rollbar link rod to strut 65nm/48lbs ft.


Now do the passenger side, exactly the same except owners with hid lights will need to remove the sensor from wishbone to chasis. Take extreme car with these as they get fragile with age and are expensive to replace, in fact now is a good time to grease and carefully inspect it for seizing joints. Undo the torx bolt, wishbone bracket to sensor, be careful not to whack or damage the sensor while you work......and remove the rags used to block the subframe holes once both sides are done.

wishbone bolt tightening procedure.

Vitally important to get this right to avoid early failure of the front wishbone bush. Repeat this procedure again should you fit new springs or lowered suspension.

Some pictures of why this is important and what will happen first of all, if not tightened correctly early failure will result.

This is result of emergency braking force causing toe out,  meaning the front wishbone is pulled outboard compressing the bush on the inner edge, damage, by my finger,  is not massively important but partly shows, along with the other pictures, why its important to change wishbones in pairs, uneven performance will result. If one side is new, this side will not behave the same under braking or react  the same to the road surface.


Here the tears are self evident,


This is the rear bush on the wishbone and is not too bad but to give an idea, shows the start of failure, tear just starting


...and a further explanation.

Usual error is to tighten the bolts wheels hanging while the car is jacked. Simulated here, the vice takes the place of the tightened subframe bracket clamping the bush center spacer. Note the angle of the wishbone pointing down.


Here the angle of the wishbone is raised  to simulate the ride height. ie with wheels loaded car on the floor. Note the bush center spacer has not moved and the bush rubber is stressed.
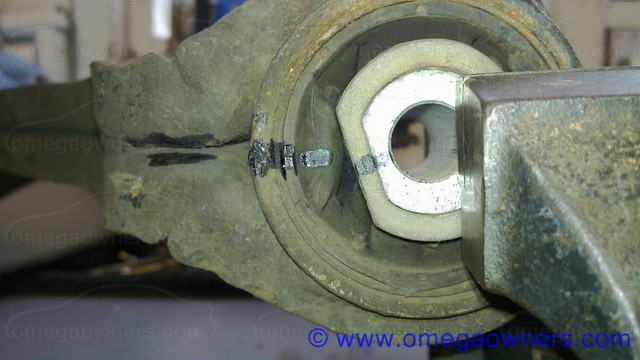


Now the bush is stressed even further, as the car corners and or hits a bump for example, the bush is stretched further than it was ever designed to.


Similar shot shows the bush rubber has torn through, hole clearly visible


Its interesting to note that the last two pictures show a difference in the wishbone bush center location in that the center spacer is not central in the bush when twisted, but in the last picture with the same torn bush in an unstressed position it returns to center. There is nothing to say that a torn bush will hold the road wheel in the correct position, in fact failed bushes are often blamed for a loss of set up causing extreme inside shoulder wear on the tyres. Similar condition to poorly set up camber on the shocks. Most garages are not aware the omega is adjustable for camber on the bottom shock mounts so camber setting is usually set far too aggressively causing similar tyre wear problems. Camber should be set to 1 degree 10mins. 

So, important to tighten wishbone bolts correctly, as follows

The bolts should be tightened to 120nm, then angle tightened a further 30 degrees, then a further 15 degrees, with the wheels loaded in the correct ride height position, vauxhall recommend adding weight similar to that of the driver with a full tank of fuel when doing this  to insure the bush center spacer is clamped by the subframe bracket in the least stressed position in the middle/average of its travel.
Like so in this simulated picture, this does not assume the ride height position gives a level wishbone


« Last Edit: 06 October 2010, 11:13:34 by jimbob »
Logged

feeutfo

  • Guest
Re: For Jimbob
« Reply #2 on: 01 October 2010, 01:00:43 »

Tip...
Tightening the bolts with wheels loaded presents a bit of a problem with access, ESP. on lowered cars. Getting under the car while it is on the floor with a torque wrench and tightening the bolts is nigh on impossible with a long handle and the floor in the way. So, simpler and easy way to do it, gently drop the car off the stands with front bush bolts loose/finger tight, drive the car slowly and carefully back and forth to allow the wheels to settle to the right track, they will be pinched otherwise.

Then tighten the bolts with a normal ratchet and spanner as best you can with the car either on the floor or front wheels on ramps, be careful with ramps though, the bumper is in the way unless you have extensions. Once the bolts are bf tight enough to crush the subframe bracket onto the bush centre spacer to hold it still, re Jack the car onto stands both sides and tighten as specified. The bush centre spacer should now be held in line with the correct ride height of the wishbone and suspension. 

Lemforder link in thread below, All German parts
http://www.omegaowners.com/forum/YaBB.pl?num=1278666535/3

Further info and prices from andyc
http://www.omegaowners.com/forum/YaBB.pl?num=1280919863

Some cheaper options
Some members have had good results with these but beware they are unbranded so they could change supplier at any time giving very different results, as said, a gamble.
http://www.vauxcentre.co.uk/index.php?option=categories&category_id=79607

Ok, wishbones fitted, do any other suspension and steering work then visit "wheels in motion" web site and get the car set up for full geometric set up, this encompasses Caster, Camber,and Toe at the front, and camber and toe at the rear. :y


Pressing bushes into wishbones.
 It is possible to press new bushes into old wishbones. But personally I would not recommend it unless you have previous experience of doing the job, at minimum a ten ton press, and the correct drifts that fit the bushes enabling pressing without damage. It is very easy to damage either the wishbone or the bush in the process. This can be somewhat inconvenient if the car is in bits on the drive, or on a lift for that matter, and you don't have a good wishbone to re fit due to damage while pressing. Economy comes into it also, by the time bushes and labour are paid for a new set of Lemforders could have been purchased. Unless your fitting other/upgraded or heavy duty bushes of course.

A better approach is to pre press an old set of wishbones, either ask for an old set in the wanted section here, or keep the old ones just removed to that end, ready for next time if you keep the car long term. Lemforder and vx do the individual bushes, in fact Merle do a heavy duty rear bush I believe, also available from allgermanparts. 

Once new bushes are successfully pressed in, then think about fitting.

Polly bushes.
These are said to be easy to fit as it can be done without removing the wishbone. However to my knowledge the rearward wishbone bush is not available. So if your rear bush is in good condition, but the front has failed this could be an option for you. Details are a little sketchy though so please ask in general help for further details. Someone will know. 

Rear donut bushes and front anti roll bar bushes are also available in Polly, but be aware Polly "may" give a firmer/harsher ride. Although those members who have them fitted swear by them.    
 
If going poly bush route, this guide may be helpful
Removing wishbone bush in order to install polybush
« Last Edit: 27 September 2011, 10:29:31 by Jimbob »
Logged
Pages: [1]   Go Up
 

Page created in 0.017 seconds with 16 queries.