

- 01 March 2026, 02:55:51
- Welcome, Guest

News:
Please check the Forum Guidelines at the top of the Newbie section
|
81
on: 25 February 2026, 15:35:45
|
||
| Started by cam.in.head - Last post by cam.in.head | ||
|
found the wires for the rear door speajers and recconnected and brought through ready for fitting .just need the grills now before i cut any holes .have put a wanted ad on here and messaged a coulple of ebay sellers .
|
||
|
82
on: 25 February 2026, 15:34:30
|
||
| Started by aaronjb - Last post by TheBoy | ||
That's useful to know thank you, I'm glad I wasn't missing something obvious in tinkercad.If you do the text in the slicer, you can make it a modifier, and have it flush level with top, if you wanted a smooth finish. Other than remotely firing off .3mf jobs at it, I've not use the cloud slicer much, and tend to only use the phone app to keep an eye on it if out and about. |
||
|
83
on: 25 February 2026, 15:30:57
|
||
| Started by chrisr - Last post by TheBoy | ||
The AC stuff can stay in situ.Not on all, as the A/C lines on some come over the top of the rad, and need the condensor/dryer removed before you can get at the rad. I can't remember exactly what variants/years this is on though. But dead easy to check, as obvious once plastic panel is off  |
||
|
84
on: 25 February 2026, 15:21:55
|
||
| Started by chrisr - Last post by Nick W | ||
|
Remember to fit the fan switch before putting the radiator in the car.
Ensure the sealing washer isn't stuck to the old radiator too... |
||
|
85
on: 25 February 2026, 13:57:12
|
||
| Started by Varche - Last post by YZ250 | ||
Bought it in the UK , 1980. Simple German made standard electric mixer. No on off switch. I doubt many of us will be, and nor would I want to be. I mean, you yourself would be over 111 years old by then.  |
||
|
86
on: 25 February 2026, 13:08:55
|
||
| Started by chrisr - Last post by Doctor Gollum | ||
|
The AC stuff can stay in situ.
The oil cooler lines are a single connection point. Simply unbolt it and tuck the plumbing end up by the expansion tank. Cover both ends. Unplug and remove the fan shroud as the first order of business. The hardest part of the whole job is probably going to be getting the screws out of the top cover. When you refill the system, climate to Hi on both sides with the fan to the lowest speed. Leave the cap off and let it idle. Once the fan kicks in twice, check the level and top up as required. Repeat with the cap on and call it done. |
||
|
87
on: 25 February 2026, 11:16:11
|
||
| Started by Varche - Last post by Field Marshal Dr. Opti | ||
Bought it in the UK , 1980. Simple German made standard electric mixer. No on off switch. It may still be 'working' in 2072, but will you?   |
||
|
88
on: 25 February 2026, 10:04:37
|
||
| Started by aaronjb - Last post by Viral_Jim | ||
|
That's useful to know thank you, I'm glad I wasn't missing something obvious in tinkercad.
I haven't played with the proper slicer yet, only the cloud based one and the phone app, so not sure if it's possible there but I will have a play at some point. The main use case I've got is exactly as you described here, labels, raised text or similar so changing at a specific layer height should work just fine for me. |
||
|
89
on: 25 February 2026, 09:44:16
|
||
| Started by aaronjb - Last post by TheBoy | ||
|
So, these are easy to create using the Layer Painting in Creality Print. Just create the model in Tinkercad, and paint the top 3-5 layers as black.
 Or painting using objects, create a flat 50x30x1mm rectangle, import into Creality Print, use the Test Tool to add the text, and change the colour of the Text object to Black: 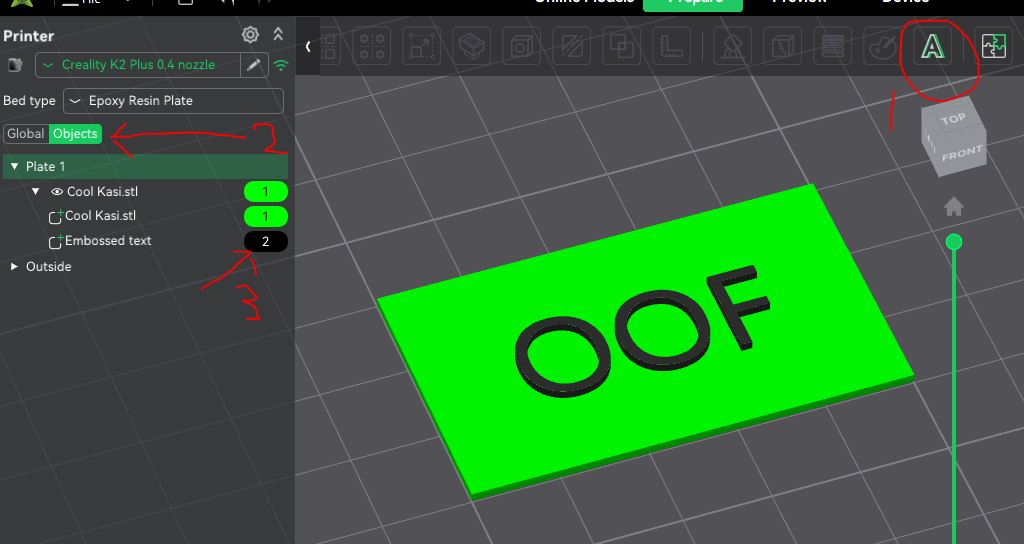 |
||
|
90
on: 25 February 2026, 09:26:38
|
||
| Started by aaronjb - Last post by TheBoy | ||
|
Yes, the STL files is simply a set of triangles, nothing more. Colour is done in the slicer, and you're in for another learning curve there.
In Creality Print, it's call painting, and they is a paint icon at the top. This is a bit limited, but gives some options, like layer level painting, or fills etc. Plenty on gayTube about Creality Print painting, which will explain better than a paragraph or 2 here. I find it limited, and a pain to edit if you need to make a change, and often end up clearing all painting and starting again. But its handy for first steps. Additionally, and more usefully in my opinion, you can also paint at an object level. Objects can be seperate models (though thats a dumb idea, as will cause massive pooping), or text that you add via the Text button at top, or "modifiers" (right like the model, then select modifiers, and the modifier shape). The latter allows SVG file imports, so great for logos and simple pictures. When painting at the object level, you need to change the view from "Global" to "Object", which is an option on the left of the screen, and it will list the colour against each object or modifier, which obviously you can change. |
||